How-To
Keep Your AWS Environment Organized
Be sure to document objects as they're created to avoid confusion later on.
Over the last few weeks, I've been working on a fairly elaborate project involving various Amazon Web Services (AWS) infrastructure components. As you can imagine, I've learned several lessons along the way, but by far the most important lessons learned have been about the importance of being organized. It's one thing to create a couple of EC2 instances for use in demonstrating a concept for a blog post. It's quite another thing to work with large numbers of EC2 instances. Any time that you work with large numbers of AWS objects, things can quickly become disorganized and confusing if you don't take the time to document objects as they're created. Let me give you an example.
Most of the time, when I set up EC2 instances for blogging purposes, I use the T2.micro instance type. After all, there's no point running up a huge AWS bill just so that I can create a couple of temporary lab instances. When you create a T2.micro instance, that instance is of course automatically provisioned with a network adapter. You can also link additional network adapters to EC2 instances, but T2.micro instances only support two adapters.
So with that in mind, let's pretend for a moment that I'm setting up an EC2 instance to act as a router. In real life I would typically use a more capable instance size, but let's go with T2.micro for the sake of illustration. An instance that acts as a router typically requires two or more network interfaces, and those interfaces typically need to be configured in a very specific way. That being the case, my approach would ideally be to create the network interfaces separately, and attach them to the virtual machine instance later on. However, there are a couple of problems with that.
One problem is that a T2.micro instance can only support two network adapters, so attaching two additional network adapters to an existing instance just isn't an option. The other issue is that you can't simply detach the instance's existing network interface, and then attach two custom interfaces. While this approach would not violate the limit on the number of network adapters that can be attached to the instance, the technique isn't viable because AWS won't allow you to detach an EC2 instance's default network adapter.
If you want to configure a T2.micro EC2 instance to act as a router (using two network adapters), then your only real option is to reconfigure the instance's existing network adapter, and then create and attach a custom network adapter.
Now if you think back to the very beginning of this article, I mentioned that I wanted to talk about the importance of being organized, not networking. Even so, there is a method to the madness. Let's take a look at what happens when I try to configure a VM instance in the manner I just described.
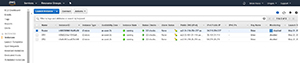
If you look at Figure 1, you can see that I've created a few EC2 instances. One of these instances is called Router, and the other two are generically named VM1 and VM2.
 [Click on image for larger view.]
Figure 1. The three EC2 VM instances I've created.
[Click on image for larger view.]
Figure 1. The three EC2 VM instances I've created.
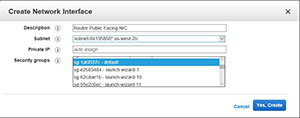
Next, I'm creating a network adapter for the router instance. As you can see in Figure 2, this is a really simple process. I just enter a name for the new interface, pick a subnet, a private IP address option and a security group.
 [Click on image for larger view.]
Figure 2. I am creating a new NIC.
[Click on image for larger view.]
Figure 2. I am creating a new NIC.
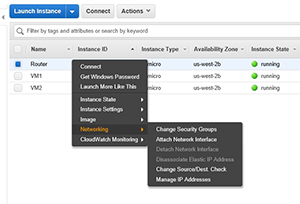
Now, let's attach the new NIC to the Router instance. To do so, I'm just going to right-click on the EC2 instance, and then choose the Networking and Attach Network Interface commands from the shortcut menus, as shown in Figure 3. From there, I pick the network interface that I want to use (there's only one in this case) and I click Attach.
 [Click on image for larger view.]
Figure 3. This is how you attach a network adapter to a VM instance.
[Click on image for larger view.]
Figure 3. This is how you attach a network adapter to a VM instance.
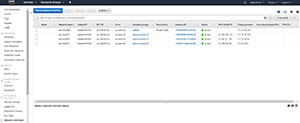
The last step that I described earlier is modifying the instance's default network adapter to meet the router's needs. This is where organization starts to come into the picture. If you look at the Network Interfaces tab, you can see that there are four network interfaces. It's easy enough to identify the one that I just created by looking at its description, but you would be a little more hard-pressed to figure out which one is the default interface for the router VM. Sure, there are ways of looking it up, but as it is now there isn't an easy way to differentiate between the NICs at a glance.
 [Click on image for larger view.]
Figure 4. Most of these adapters look alike.
[Click on image for larger view.]
Figure 4. Most of these adapters look alike.
As you look at Figure 4, you'll notice that the list of NICs contains a name field, but this field is empty. You can easily assign a name to each NIC. My recommendation is to name an instance's NIC just after creating the instance. That way, you won't find yourself trying to identify one specific NIC that looks like every other NIC in the list. A little organization up front can go a long way toward making your life easier later on.
Keep in mind that although I'm using virtual NICs as an example, the same basic concept applies to any object that you might create in AWS. For example, when you create an EC2 VM, a corresponding volume is also created. These volumes are initially unnamed, but you can name them to make it easier to identify each volume.
About the Author
Brien Posey is a 22-time Microsoft MVP with decades of IT experience. As a freelance writer, Posey has written thousands of articles and contributed to several dozen books on a wide variety of IT topics. Prior to going freelance, Posey was a CIO for a national chain of hospitals and health care facilities. He has also served as a network administrator for some of the country's largest insurance companies and for the Department of Defense at Fort Knox. In addition to his continued work in IT, Posey has spent the last several years actively training as a commercial scientist-astronaut candidate in preparation to fly on a mission to study polar mesospheric clouds from space. You can follow his spaceflight training on his Web site.