How-To
Step-by-Step: Upgrading to VCSA 6.7
Due to enhancements to vCenter Server Appliance (VCSA) version 6.7, in particular its performance and vSphere Client, you may want to consider upgrading your VCSA sooner rather than later. Here's how.
vSphere 6.7, released in April 2018, includes new features in the vCenter Server Appliance (VCSA). In this article, I'll give a brief overview of some of these new features, and then I'll show you how I upgraded my VCSA from 6.5 to 6.7. For a more in-depth discussion of product enhancements, new features and performance improvements to vSphere 6.7 in general, be sure to read my previous article, "Here's What's New in vSphere 6.7."
New Features in VCSA 6.7
A complete list of the new features in vSphere 6.7 can be found in its release notes, but after working with vSphere 6.7 for a few months, here are the new features in VCSA that I find most useful in my environment.
The most visible enhancement is the vSphere Client, its main interface. The HTML5-based vSphere Client has replaced the Flash-based vSphere Web Client. Although I found the vSphere Client in vSphere 6.5 responsive and intuitive to use, it lacked all of the functionality of the vSphere Web Client. In vSphere 6.7, however, VMware has addressed this issue; in a blog announcement, VMware stated that the vSphere Client (to be released in the fall of 2018) will have most of the functionality and features of the vSphere Web Client.
In its "What's New in Performance? VMware vSphere 6.7" white paper, VMware states that the 6.7 VCSA is 2x times faster in vCenter operations per second, has a 3x reduction in memory usage, and is 3x faster in DRS-related operations than the previous version. I haven't benchmarked any of these claims, but after using the vSphere 6.7 VCSA for a while, I can vouch that it is indeed more responsive than the previous version.
Pre-Upgrading VCSA
Before upgrading my VCSA, I checked the release notes for any issues that may cause problems within my environment, and then checked the VMware Product Interoperability Matrix to make sure that it would work with other products in my environment.
Because there's a specific sequence by which to upgrade vSphere 6.7, and it's possible this order will change in the future, you should check the latest documentation for the latest guidance and caveats before proceeding. As of now, however, the basic procedure is as follows: upgrade the Platform Service Controller (PSC) first, then the vCenter Server and last the ESXi hosts. VMware has a Knowledge Base entry on the update sequence for vSphere 6.7 and its compatible VMware products.
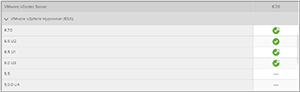
In my case, I'll only be upgrading the VCSA as my ESXi hosts run on Intel processors that aren't supported in vSphere 6.7. If you're planning on upgrading your ESXi hosts, check the VMware hardware compatibility list (HCL) to verify that your equipment is supported. Figure 1 is a matrix that outlines the versions of ESXi that are supported with vSphere 6.7 VCSA.
 [Click on image for larger view.]
Figure 1. ESXi versions supported by VCSA 6.7.
[Click on image for larger view.]
Figure 1. ESXi versions supported by VCSA 6.7.
Upgrading VCSA
There are a few different ways to upgrade your VCSA, and in my case the easiest way was to download the VCSA ISO image and do the upgrade from it.
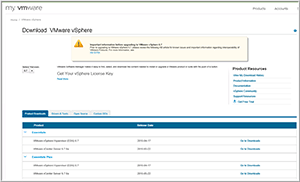
To download the VCSA ISO image I went to my.vmware.com, proceeded to the Products page (Figure 2), selected vSphere, and then selected the VMware vCenter Sever Appliance to download (Figure 3). There was also a VMware vCenter Sever Appliance Update Bundle, but this is to update VCSA 6.7 to the latest patch bundle; this is not what you want to download if you're upgrading from a previous VCSA version.
 [Click on image for larger view.]
Figure 2. Downloading VCSA 6.7.
[Click on image for larger view.]
Figure 2. Downloading VCSA 6.7.
 [Click on image for larger view.]
Figure 3. VCSA 6.7 version and build.
[Click on image for larger view.]
Figure 3. VCSA 6.7 version and build.
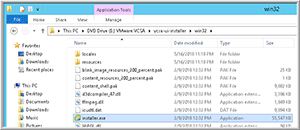
After the ISO had downloaded and I had backed up my VCSA appliance, I mounted the ISO on my desktop system, navigated to the mountpoint F:/VMware VCSA/ccsa-ui-installer/win32 and double-clicked the installer.exe file (Figure 4).
 [Click on image for larger view.]
Figure 4. The VCSA installation package.
[Click on image for larger view.]
Figure 4. The VCSA installation package.
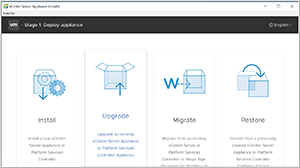
The installer UI displays four different options (Install, Upgrade, Migrate and Restore) as shown in Figure 5, and I selected Upgrade. Upgrading is a two-stage process: The first stage deploys a new appliance to the target vCenter server or ESXi host; the second stage copies the data from the source appliance to the deployed appliance.
 [Click on image for larger view.]
Figure 5. The four different VCSA options.
[Click on image for larger view.]
Figure 5. The four different VCSA options.
I worked my way through the Upgrade wizard, accepting the end-user license (EUL) agreement, and inputting the IP address and login credentials for my existing VCSA and the ESXi host on which it was running, the ESXi host I wanted to deploy the VCSA, the name of the VCSA, and the root password I wanted it to have (Figure 6).
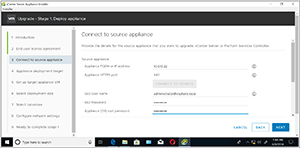 [Click on image for larger view.]
Figure 6. Upgrading the VCSA using the Upgrade wizard.
[Click on image for larger view.]
Figure 6. Upgrading the VCSA using the Upgrade wizard.
I was then asked for the size of VCSA I wanted to deploy (Figure 7).
 [Click on image for larger view.]
Figure 7. Deployment size.
[Click on image for larger view.]
Figure 7. Deployment size.
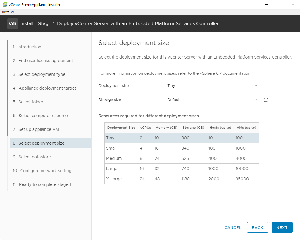
Next, I was asked what datastore and networking configuration I wanted to use. The last step in the wizard was to verify the information and then click Finish.
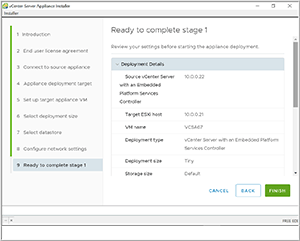 [Click on image for larger view.]
Figure 8. Stage 1 finish.
[Click on image for larger view.]
Figure 8. Stage 1 finish.
A screen was then displayed indicating that the deployment had been kicked off (Figure 9).
 [Click on image for larger view.]
Figure 9. VCSA deployment started.
[Click on image for larger view.]
Figure 9. VCSA deployment started.
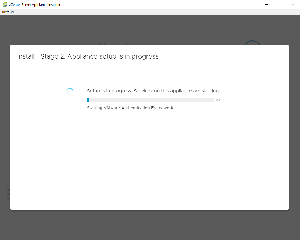
After a few minutes I was notified that Stage 1 had completed (Figure 10), and after I clicked Continue and Next, the Stage 2 automatically started (Figure 11).
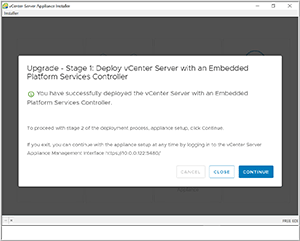 [Click on image for larger view.]
Figure 10. Stage 1 completed.
[Click on image for larger view.]
Figure 10. Stage 1 completed.
 [Click on image for larger view.]
Figure 11. Starting deployment with Stage 2.
[Click on image for larger view.]
Figure 11. Starting deployment with Stage 2.
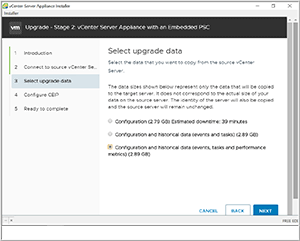
During the installation, I was asked what historical data I wanted to import from the existing VCSA (Figure 12).
 [Click on image for larger view.]
Figure 12. Importing historical data.
[Click on image for larger view.]
Figure 12. Importing historical data.
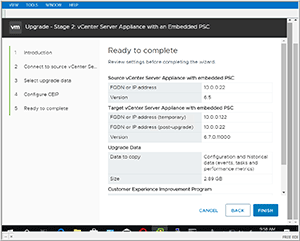
The last step in the wizard was to verify the information I had entered and that the existing VCSA had been backed up (Figure 13).
 [Click on image for larger view.]
Figure 13. Ready to complete Stage 2.
[Click on image for larger view.]
Figure 13. Ready to complete Stage 2.
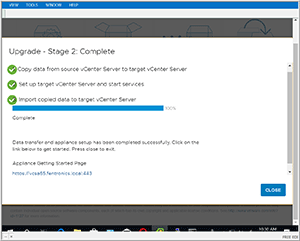
After about 30 minutes, a screen appeared saying that Stage 2 had completed; the page also included an Appliance Getting Started Page link (Figure 14).
 [Click on image for larger view.]
Figure 14. Upgrade completed.
[Click on image for larger view.]
Figure 14. Upgrade completed.
Post-Upgrade VCSA 6.7
Once the upgrade had completed, I clicked the Appliance Getting Started Page link. This page gave me the option to go to the vSphere Client, vSphere Web Client, and vSphere documentation, to see the functionality updates for the vSphere Client, as well as to browse my datastore and learn about the vSphere Web service SDK (Figure 15).
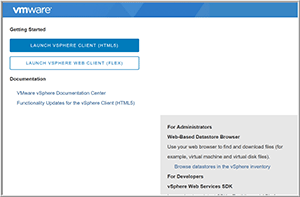 [Click on image for larger view.]
Figure 15. VCSA launch page.
[Click on image for larger view.]
Figure 15. VCSA launch page.
The Functionality Updates for the vSphere Client page (Figure 16) is quite helpful as it shows what workflow functionality is not yet available in the vSphere Client. I browsed this page and then found myself returned to it occasionally to see if what I was trying to accomplish was doable in the vSphere Client. If you want to visit this page without going through the client, you can find it here (I suggest that you bookmark this link).
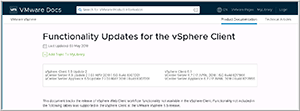 [Click on image for larger view.]
Figure 16. vSphere Client functionality.
[Click on image for larger view.]
Figure 16. vSphere Client functionality.
The next thing I did was go to the vSphere Client. As a visual indicator, the vSphere Client has a black border (Figure 17) while the vSphere Web Client is framed in blue (Figure 18).
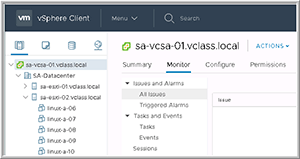 [Click on image for larger view.]
Figure 17. vSphere Client framed in black.
[Click on image for larger view.]
Figure 17. vSphere Client framed in black.
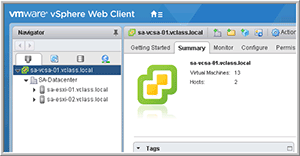 [Click on image for larger view.]
Figure 18. vSphere Web Client framed in blue.
[Click on image for larger view.]
Figure 18. vSphere Web Client framed in blue.
Backup Scheduler
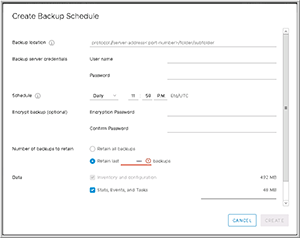
vSphere has provided a tool to back up the VCSA since vSphere 6.5; however, this tool was limited. Furthermore, the 6.7 release includes a new scheduling tool (Figure 19), which allows you to back up the data on a specific schedule and set a retention policy. For more information on setting up and using the VCSA backup tool, be sure to see my previous article here.
The VCSA backup scheduler can be accessed from the VMware Appliance Management Interface (VAMI) UI. To access the VAMI, append :5480 to the end of the URL IP address of the VCSA (for example, VCSA67.Fentronics.local:5480).
 [Click on image for larger view.]
Figure 19. vSphere 6.7 VCSA backup scheduler.
[Click on image for larger view.]
Figure 19. vSphere 6.7 VCSA backup scheduler.
Monitoring VCSA
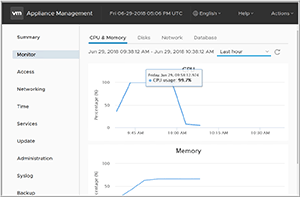
The VAMI also has a new monitoring tool for vSphere, which can be accessed by clicking the Monitor tab located on the left of the VAMI page (Figure 20). From this page, you can toggle through CPU & Memory, Disk, Networking, and Database tabs to monitor VCSA activity.
 [Click on image for larger view.]
Figure 20. VCSA monitoring.
[Click on image for larger view.]
Figure 20. VCSA monitoring.
From the VCSA Monitor tab, you can see activity for the last hour, day, week, month, quarter or year.
Patching VCSA
All software will eventually need to be patched, and the VCSA is no exception. Fortunately, VMware has made it very simple to patch the VCSA, and I'll walk you through the steps that I took to do so.
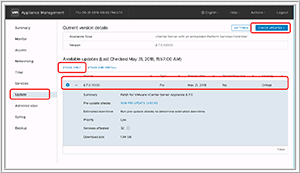
A few weeks after installing my VCSA, I noticed that an update was available for it. To update my VCSA, I went to my VAMI and logged into it as root. I then clicked Update, and after a short wait it showed that there was a critical update available (Figure 21).
I clicked Stage Only (I tried Stage and Install but it failed), which downloaded the update from VMware.
 [Click on image for larger view.]
Figure 21. The Update menu.
[Click on image for larger view.]
Figure 21. The Update menu.
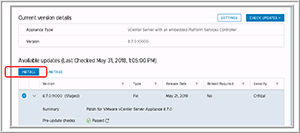
After the update was downloaded and the staging was complete, I clicked Install (Figure 22).
 [Click on image for larger view.]
Figure 22. Installing the update.
[Click on image for larger view.]
Figure 22. Installing the update.
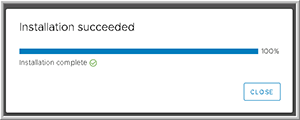
I then needed to accept the EUL, opt to join or not join VMware's Customer Experience Improvement Program (CEIP), and acknowledge that I had backed up my VCSA. The installation process then stopped the services currently running on the VCSA, installed the patches, and then restarted the services. After the installation completed, I received a message that the installation succeeded (Figure 23). While the update was in progress, the vSphere Client displayed a message that the vSphere Client was being updated and then initializing. When I logged back in to the vSphere Client, I saw that it had been updated successfully.
 [Click on image for larger view.]
Figure 23. Installation completed successfully.
[Click on image for larger view.]
Figure 23. Installation completed successfully.
Final Thoughts
It took me approximately half an hour to upgrade my VCSA from version 6.5 to 6.7 without any issues; overall, a smooth and seamless process. If you have a larger infrastructure I'm sure that it will take more time, and if you have a complex environment it will take more planning to execute a seamless upgrade. I haven't seen many issues reported by the community regarding vSphere 6.7 VCSA, a good indication that the updated version is stable.
Due to enhancements to VCSA version 6.7, in particular its performance and vSphere Client, you may want to consider upgrading your VCSA sooner rather than later.