How-To
Migrating VMs to AWS: How-To Overview
In this first article of a three-part series, Posey gives an overview of how to migrate a virtual machine to the Amazon Web Services cloud.
Migrating virtual machines (VMs) to the cloud has historically been a daunting process. Thankfully, Amazon Web Services (AWS) provides some tools that can make the migration process a lot easier. In this three-part article series, I want to give you an overview of how to migrate a VM to the AWS cloud.
Before I get started, I need to point out that a cloud migration isn't an operation to be taken lightly. There are numerous things that need to be considered during the planning phase of the migration. These articles don't address migration planning, and serve only to familiarize you with some of the migration tools. So with that said, let's get started.
Begin the process by clicking on the AWS Migration Hub option within the list of AWS services (it's in the Migration section). This will cause AWS to open the Migration Hub interface. When the Migration Hub dashboard appears, click on the Get Started with Discovery button, followed by the View AWS Discovery Tools button.
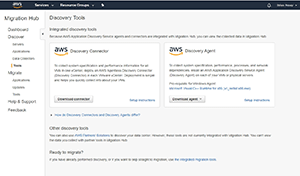
As you can see in Figure 1, AWS provides two different discovery tools. The first of these tools is the AWS Discovery Connector. The AWS Discovery Connector is an agentless tool that's designed to work with VMware vCenter. If the VMs that you need to migrate exist in a VMware environment and you're using vCenter Server to manage your VMware hosts, then the AWS Discovery Connector is definitely the tool of choice.
 [Click on image for larger view.]
Figure 1. There are two different discovery tools available.
[Click on image for larger view.]
Figure 1. There are two different discovery tools available.
The other option is to use the AWS Discovery Agent. The AWS Discovery Agent is the tool of choice for migrating VMs that aren't running on VMware, or that run in a smaller VMware environment that's not equipped with a vCenter Server. Incidentally, the Discovery Agent can also be used to migrate workloads that are running on physical servers. For the purposes of this two-part series, I'll be using the Discovery Agent.
AWS provides both a Linux and a Windows version of the agent. Before you'll be able to install the agent, you'll need to download and install the x86 version of the Microsoft Visual Studio C++ Redistributable. You can download this component from here.
There are two things that are worth noting about the requirement for the Microsoft Visual Studio C++ Redistributable. First, the AWS documentation specifically references the 2015 version, but newer versions will work. Second, if you have problems getting the Microsoft Visual Studio C++ Redistributable to install successfully, then make sure that the system that you're installing it onto has all of the latest updates.
Once you've installed the Microsoft Visual C++ Redistributable onto the system that you plan to migrate, you'll need to install the AWS Discovery Agent. The process for doing so is a little bit tricky, because the agent contains a standard setup wizard. However, if you run the setup wizard, the agent will install on your system, but it won't do anything because the agent won't know how to communicate with your AWS account. As such, you're going to have to install the agent from the command line. When doing so, you're also going to have to specify your key ID and your secret key. The command syntax looks like this:
msiexec.exe /i AWSDiscoveryAgentInstaller.msi REGION="us-west-2" KEY_ID="<aws key id>" KEY_SECRET="<aws key secret>" /q
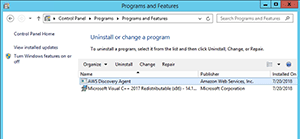
If you look at Figure 2, you can see that I downloaded the agent and copied it to a folder named AWS Discovery Agent. From there, I ran the command syntax (the keys are hidden for the sake of security).
 [Click on image for larger view.]
Figure 2. This is how you install the agent.
[Click on image for larger view.]
Figure 2. This is how you install the agent.
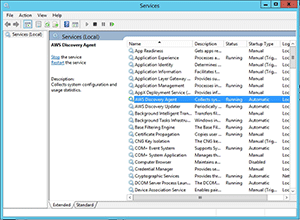
As you look at Figure 2, you'll notice that the installer doesn't generate any visible output. To find out whether the agent has been installed, open the Control Panel and go to Programs | Programs and Features. The Programs and Features screen should list the AWS Discovery Agent among the installed applications. You can see what this looks like in Figure 3.
 [Click on image for larger view.]
Figure 3. The AWS Discovery Agent has been installed.
[Click on image for larger view.]
Figure 3. The AWS Discovery Agent has been installed.
It can take 15 minutes or more for the agent to begin populating the AWS console with data. While you're waiting, I recommend opening the Service Control Manager (by entering the Services.msc command at the server's Run prompt) and checking to make sure that the AWS Discovery Agent and AWS Discovery Updater services are installed and running. You can see what this looks like in Figure 4.
 [Click on image for larger view.]
Figure 4. Make sure that the AWS services are installed and running.
[Click on image for larger view.]
Figure 4. Make sure that the AWS services are installed and running.
Now that the AWS Discovery Agent is installed, it's time to begin working toward a migration. I'll show you the next steps in Part 2.
About the Author
Brien Posey is a 22-time Microsoft MVP with decades of IT experience. As a freelance writer, Posey has written thousands of articles and contributed to several dozen books on a wide variety of IT topics. Prior to going freelance, Posey was a CIO for a national chain of hospitals and health care facilities. He has also served as a network administrator for some of the country's largest insurance companies and for the Department of Defense at Fort Knox. In addition to his continued work in IT, Posey has spent the last several years actively training as a commercial scientist-astronaut candidate in preparation to fly on a mission to study polar mesospheric clouds from space. You can follow his spaceflight training on his Web site.