How-To
Creating a Custom Windows AMI in AWS
Amazon Machine Images (AMIs) are the mechanism that makes it possible to create Amazon Elastic Compute Cloud (Amazon EC2) virtual machine (VM) instances -- here's how to create a custom Windows AMI.
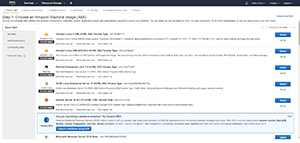
In Amazon Web Services (AWS), Amazon Machine Images (AMIs) are the mechanism that makes it possible to create Amazon Elastic Compute Cloud (Amazon EC2) virtual machine (VM) instances. An AMI is essentially a pre-configured template for setting up an Amazon EC2 instance in a specific way. AWS provides a variety of AMIs for creating both Linux and Windows instances. You can see a few of these AMIs in Figure 1. Often times, however, it's advantageous to create your own custom AMI.
 [Click on image for larger view.]
Figure 1. These are some of the built-in AMIs in AWS.
[Click on image for larger view.]
Figure 1. These are some of the built-in AMIs in AWS.
Suppose for a moment that you needed to create 50 new Amazon EC2 instances, and all of them needed to include a particular file that's unique to your own organization. If you used a default AMI to generate the instances, then you'd have to manually log into each one of the instances later on and copy the required file. On the other hand, you could create a custom AMI that already includes the required file, and build the instances from your custom AMI.
Before I show you how to create a custom AMI, I need to point out that the procedure for doing so varies considerably depending on whether you're creating a Windows or a Linux instance. For the purposes of this blog post, I'm going to walk you through the process of creating a Windows AMI.
So with that said, the first thing you'll need to do is create a VM instance in the usual way. This means selecting one of the built-in AWS Windows AMIs, and building the instance from that AMI.
Once you've created the new VM instance, you can log into the instance and make any required customizations. However, because the AMI creation process works similarly to Microsoft Sysprep, it's a good idea to avoid joining the instance to a domain.
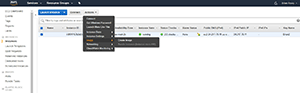
Once you've made any desired customizations to the Amazon EC2 instance, it's time to actually create the AMI. Thankfully, this is a pretty simple process. From within the Amazon EC2 dashboard, select the Instances folder, and then select the instance that you plan to use as the basis for your AMI. Now, choose the Image | Create Image commands from the Actions dropdown menu, as shown in Figure 2.
 [Click on image for larger view.]
Figure 2. Selecting the Image | Create Image commands from the Actions dropdown menu.
[Click on image for larger view.]
Figure 2. Selecting the Image | Create Image commands from the Actions dropdown menu.
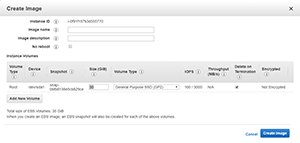
At this point, you'll be taken to the Create Image dialog box, which is shown in Figure 3. As you can see, you'll need to create a name and a description for the new image that you're creating. However, there are also a couple of other items on this dialog box that warrant a bit of attention.
 [Click on image for larger view.]
Figure 3. You'll need to provide a name and a description for the new image.
[Click on image for larger view.]
Figure 3. You'll need to provide a name and a description for the new image.
First, you'll notice in the screen capture that the image contains a No Reboot checkbox. The reason why this checkbox exists is because the VM instance is rebooted as a part of the AMI creation process. Amazon EC2 performs a shut down, creates a snapshot, builds the AMI and then powers the instance back up. You can opt out of the reboot, but there's a good possibility that the resulting image will be corrupt if you do.
The dialog box also allows you to manage the volumes that will be attached to the image that you're creating. The interface gives you the ability to change the size and type of the boor volume, to create additional volumes, and to control whether or not volumes will be deleted on termination.
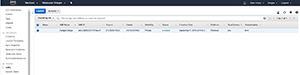
Once you've populated the various fields within the dialog box, you can create the image by clicking on the Create Image button. When the process completes, you can find your new image in the AMIs container, as shown in Figure 4.
 [Click on image for larger view.]
Figure 4. The custom image that I created.
[Click on image for larger view.]
Figure 4. The custom image that I created.
If you want to create a new Amazon EC2 instance from the AMI that you've just created, then all you have to do is select the AMI and then click the Actions button and select the Launch command. This will launch a wizard that's almost identical to the one that's normally used to create VM instances, except that Amazon EC2 will use the specified AMI, rather than prompting you to choose an AMI.
About the Author
Brien Posey is a 22-time Microsoft MVP with decades of IT experience. As a freelance writer, Posey has written thousands of articles and contributed to several dozen books on a wide variety of IT topics. Prior to going freelance, Posey was a CIO for a national chain of hospitals and health care facilities. He has also served as a network administrator for some of the country's largest insurance companies and for the Department of Defense at Fort Knox. In addition to his continued work in IT, Posey has spent the last several years actively training as a commercial scientist-astronaut candidate in preparation to fly on a mission to study polar mesospheric clouds from space. You can follow his spaceflight training on his Web site.