How-To
Sync Files from NFS to EFS in AWS, Part 2: Creating a Sync Task
In this second article of a two-part series, Posey finishes up by showing you how to set up the sync task so you can synchronize your data across the two file systems.
In the previous article, I showed you how to set up the sync agent that will be used to synchronize files to EFS. Now that the required agent is in place, I want to show you how to complete the process by creating a sync task.
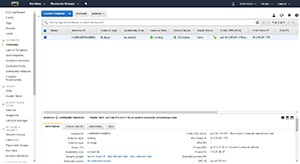
Begin the process by opening the Amazon Elastic Compute Cloud (EC2) dashboard and make sure that the instance being used by the agent is running. It's also a good idea to double check that the instance is of the required size, which should be Xlarge or larger. You can see the instance I'm using in Figure 1.
 [Click on image for larger view.]
Figure 1. Make sure that your agent's instance is running and is the correct size.
[Click on image for larger view.]
Figure 1. Make sure that your agent's instance is running and is the correct size.
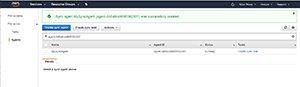
Now, open the EFS dashboard, expand the File Syncs section, and then click on the Agents tab. You should see your agent listed, as shown in Figure 2. Make sure that the agent is running. If the Amazon EC2 instance is running, but the agent isn't, then the agent might need to be activated.
 [Click on image for larger view.]
Figure 2. Make sure the agent is running.
[Click on image for larger view.]
Figure 2. Make sure the agent is running.
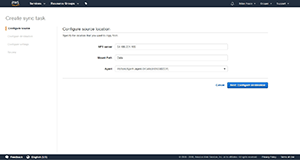
As you look at Figure 2, you'll notice that the agent's Tasks column contains a link that you can use to create a sync task. Go ahead and click on the Create Sync Task link. This will take you to the Create Sync Task screen. The first thing you'll need to do is provide the details for your NFS server. Specifically, you'll need to enter the domain name or IP address, list the mount path, and then select your agent from the dropdown. You can see what this looks like in Figure 3.
 [Click on image for larger view.]
Figure 3. Specify your NFS server name or IP address, mount path, and agent.
[Click on image for larger view.]
Figure 3. Specify your NFS server name or IP address, mount path, and agent.
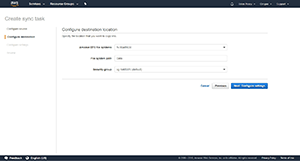
Click the Next button, and you'll be taken to a screen asking you to specify details about the destination location. Specifically, you'll need to choose your AWS EFS file system from the Amazon EFS File Systems dropdown list. You'll also need to specify a file system path. This is the path to which the synchronized data will be written.
Once you enter this information, a Security Group dropdown will appear. Select the security group that you wish to use for the destination, as shown in Figure 4.
 [Click on image for larger view.]
Figure 4. You'll need to select your EFS file system, specify a file-system data path and choose a security group.
[Click on image for larger view.]
Figure 4. You'll need to select your EFS file system, specify a file-system data path and choose a security group.
Click the Next button, and you'll be taken to the Configure Sync Settings screen, which you can see in Figure 5. This screen asks you to choose the settings you wish to use when you synchronize the files from your NFS file system to EFS. For example, you can choose which types of metadata you wish to synchronize (ownership, permissions and timestamps). You can also choose whether you want to keep destination files if they're deleted at the source. Finally, you can choose whether you want to ensure full consistency between the source and the destination file systems. In most cases, you'll want to enable each of these options, especially the Verification Mode option.
 [Click on image for larger view.]
Figure 5. Choose the settings you wish to use when you synchronize the files from NFS to EFS.
[Click on image for larger view.]
Figure 5. Choose the settings you wish to use when you synchronize the files from NFS to EFS.
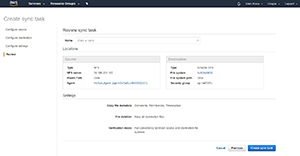
Click Next, and you'll be taken to the Review Sync Task screen, which you can see in Figure 6. There are two things that you'll need to do on this screen. First, you'll need to enter a name for the sync task that you're creating. Second, you should review the settings that are displayed on the screen to make sure that the settings are correct.
 [Click on image for larger view.]
Figure 6. Enter a name for the sync task, and then make sure all of the settings shown are correct.
[Click on image for larger view.]
Figure 6. Enter a name for the sync task, and then make sure all of the settings shown are correct.
Click the Create Sync Task button and the sync task will be created. After a few minutes the data should begin to synchronize across the two file systems.
About the Author
Brien Posey is a 22-time Microsoft MVP with decades of IT experience. As a freelance writer, Posey has written thousands of articles and contributed to several dozen books on a wide variety of IT topics. Prior to going freelance, Posey was a CIO for a national chain of hospitals and health care facilities. He has also served as a network administrator for some of the country's largest insurance companies and for the Department of Defense at Fort Knox. In addition to his continued work in IT, Posey has spent the last several years actively training as a commercial scientist-astronaut candidate in preparation to fly on a mission to study polar mesospheric clouds from space. You can follow his spaceflight training on his Web site.