How-To
MicroK8s: How To Install and Use Kubernetes
Tom Fenton shows how easy it can be to get started with containers.
Container technology is one of the hottest topics in IT right now. Containers are user-space instances that allow programs to run in an isolated space; applications running in containers can only see devices and resources assigned to them. As containers share the kernel, albeit with some isolation, they're considerably lighter weight than virtual machines (VMs). Containers can be spun up quickly and because they don't consume the same resources as a full VM, many more containers can be run on a server compared to a full VM. Figure 1 is a gross oversimplification of how a VM compares to a container.
In this series of articles, I show how easy it is to get started with containers by installing MicroK8s, a running platform for containers that you can use as a basis for learning about them. As this is a series of articles, I won't be explaining every concept behind containers until they're relevant in the article.
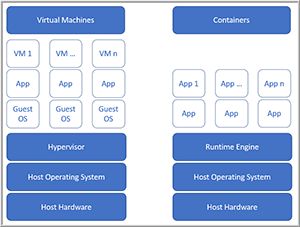 [Click on image for larger view.]
Figure 1. Virtual machines vs. containers.
[Click on image for larger view.]
Figure 1. Virtual machines vs. containers.
Although they've been around for decades, containers didn't enter into widespread use until about four years ago when Kubernetes (K8s) came on the scene. K8s, a container-orchestration system that automates the deployment of applications running in containers, was originally designed by Google and was later donated to the Cloud Native Computing Foundation (CNCF), which now maintains K8s as an open source project. Although K8s has only been around for four years, it has a lot of buzz around it and the velocity of its adoption is unparalleled.
One of the drawbacks to K8s is that it has historically been difficult to install and get a functional K8s environment up and running. However, in the last year or so, various companies have come forward to make it easy to do so. In this article, I walk you through how I installed K8s on a VM running on vSphere.
Introducing MicroK8s
One week before KubeCon 2018, Canonical showed its commitment to K8s, and its new user base, with a number of announcements -- the most exciting of which to me was MicroK8s, a single snap package that can be installed on Ubuntu, as well as other Linux distributions. MicroK8s is easy to install and has a small disk and memory footprint, making it a good entry point for those interested in exploring K8s.
Installing MicroK8s
I chose to use a VM running on vSphere to create the Ubuntu VM on which I will install MicroK8s. You could install Ubuntu on a bare metal server or a different hypervisor, such as VMware Workstation or VirtualBox.
For this lab, I used Ubuntu Server 18.04.1 as my base OS. Although MicroK8s will run on other Linux distributions, I found that Ubuntu has the best documentation support for installing and using MicroK8s. I downloaded the Ubuntu Server 18.04 ISO image from: ubuntu.com/download/server.
I used the ISO image to create a VM with 2 CPU, 12GB of RAM and a 64GB hard drive (Figure 2). The ESXi host that I was using was a Dell R610 running ESXi 6.5, and vCenter 6.7U1. The datastore I used for the VM was backed by a Micron 9100 NVMe Drive.
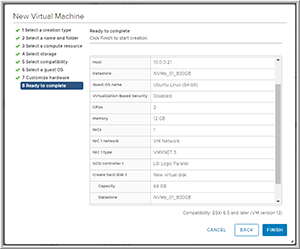 [Click on image for larger view.]
Figure 2. The Ubuntu virtual machine.
[Click on image for larger view.]
Figure 2. The Ubuntu virtual machine.
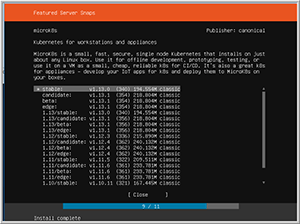
After the VM was created, I then configured it; the only snap that I chose to install was MicroK8s (Figure 3) and then I selected the stable release of MicroK8s (Figure 4). I accepted all other defaults during the Ubuntu installation process, and named the server ubuntu18a.
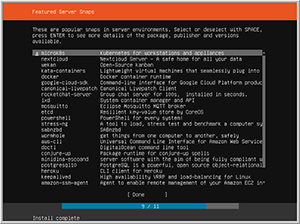 [Click on image for larger view.]
Figure 3. The MicroK8s Snap.
[Click on image for larger view.]
Figure 3. The MicroK8s Snap.
 [Click on image for larger view.]
Figure 4. The MicroK8s version.
[Click on image for larger view.]
Figure 4. The MicroK8s version.
It took just a few minutes for Ubuntu to install and reboot.
Using MicroK8s
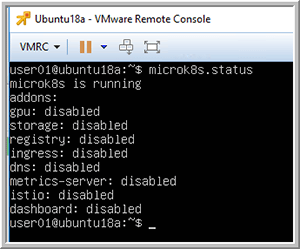
Once the system finished rebooting, I logged in to it as the user that I created during the installation process. MicroK8s comes with various commands to control and monitor it. I entered microk8s.status to verify that MicroK8s was running (it was), as well as to see which add-ons, if any, were enabled (none were), as shown in Figure 5.
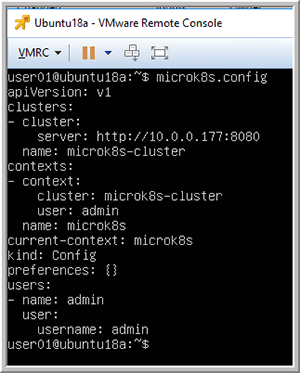
I then entered microk8s.config to show the configuration file for K8s (Figure 6).
 [Click on image for larger view.]
Figure 5. Running microk8s.status.
[Click on image for larger view.]
Figure 5. Running microk8s.status.
 [Click on image for larger view.]
Figure 6. Running microK8s config.
[Click on image for larger view.]
Figure 6. Running microK8s config.
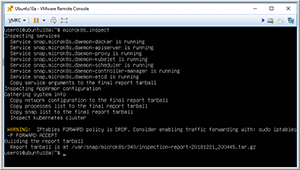
To see what services were running, and to see if my installation had any issues, I entered microk8s.inspect. Doing so indicated that a few services were running and it suggested that I change my firewall settings to allow for IP forwarding (Figure 7), which I did.
 [Click on image for larger view.]
Figure 7. Running the microk8s inspect command.
[Click on image for larger view.]
Figure 7. Running the microk8s inspect command.
As a side note: If you're using only MicroK8s, you can simplify your typing by entering snap alias microk8s.kubectl kubectl. In this series of articles, for clarity, I'll use the long form when entering commands.
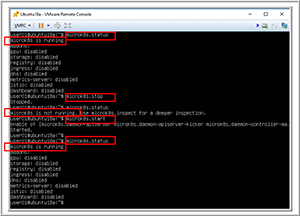
The last set of commands that needs mentioning is how to stop and start your K8s services, which you can do by entering microk8s.stop and microk8s.start. Figure 8 shows me starting and stopping MicroK8s.
 [Click on image for larger view.]
Figure 8. Starting and stopping microk8s.
[Click on image for larger view.]
Figure 8. Starting and stopping microk8s.
Wrapping Up
For the past couple of years, I have struggled with getting an operating K8s environment up and running, and I was surprised and pleased by how easy Canonical made it to install a K8s environment with MicroK8s. In this article, I walked you through how I installed a working K8s environment and the commands needed to verify that it is operational. In the next article, I'll show you what you need to do to get a K8s GUI up and running. In the last article in this series, I'll dive even deeper and explore how to use MicroK8s to run applications.
About the Author
Tom Fenton has a wealth of hands-on IT experience gained over the past 30 years in a variety of technologies, with the past 20 years focusing on virtualization and storage. He previously worked as a Technical Marketing Manager for ControlUp. He also previously worked at VMware in Staff and Senior level positions. He has also worked as a Senior Validation Engineer with The Taneja Group, where he headed the Validation Service Lab and was instrumental in starting up its vSphere Virtual Volumes practice. He's on X @vDoppler.