How-To
Drilling Down on PCoIP Settings on VMware Horizon 7.7
Using the pcoip.admx file, you can change the behavior of your PCoIP connection between a virtual desktop and a VDI client.
PC over IP (PCoIP) is one of the protocols that can be used by Horizon, VMware's Virtual Desktop Infrastructure (VDI) solution, which allows the information from a virtual desktop to be efficiently transferred and displayed to a VDI client. Some of the techniques that PCoIP uses to decrease the amount of network traffic from the virtual desktop to the VDI client include compressing data, capping the amount of bandwidth each PCoIP session can consume, prioritizing certain streams of data and building a graphic display to lossless. PCoIP allows you to adjust these settings in order to modify the experience that an end user has with his virtual desktop. In this article, I'll first give a brief overview of PColP and then discuss some its settings that can be modified and how I modified them.
PCoIP constantly monitors its network connections and will adjust how much data is being transferred from the virtual desktop to the VDI client as needed. For example, because you may want to have PCoIP manually cap the amount of data that's transferred over the network, PCoIP allows you to put a maximum on the amount of network traffic that a VDI session can consume. Also, as PCoIP transfers information such as video, audio, and USB, and other interactions between a VDI client and a virtual machine, PCoIP allows you to dictate the amount of bandwidth these interactions can consume.
"Build-to-lossless" is a clever way that PCoIP can increase an end user's experience with his virtual desktop and reduce network traffic. In highly simplified terms, it starts with a low-resolution version of what's being displayed and then the display will progressively transition to a higher resolution over time. To show how build-to-lossless works, imagine that you're scrolling down through a Web page on your virtual desktop: at first you'll have low resolution or lossy graphics, and if you stay on the page the graphics will soon achieve their native resolution or become lossless, but if you move on from the page, unneeded graphic information won't be transferred over the network.
I recently wanted to modify the PCoIP settings on my installation of Horizon 7.7 that was using a Windows 7 virtual desktop. I checked the official VMware and Teradici (the creators of PCoIP) documentation for guidance on how to do this, but didn't find much information. Although I did find information on how to adjust these settings in older documentation, this information was outdated and didn't match up with what I was seeing on my installation.
Before I dive into the article and explain how I was able to modify PColP settings, however, you should be aware that in the vast majority of cases, PCoIP settings should not be modified— you can hurt, rather than help, the performance of your VDI deployment. That said, in some (albeit rare) cases, modifying these settings can radically improve an end user's VDI experience.
PCoIP Settings
PCoIP settings can be adjusted on an individual virtual desktop, or on a group of virtual desktops by modifying an Active Directory Group Policy or by using Horizon 7 policies, which are set from the Horizon Administrator. This article will show you how to adjust them on a per-virtual-desktop basis, but much of the information can be used to adjust a group of desktops.
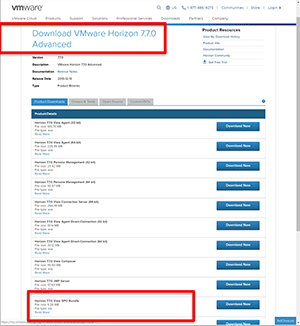
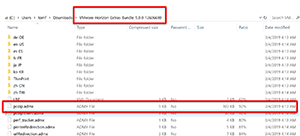
The policies for PCoIP are stored in an ADMXtemplate file (pcoip.admx) available in VMware-Horizon-Extras-Bundle-x.x.x-yyyyyyy.zip, which can be downloaded from https://my.vmware.com/web/vmware/downloads under the VMware Horizon 7 download section by selecting the View GPO Bundle (Figure 1). The GPO bundle will be downloaded as the VMware-Horizon-Extras-Bundle-5.0.0-xxx. This .zip file includes pcoip.admx file, as well as other ADMX files (Figure 2).
 [Click on image for larger view.]
Figure 1. TThe Horizon View GPO Bundlee.
[Click on image for larger view.]
Figure 1. TThe Horizon View GPO Bundlee.
 [Click on image for larger view.]
Figure 2. The pcoip.admx file.
[Click on image for larger view.]
Figure 2. The pcoip.admx file.
Installing pcoip.admx
After extracting the pcoip.admx file from the archive and copying it to my Windows 7 virtual desktop, I copied the contents of the ADMX folder to the local PolicyDefinitions folder on my Windows 7 virtual desktop at C:\Windows\PolicyDefinitions.
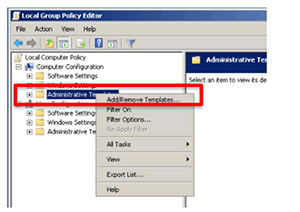
If you use Windows 10, you'll be able to install the ADMX file from gpedit directly by entering gpedit.msc in the start box, then navigating to Computer Configuration, right-clicking Administrative Template, selecting Add/Remove Template, clicking Add, and finally selecting the pcoIp.admx file (Figure 3).
 [Click on image for larger view.]
Figure 3. Adding pcoip.admx Windows 10.
[Click on image for larger view.]
Figure 3. Adding pcoip.admx Windows 10.
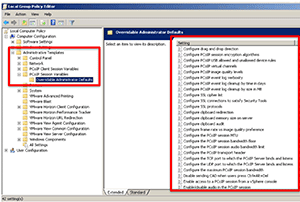
I entered gpedit.msc in the start box of my virtual desktop and navigated to Local Computer Policy/Computer Configuration/Administrative Templates/PCoIP Session Variables/Overridable Administrator Defaults (Figure 4).
 [Click on image for larger view.]
Figure 4. The PCoIP settings in gpedit.
[Click on image for larger view.]
Figure 4. The PCoIP settings in gpedit.
Using pcoip.admx
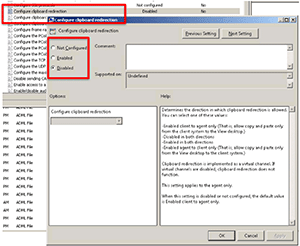
To test the PCoIP settings, I disabled clipboard redirection using gpedit (Figure 5) and then logged into the virtual desktop and found that clipboard redirection was, in fact, disabled.
 [Click on image for larger view.]
Figure 5. The PCoIP clipboard setting.
[Click on image for larger view.]
Figure 5. The PCoIP clipboard setting.
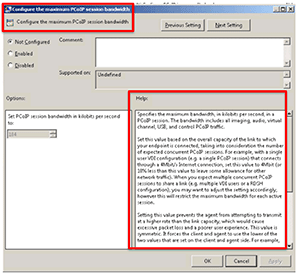
One of the nice features with these settings is that an explanation is given in the setting's Help section. For example, when I went to change the maximum bandwidth setting, I was informed how it would affect the connection (Figure 6). Not all these changes will take effect immediately; some require a new session to be instantiated between the virtual desktop and the client.
 [Click on image for larger view.]
Figure 6. The PCoIP max bandwidth.
[Click on image for larger view.]
Figure 6. The PCoIP max bandwidth.
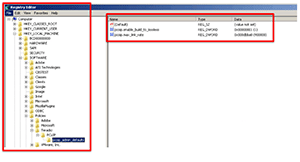
After changing a few of the values using gpedit, I looked at them in the registry by bringing up regedit and navigating to HKEYLOCAL_MACHINE\SOFTWARE\Policies\Teradici\PC0IP\; in this folder, I saw registry objects with the values that I changed (Figure 7).
 [Click on image for larger view.]
Figure 7. The Registry.
[Click on image for larger view.]
Figure 7. The Registry.
Using the pcoip.admx file, you can change the behavior of your PCoIP connection between a virtual desktop and a VDI client. There are many different PCoIP settings you can adjust, but, as stated at the beginning of this article, it is very seldom that you should need to so.
About the Author
Tom Fenton has a wealth of hands-on IT experience gained over the past 30 years in a variety of technologies, with the past 20 years focusing on virtualization and storage. He previously worked as a Technical Marketing Manager for ControlUp. He also previously worked at VMware in Staff and Senior level positions. He has also worked as a Senior Validation Engineer with The Taneja Group, where he headed the Validation Service Lab and was instrumental in starting up its vSphere Virtual Volumes practice. He's on X @vDoppler.