How-To
Simplify Kubernetes in AWS with the Amazon EKS Service
You can use Kubernetes on Amazon Web Services without installing it yourself.
Although it's relatively common for Amazon Web Services (AWS) customers to deploy their own Kubernetes servers in Amazon Elastic Compute Cloud (EC2), Amazon has begun offering a service called Amazon Elastic Container Service for Kubernetes (EKS) that allows you to use Kubernetes without having to install it yourself.
In addition to being easier to deploy, Amazon EKS has another potential benefit over deploying your own Kubernetes server on Amazon EC2: flat-rate pricing. AWS currently makes the Amazon EKS service available at a rate of $0.20 per hour, which is likely less expensive than a do-it-yourself Kubernetes deployment. It's important to note, however, that the cost of the worker nodes aren't included in this price. Worker nodes run on Amazon EC2, and will typically be required regardless of whether you deploy Kubernetes yourself or use the Amazon EKS service.
Before I go on, I want to take just a second to talk about worker nodes for the benefit of anyone who might be new to Kubernetes. In Kubernetes, a worker node (which is sometimes referred to simply as a node) is a physical or virtual machine that has the resources necessary to run one or more pods. A pod is a group of containers that share storage and networking resources. As such, the Amazon EKS service acts as a control plane, and the worker nodes act as container hosts.
EKS service-based Kubernetes deployments are clustered, and each cluster requires a name. So, with that said, the first thing you need to do to get started is to come up with a cluster name. You will also need an IAM role that Kubernetes can use to manage container-related AWS resources on your behalf. As a best practice, it's a good idea to create a dedicated IAM role that's to be used solely by Kubernetes, but before delving into the Kubernetes configuration process. You can create an IAM role here.
Once you've settled on a cluster name and created an IAM role, go to the EKS service page, enter your chosen cluster name and click Next Step.
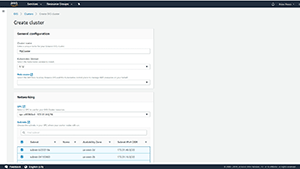
At this point, you'll be taken to the Create Cluster screen, which you can see in Figure 1. The first steps you need to take on this screen are to select a Kubernetes version and provide a role name. The role name is simply the name of the IAM role that you created earlier.
 [Click on image for larger view.]
Figure 2. Choose the version of Kubernetes that you want to deploy, and select the IAM role that you want the Kubernetes cluster to use.
[Click on image for larger view.]
Figure 2. Choose the version of Kubernetes that you want to deploy, and select the IAM role that you want the Kubernetes cluster to use.
Now, scroll down and you'll be taken to the Networking section. This section requires you to choose a Virtual Private Cloud (VPC) within which to create the Kubernetes cluster. You'll also need to choose the subnets within which the Kubernetes worker nodes will run, as shown in Figure 2. Keep in mind that you will need to select a minimum of two subnets, and those subnets must be in different availability zones.
 [Click on image for larger view.]
Figure 2. You'll need to select a Virtual Private Cloud, and then choose the subnets within which the worker nodes will run.
[Click on image for larger view.]
Figure 2. You'll need to select a Virtual Private Cloud, and then choose the subnets within which the worker nodes will run.
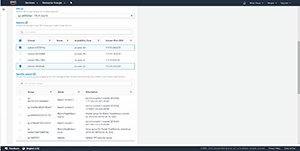
The next task in the configuration process is to select a security group. The security group that you select will be applied to the worker node's network interfaces. The Security Group section also requires you to either enable or disable public and private API server endpoint access. As you can see in Figure 3, there are separate controls for each. Private access is disabled by default, and public access is enabled by default.
 [Click on image for larger view.]
Figure 3. You'll need to select a security group to be used by the worker nodes.
[Click on image for larger view.]
Figure 3. You'll need to select a security group to be used by the worker nodes.
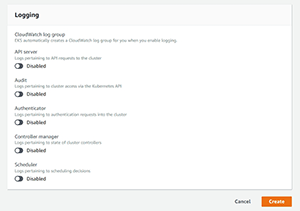
The last section of the interface is the Logging section, which you can see in Figure 4. As you can see in the figure, enabling logging causes a CloudWatch log group to be created. You can manually enable or disable logging for the API server, auditing, authentication and more. When you finish configuring the logging options, click the Create button to create the cluster.
 [Click on image for larger view.]
Figure 4. Enabling logging creates a CloudWatch log group.
[Click on image for larger view.]
Figure 4. Enabling logging creates a CloudWatch log group.
Now that I've shown you how to create a Kubernetes cluster, I want to show you how to configure container resources in my next article.
About the Author
Brien Posey is a 22-time Microsoft MVP with decades of IT experience. As a freelance writer, Posey has written thousands of articles and contributed to several dozen books on a wide variety of IT topics. Prior to going freelance, Posey was a CIO for a national chain of hospitals and health care facilities. He has also served as a network administrator for some of the country's largest insurance companies and for the Department of Defense at Fort Knox. In addition to his continued work in IT, Posey has spent the last several years actively training as a commercial scientist-astronaut candidate in preparation to fly on a mission to study polar mesospheric clouds from space. You can follow his spaceflight training on his Web site.