How-To
Amazon Forecast Makes Machine Learning Easy
In Part 1 of a series, Brien Posey goes hands-on to explain this AWS service that allows you to use machine learning to make predictions based on your data, but without having to do math or write code.
Machine learning has a reputation for being complex. Even so, Amazon has provided a service called Forecast that allows you to use machine learning to make predictions based on your data, but without having to do math or write code. In this blog series, I will show you how it works.
The first thing that you will need is a sample dataset. You can use your own, but another option is to use the Machine Learning Repository hosted by UC Irvine. Amazon also provides a sample dataset (Note: Clicking on link may initiate download). Whatever dataset you choose to use, you will need to copy it to an S3 bucket.
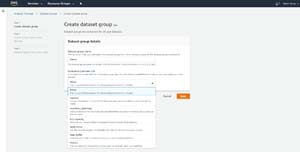
Once you have a sample dataset that you can use for testing purposes, log into the AWS console and choose the Amazon Forecast option from the list of services (it's in the Machine Learning section). When Amazon Forecast opens, click on the Create Dataset Group button. When you do, you will be taken to the Create Dataset Group page, shown in Figure 1.
 [Click on image for larger view.]
Figure 1: The Create Dataset Group page requires you to provide a dataset name and to choose a forecasting domain.
[Click on image for larger view.]
Figure 1: The Create Dataset Group page requires you to provide a dataset name and to choose a forecasting domain.
This screen requires you to enter a name for the dataset group that you are creating, and to pick a forecasting domain. The forecasting domain is really just a model that you can use to tell AWS what type of data you are importing. Some of the built-in forecasting domains include Retail, EC2 Capacity, and Inventory Planning, but there is also a custom option that you can use if your data does not fit neatly into any of the pre-built forecasting domains.
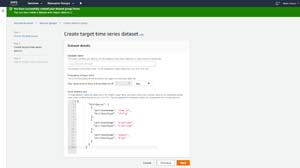
The next step in the process is to specify a name for your dataset, as well as the data's frequency (daily, weekly, etc.). Once you have done that, you have to provide the schema for your dataset. If you look at Figure 2, you can see that by default, AWS uses some generic schema names and data types. These are the items that you will have to modify to match your data.
 [Click on image for larger view.]
Figure 2: You will have to replace the generic schema data with the schema data from the file that you will be importing.
[Click on image for larger view.]
Figure 2: You will have to replace the generic schema data with the schema data from the file that you will be importing.
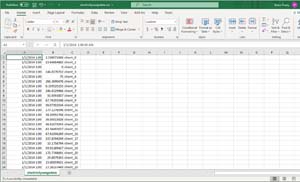
Figure 3 shows what my data file looks like. As you can see in the figure, there aren't any column headers. Even so, we have to define column headers within the space provided in the AWS interface. We also have to tell AWS what type of data is in each column.
 [Click on image for larger view.]
Figure 3: This is what my dataset looks like.
[Click on image for larger view.]
Figure 3: This is what my dataset looks like.
If you look at Figure 4, you can see that I have populated the schema section to reflect the nature of my data. It is worth noting that AWS is really picky about attribute names. The names that I am using are required by the Custom forecasting domain. If you choose one of the other forecasting domains, there are other required values.
The first column of my CSV file contained a timestamp, so I created an attribute called timestamp of the timestamp data type. It may seem a little odd calling my date/time column timestamp when timestamp is also the name of the datatype, but AWS requires a column to be named timestamp.
The second column in the CSV file was a numerical value, so I added an attribute called target_value to the schema, and made it a floating point value. Again, AWS requires you to have an attribute named target_value.
The last column in my CSV file stored the client name. However, I did not end up calling this attribute Client. AWS requires one item to be called Item_ID. I used the Item_ID for the list of clients so that the data can be identified by client.
 [Click on image for larger view.]
Figure 4: This is my custom schema.
[Click on image for larger view.]
Figure 4: This is my custom schema.
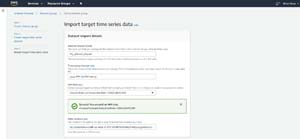
Click Next, and you will be taken to the screen where you can import your data. Enter a name for the data import set, specify a timestamp format and enter an IAM role, and then specify the location of your data, as shown in Figure 5.
 [Click on image for larger view.]
Figure 5: The path to your file should be entered as s3://<bucket>/file
[Click on image for larger view.]
Figure 5: The path to your file should be entered as s3://<bucket>/file
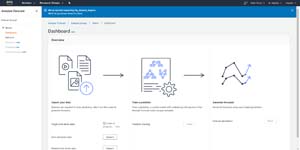
Click the Start Import button and you will be taken to the dashboard, shown in Figure 6. Depending on the size of your dataset, the import process can take a while to complete. I will use Part 2 to discuss what to do once the data has been imported.
 [Click on image for larger view.]
Figure 6: This is the screen that is displayed as your data is imported.
[Click on image for larger view.]
Figure 6: This is the screen that is displayed as your data is imported.
Stay tuned for Part 2.
About the Author
Brien Posey is a 22-time Microsoft MVP with decades of IT experience. As a freelance writer, Posey has written thousands of articles and contributed to several dozen books on a wide variety of IT topics. Prior to going freelance, Posey was a CIO for a national chain of hospitals and health care facilities. He has also served as a network administrator for some of the country's largest insurance companies and for the Department of Defense at Fort Knox. In addition to his continued work in IT, Posey has spent the last several years actively training as a commercial scientist-astronaut candidate in preparation to fly on a mission to study polar mesospheric clouds from space. You can follow his spaceflight training on his Web site.