How-To
Creating Immutable Storage on AWS S3, Part 1
Brien Posey demonstrates Object Lock and other functionality for immutable storage on the AWS cloud, often used for compliance mandates and increasingly in conjunction with backup and recovery solutions since some types of ransomware are now designed to target backups.
Immutable storage has been around in one form or another for decades. In recent years though, the technology has gained newfound popularity. Immutable storage is often used by those who have compliance mandates requiring them to maintain specific data. It is also being increasingly used in conjunction with backup and recovery solutions since some types of ransomware are now designed to target backups.
Amazon Web Services (AWS) makes it possible to create immutable storage on S3 by using a feature called Object Lock. Object Lock seems to be best suited to the task of preserving data in accordance with compliance requirements. In fact, it allows an administrator to specify a data retention period, or to implement a legal hold that prevents data from being deleted until the hold is removed.
The process of setting up S3 Object Lock is relatively easy, but it is worth noting that Object Lock can only be enabled if an S3 bucket has been configured to support versioning. It is also worth noting that although you can enable versioning at any time, Object Lock can only be enabled when you are initially creating a bucket. For the sake of demonstration, I will show you how to enable versioning on an existing bucket, and then show you what happens if you try to enable Object Lock. From there, I will show you how to create a new bucket with Object Lock enabled.
Enabling Versioning in an Existing Bucket
If you want to enable versioning within an existing bucket, open the S3 administrative console and then click on the bucket that you want to manage. This will cause AWS to display a tabbed interface that allows you to manage the bucket and its various attributes. Select the Properties tab, shown in Figure 1.
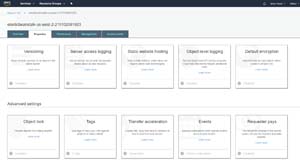 [Click on image for larger view.] Figure 1: The Properties tab can be used to manage the bucket's various features.
As you can see in the figure, the Properties tab displays a number of tiles, each of which corresponds to a particular setting. The leftmost tab on the top row controls object versioning. As you can see in the figure, versioning is disabled by default. To enable versioning for the bucket, click on the text that says Disabled, and AWS will display an option for enabling versioning, as shown in Figure 2. After selecting the Enable Versioning option, be sure to click Save.
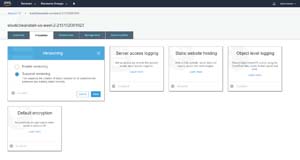 [Click on image for larger view.] Figure 2: Select the option to enable versioning and then click Save.
With versioning now enabled, you will be returned to the Properties tab's main screen. The Versioning tile should display an Enabled icon, as shown in Figure 3. As you look at this figure, you will also notice that there is an Object Lock tile just below the Versioning tile. Like versioning, Object Lock is also disabled.
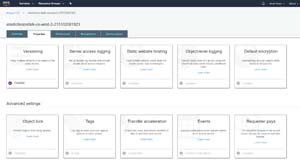 [Click on image for larger view.] Figure 3: Versioning is now enabled.
As previously noted, you can't enable Object Lock for an existing bucket. If you try, you will see an error message like the one that is shown in Figure 4.
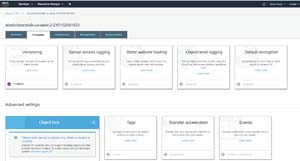 [Click on image for larger view.] Figure 4: You can't enable Object Lock on an existing bucket.
Since you can't enable object lock for an existing bucket, let's take a look at how to create a new bucket with Object Lock enabled. To do so, go back to the S3 administrative console's main screen, and then click on the Create Bucket button, shown in Figure 5. This will cause the console to display the Create Bucket screen.
 [Click on image for larger view.]Figure 5: Click the Create Bucket button.
The Create Bucket screen requires you to provide a name for the new bucket and to choose the region in which you want the bucket to be created. You will also need to specify whether or not public access to the bucket is allowed (public access is blocked by default). If you scroll down to the bottom of this screen, you will see an Advanced Settings section, as shown in Figure 6. You will need to expand this section by clicking on it.
 [Click on image for larger view.] Figure 6: You will need to expand the Advanced Settings section.
As you can see in Figure 7, the Advanced Settings section includes an option to enable Object Lock for the new bucket. There is no need to enable versioning, because versioning will be automatically enabled if you choose to enable Object Lock. When you have enabled Object Lock, click the Create Bucket button to create the new bucket.
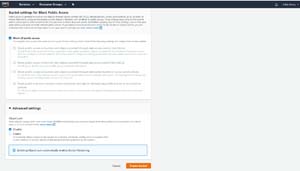 [Click on image for larger view.] Figure 7: The option to enable Object Lock is embedded in the Advanced Settings.
As previously noted, enabling Object Lock causes some additional features to be made available. For instance, you can configure retention periods and legal holds for your data. I will show you how to use these options in Part 2.
About the Author
Brien Posey is a 22-time Microsoft MVP with decades of IT experience. As a freelance writer, Posey has written thousands of articles and contributed to several dozen books on a wide variety of IT topics. Prior to going freelance, Posey was a CIO for a national chain of hospitals and health care facilities. He has also served as a network administrator for some of the country's largest insurance companies and for the Department of Defense at Fort Knox. In addition to his continued work in IT, Posey has spent the last several years actively training as a commercial scientist-astronaut candidate in preparation to fly on a mission to study polar mesospheric clouds from space. You can follow his spaceflight training on his Web site.