How-To
Creating an iSCSI Target on FreeNAS
Tom follows up on his previous article about installing FreeNAS and using it to create an NFS share to back a VM, now creating an iSCSI target on FreeNAS and using that target as backing for a vSphere VM.
In a previous article, I showed you how I installed FreeNAS and used it to create an NFS share, and then how I used the share as backing for a virtual machine (VM). In this article, I will go a step further show you how I created an iSCSI target on FreeNAS and used that target as backing for a vSphere VM. In my demonstration, I will be using the same environment I had set up in my previous article.
The iSCSI protocol uses an initiator (client) and target (storage device) topology. The target will be presented as block device to the iSCSI initiator. In the section below, I will show you how I created a target on my FreeNAS VM, but I will not be explaining all of the options available when you create an iSCSI target as you can refer to the 11.3 release notes for that information. I will be using one of the 100GB drives that I created when I created the VM for FreeNAS for the target.
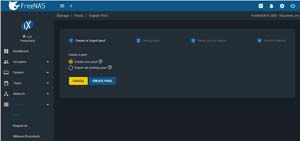
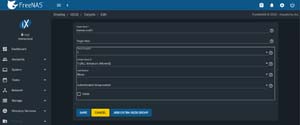
From the
Storage drop-down menu, I selected
Pools and then
Add. Then, I selected
Create new pool and
CREATE POOL.
 [Click on image for larger view.]
I entered iscsipool01 in the Name text box, selected da2 and the → symbol (right arrow), and clicked Create. I selected the Confirm checkbox, and clicked Create Pool. I selected the three vertical dots (options) to the right of the pool, and selected Add Zvol.
 [Click on image for larger view.]
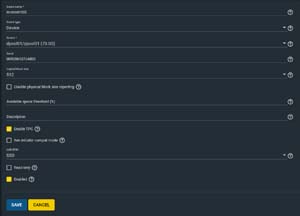
I entered iscsizvol01 in the Zvol name text box and 75 GiB in the Size for this zvol text box, and then clicked Save.
 [Click on image for larger view.]
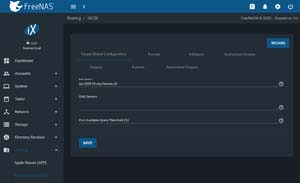
From the Sharing drop-down menu, I selected Block Shares (iSCSI), and then selected Wizard.
 [Click on image for larger view.]
The Target Global Configuration page contains settings that will apply to all the iSCSI shares. I kept all the defaults and clicked Save. In the popup dialog, I selected Enable Service.
 [Click on image for larger view.]
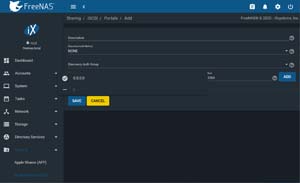
I clicked the Portals tab and clicked Add. In the IP Address text box, I entered 0.0.0.0; this will listen in on all the IPv4 addresses on the system. I left all the other default values, clicked Save, and then clicked Save again.
 [Click on image for larger view.]
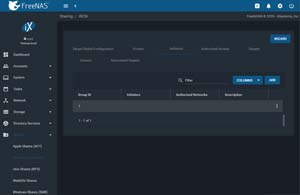
I clicked the Initiators tab (this is the panel where you can specify which systems are allowed to connect to your iSCSI targets) and then Add. I selected the Allow all initiators check box and then clicked Save.
 [Click on image for larger view.]
I skipped over the Authorized Access tab as my FreeNAS system was behind a DMZ.
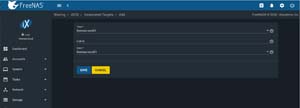
I clicked the Targets tab and clicked Add. In the Target Name text field, I entered freenas-iscsi01. Then, I selected 1 from the Portal Group ID drop-down menu and 1 from the Initiator Group ID drop-down menu, and then clicked Save.
 [Click on image for larger view.]
I clicked the Extents tab and clicked Add. In the Extent Name text field, I entered freenas-iscsi01. Then, I and selected Device from the Extent type drop-down menu and iscsizpool01 from the Device drop-down menu. Next, I clicked the Enabled checkbox and then Save.
 [Click on image for larger view.]
I clicked Associated Targets and then Add. I selected freenas-iscsi01 from the Target drop-down menu and freenas-iscsi01 from the Extent drop-down menu, and then clicked Save.
 [Click on image for larger view.]
Using an iSCSI Target with vSphere
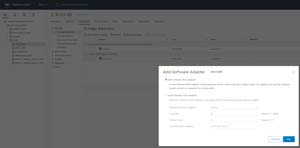
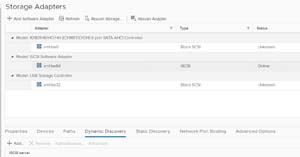
Once the target was created and configured, I added it to my vSphere Environment. To do this, I logged in to my vSphere Client and selected a host in the navigation pane, and then navigated to Configure > Storage > Storage Adapters. I clicked Add Software Adapter, verified that Add software iSCSI adapter was selected, and then clicked OK.
 [Click on image for larger view.]
Next, I selected vmhba64 (the iSCSI software adapter), and then clicked Rescan Adapter and OK.
 [Click on image for larger view.]
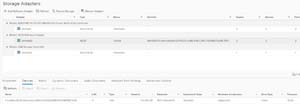
I selected the Dynamic Discovery tab and then clicked Add. In the Add Send Target Server panel, I entered the IP address of my FreeNAS system in the ISCSI Server text field and clicked OK.
I then clicked Rescan Adapter and OK. I selected the Device tab and saw the FreeNAS iSCSI device listed.
 [Click on image for larger view.]
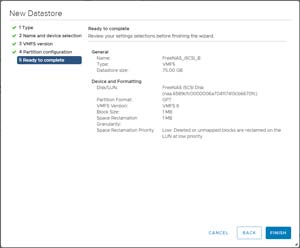
I right-clicked the ESXi host, then navigated to Storage > New Datastore. I verified that VMFS was selected, and clicked Next. I entered FreeNAS_iSCSI_A in the Datastore name text field, selected the iSCSI target, and clicked Next. I verified that VMFS 6 was selected and clicked Next. I clicked Next on the Partition configuration pane, verified that the configuration was correct, and then clicked Finish.
 [Click on image for larger view.]
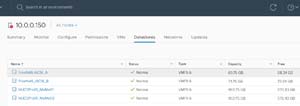
I clicked the Datastore tab and saw the iSCSI-based datastore listed.
 [Click on image for larger view.]
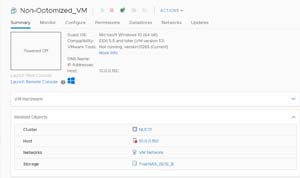
I then used it as storage for my VMs.
 [Click on image for larger view.]
The VM ran without any issues, and I didn't notice any performance issues throughout my day-to-day activities.
Conclusion
It took me less than a half hour to install FreeNAS, configure an iSCSI target, attach the iSCSI target to create a vSphere datastore, and use that datastore as backing for VMs. I didn't get a chance to really stress the NFS or iSCSI storage, but I didn't notice any issues when using it for backing for ESXi VMs. Seeing how FreeNAS is free to use, I would highly suggest that you give it try. If needed, you can buy a support contract for it from iXsystems; otherwise, the FreeNAS forums are very active and if you have any issues, other users can probably help you work through them.
About the Author
Tom Fenton has a wealth of hands-on IT experience gained over the past 30 years in a variety of technologies, with the past 20 years focusing on virtualization and storage. He previously worked as a Technical Marketing Manager for ControlUp. He also previously worked at VMware in Staff and Senior level positions. He has also worked as a Senior Validation Engineer with The Taneja Group, where he headed the Validation Service Lab and was instrumental in starting up its vSphere Virtual Volumes practice. He's on X @vDoppler.