How-To
How to Migrate DNS Services from GoDaddy to AWS Route 53
If you host a lot of services on AWS, it can sometimes be useful to let Amazon's Route 53 handle your DNS hosting rather than letting a domain registry service handle it, because sometimes it's just nice to be able to manage your DNS record from within the same environment that you use to manage your other AWS resources.
If you host a lot of services on AWS, it can sometimes be useful to let Amazon's Route 53 handle your DNS hosting rather than letting a domain registry service handle it. In this blog post, we'll take a look at how to do a DNS migration from GoDaddy to AWS Route 53.
Before I get started, I just want to clarify that there is no rule that says that you have to do a DNS migration. GoDaddy's DNS servers are perfectly capable of accommodating DNS records that point to AWS resources. The same is also true of other third-party DNS providers. Even so, sometimes it's just nice to be able to manage your DNS record from within the same environment that you use to manage your other AWS resources. It is worth noting however, that while most domain registration providers allow you to use their DNS services for free, AWS does charge a small fee for using Route 53 for DNS name resolution.
The first step in the process is to log into the AWS console and choose Route 53 from the list of services (it's in the Networking and Content Delivery section). Next, you will need to create a hosted zone. A hosted zone acts as a domain manager for your domain. To create a hosted zone, click the Create Hosted Zone button shown in Figure 1.
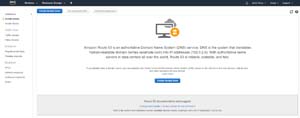 [Click on image for larger view.]
Figure 1: Click the Create Hosted Zone button.
[Click on image for larger view.]
Figure 1: Click the Create Hosted Zone button.
At this point, you will be taken to a screen that shows your currently existing hosted zones. Since you haven't created a hosted zone yet, this screen is going to be empty. Click on the Create Hosted Zone button and the console will display a series of fields asking you to provide your domain name, the type of hosting zone that you want to create, and an optional comment. You can see what this looks like in Figure 2.
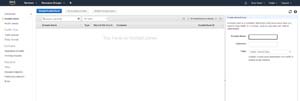 [Click on image for larger view.]
Figure 2: This is the interface used to create a hosted zone.
[Click on image for larger view.]
Figure 2: This is the interface used to create a hosted zone.
Enter your domain name into the Domain Name field and then set the Type option to Public Hosted Zone. Now, click the Create button to create the record set.
At this point, you will be taken to a screen that displays an NS record and an SOA record. For each of the two records, select the record, set the TTL to an appropriate value (I like using 300 seconds), make any required adjustments to the records (there usually won't be any), and click the Save Record Set button. You can see what this looks like in Figure 3.
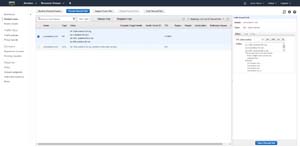 [Click on image for larger view.]
Figure 3: I recommend setting the TTL to 300 seconds.
[Click on image for larger view.]
Figure 3: I recommend setting the TTL to 300 seconds.
Now, log into the GoDaddy console and click on the Domains option, and then click on the domain whose DNS you are migrating to AWS Route 53. Next, click on the DNS option to get a list of the DNS records that exist for the domain.
If you are working with a brand new domain, then you won't have to worry about existing DNS records because there won't be any. For an established domain name however, you will likely need to create a list of the existing records so that you can manually add the records to the hosted zone that you have created on Route 53.
When you are done, scroll down to the Nameservers section. Here you will see the DNS servers that the domain is currently configured to use. You will have to replace these name servers with the name servers that Route 53 is configured to use. To get the names of these name servers, go back to the Route 53 console, select the Hosted Zones tab, and then select the radio button associated with your domain name. The tab on the right will display the names of the name servers that are being used. You can see what this looks like in Figure 4.
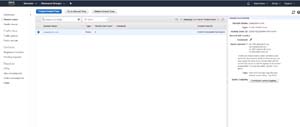 [Click on image for larger view.]
Figure 4: These are the name servers that are being used.
[Click on image for larger view.]
Figure 4: These are the name servers that are being used.
In the GoDaddy management console, click the Change button and then follow the prompts to change the name servers. Paste the names of the AWS DNS servers into GoDaddy's DNS manager, as shown in Figure 5.
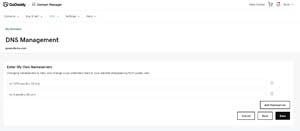 [Click on image for larger view.]
Figure 5: You will need to paste the AWS DNS server names into the GoDaddy interface.
[Click on image for larger view.]
Figure 5: You will need to paste the AWS DNS server names into the GoDaddy interface.
Click the Save button and then refresh the display. You should now see the NameServers section pointing toward the AWS DNS servers, as shown in Figure 6. Keep in mind that it can take a couple of days for the change to take effect.
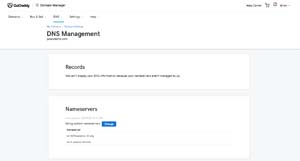 [Click on image for larger view.]
Figure 6: GoDaddy is now pointing toward the AWS DNS servers.
[Click on image for larger view.]
Figure 6: GoDaddy is now pointing toward the AWS DNS servers.
About the Author
Brien Posey is a 22-time Microsoft MVP with decades of IT experience. As a freelance writer, Posey has written thousands of articles and contributed to several dozen books on a wide variety of IT topics. Prior to going freelance, Posey was a CIO for a national chain of hospitals and health care facilities. He has also served as a network administrator for some of the country's largest insurance companies and for the Department of Defense at Fort Knox. In addition to his continued work in IT, Posey has spent the last several years actively training as a commercial scientist-astronaut candidate in preparation to fly on a mission to study polar mesospheric clouds from space. You can follow his spaceflight training on his Web site.