How-To
Using Windows 10 Task Scheduler with PowerShell Scripts
Tom Fenton details step-by-step directions to configure Windows 10 to allow running Task Scheduler and how to set up an automated task to run a PowerShell script every four hours.
Recently I had a project that required me to run a PowerShell script every four hours. While I could have dutifully logged in to the system every four hours to manually run the script, I enjoy my sleep, so I wanted to find a way to automate this task.
I attempted to do so with the Windows built-in scheduling tool, Task Scheduler, but after many attempts I found that I couldn't simply specify the PowerShell script. Instead, to get it to run I needed to tell Task Scheduler to run PowerShell with my PowerShell script as an argument to it. In this article, I will show you how I configured my Windows 10 system to allow me to run Task Scheduler, and then how I set up an automated task to run my script every four hours.
The first thing I needed to do was grant myself the right to schedule a job. If you don't do this, you will receive the following message: "Logon failure: the user has not been granted the requested logon type at this computer."
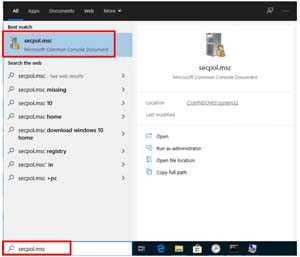
To grant myself these rights, I entered SecPol.MSC in the Windows Start menu.
 [Click on image for larger view.]
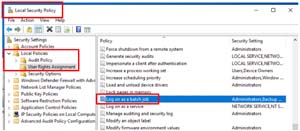
From the Local Security Policy dialog, I navigated to Local Policies > User Rights Assignment > Log on as a batch job.
 [Click on image for larger view.]
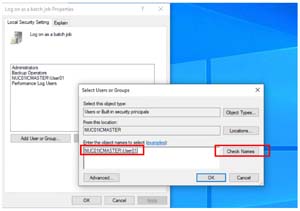
I selected Add User or Group, and added my user to the policy.
 [Click on image for larger view.]
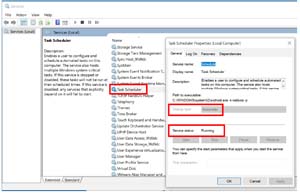
As Task Scheduler is a service, I wanted to verify that it was running. I did this by entering services.msc in the Windows Start menu, then double-clicking Task Scheduler and verifying that the Startup Type field was set to Automatic and that the Service Status field was set to Running.
 [Click on image for larger view.]
Schedule a Job Using the Task Schedule Interface
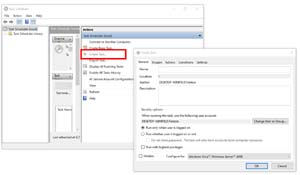
To schedule the PowerShell job to run every four hours, I entered taskschd.msc in the Windows Start menu, which brought up the Task Scheduler. In the Actions pane, I clicked Create Task.
 [Click on image for larger view.]
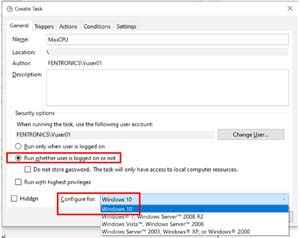
I entered MaxCPU in the Name text box, supplied the location of the script, selected Run whether user is logged on or not, and selected Windows 10 from the Configure for drop-down menu.
 [Click on image for larger view.]
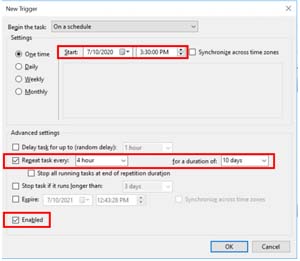
I selected the Triggers tab and clicked New, and configured it to run every four hours for the next 10 days, starting at 3:30pm
 [Click on image for larger view.]
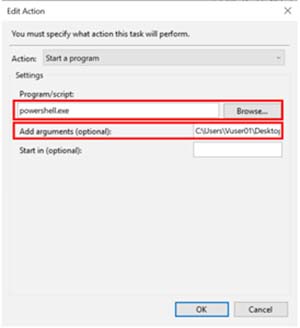
I selected the Actions tab and clicked New and then Browse. Then, I navigated to the location of the PowerShell executable (C:\Windows\System32\WindowsPowerShell\v1.0\powershell.exe), and entered the location of the PowerShell script I wanted to run in the Add arguments (optional) text box.
 [Click on image for larger view.]
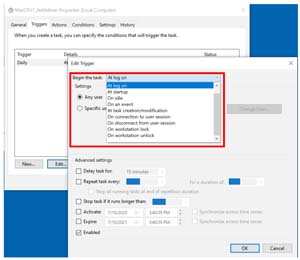
Task Scheduler not only lets you run a task at a specific time, but also allows you to activate many other triggers, such as when a user logs on. You can set these triggers from the Begin the task drop-down menu after opening the Triggers tab.
 [Click on image for larger view.]
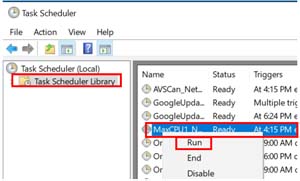
I have found it helpful to manually run a task once it has been scheduled to make sure that I set everything up correctly. To manually run a job, right-click the job and select Run.
 [Click on image for larger view.]
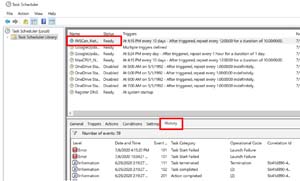
You can see if a job has run successfully by selecting the History tab. You can also double-click any event within this tab to find more detailed information.
 [Click on image for larger view.]
Exporting a Scheduled Task
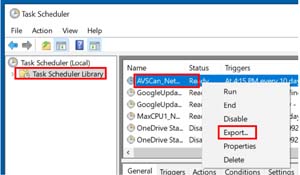
Once I created the scheduled task, I wanted this task to run on a couple different Windows 10 systems. To do this, I went to Task Scheduler, right-clicked the task, selected Export, and then specified the location I wanted to save it to.
 [Click on image for larger view.]
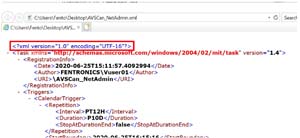
The task was saved as an XML file.
 [Click on image for larger view.]
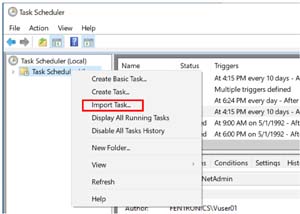
To import the task, I copied the XML file to the other system, and then brought up Task Scheduler on that system. Then, I right-clicked the folder I wanted the task to appear in, selected Import Task from the menu, and selected Import task.
 [Click on image for larger view.]
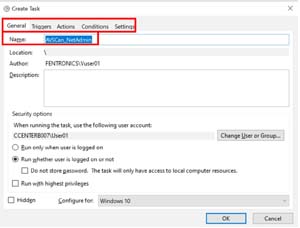
When importing the task, you can edit any of its attributes including its name.
 [Click on image for larger view.]
Conclusion
Microsoft Windows Task Scheduler can run PowerShell scripts, but to do so you will first need to specify it as an argument to PowerShell. Hopefully this article will help you automate many of your daily activities on your Windows system.
About the Author
Tom Fenton has a wealth of hands-on IT experience gained over the past 30 years in a variety of technologies, with the past 20 years focusing on virtualization and storage. He previously worked as a Technical Marketing Manager for ControlUp. He also previously worked at VMware in Staff and Senior level positions. He has also worked as a Senior Validation Engineer with The Taneja Group, where he headed the Validation Service Lab and was instrumental in starting up its vSphere Virtual Volumes practice. He's on X @vDoppler.