How-To
Upgrading Windows Server 2012 EC2 Instances, Part 3: Finishing Up
Windows Server 2012 is reaching its expected end of life in 2023. As such, organizations need to begin planning now for an upgrade to a supported Windows Server OS.
EC2 instances that are running Windows Server 2012 and 2012 R2 will continue to function after the end-of-life date, but Microsoft will no longer be providing security patches. Thus it is in an organization's best interest to go ahead and update their EC2 instances to a newer OS.
In the first part of this blog series I discussed some planning concerns related to the upgrade process, and in the second part of the series I began the hands-on portion. The last thing that we did in Part 2 was to create a virtual disk containing the Windows Server installation files, and then attach that virtual disk to the EC2 instance that is being upgraded. For the purposes of this blog series, I am going to be upgrading to Windows Server 2019, but the procedure that I'm about to show you works similarly for all Windows Server versions.
Now that you have attached the volume containing the installation files to the instance, you need to make that volume accessible to the existing Windows OS. From within the virtual machine, enter the diskmgmt.msc command at the Windows Run prompt. This will cause Windows to open the Disk Management Console. You will need to use this console to bring the disk online.
In some cases, you will get lucky and the new disk will be brought online automatically. However, if the Disk Management Console does not indicate that the disk is online, you will have to right click on the disk and choose the Online option from the shortcut menu. Incidentally, be careful not to accidentally choose the Initialize option, as doing so causes data loss.
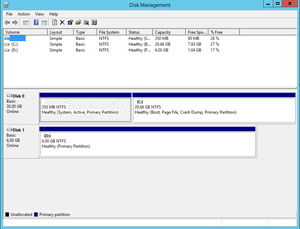 [Click on image for larger view.] Figure 1: The disk is now online.
Once the new disk has been brought online, you will be able to access the Windows Setup files that are stored on the disk. This means that now you can move forward with performing the OS upgrade. As you can see in the figure below, the disk that you have brought online contains the Windows installation files. You can use these files to perform an in place upgrade of Windows.
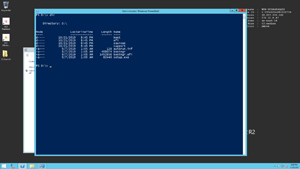 [Click on image for larger view.] Figure 2: The newly attached volume contains the Windows installation files.
To initiate the upgrade, open an Administrative PowerShell window and enter the following commands:
D:
./Setup.exe /auto upgrade
If you find that these commands do not work, then check the Disk Management Console to see if the new volume was mapped to a drive letter other than D:, and then make the substitution. As you can see in the next figure, this launches the Windows Setup process.
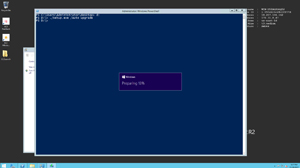 [Click on image for larger view.] Figure 3: We have launched Windows Setup.
At this point, there are a couple of things left that you will need to do to complete the upgrade process. First, you are going to have to choose the OS that you want to install, as shown in Figure 4. You will typically want to match the edition that is currently in place since you are performing an in place upgrade.
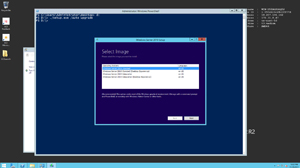 [Click on image for larger view.] Figure 4: Choose the OS that you want to install.
The other thing that you may have to do is to specify whether you want to perform an upgrade or a clean Windows Server installation. AWS won't always display this prompt (because of the Upgrade switch used with setup.exe), but if it does, be sure to choose the upgrade option. Otherwise, Setup will overwrite your applications and settings.
The amount of time that it takes to complete the upgrade can vary widely. Eventually though, the upgrade process should complete. You can see the newly upgraded Windows OS in the next figure.
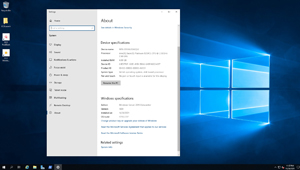 [Click on image for larger view.] Figure 5: The upgrade process is done.
About the Author
Brien Posey is a 22-time Microsoft MVP with decades of IT experience. As a freelance writer, Posey has written thousands of articles and contributed to several dozen books on a wide variety of IT topics. Prior to going freelance, Posey was a CIO for a national chain of hospitals and health care facilities. He has also served as a network administrator for some of the country's largest insurance companies and for the Department of Defense at Fort Knox. In addition to his continued work in IT, Posey has spent the last several years actively training as a commercial scientist-astronaut candidate in preparation to fly on a mission to study polar mesospheric clouds from space. You can follow his spaceflight training on his Web site.