How-To
Revisiting Windows Subsystem for Linux: CLI Installation
Over the past four years, I have written extensively about Windows Subsystem for Linux (WSL), and I have seen it grow during that time from being a mere curiosity to a mature product that has found use in a wide variety of fields. In fact, HP recently announced an offering for high-performance workflows that combines ZCentral Software and Teradici CAS with WSL.
For those who are unfamiliar, WSL allows you to run various Linux distributions on Windows 10, Windows 11 and Windows Server 2019. Instead of using virtual machines (VMs), WSL uses a compatibility layer that allows Linux binary executables to run natively on Windows. One of the neat things about WSL is that it can even read and write files from the Windows system.
In this article, I will show you how to install WSL using the command line and then access files from the base Windows system. In a follow-up article, I will show you how set up WSL to use a graphics system. To discover how to install WSL using the Windows GUI interface, you can find my previous articles here and here.
Installing WSL
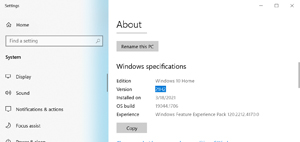
To install WSL, you will need to be running Windows version 1909 or higher. To confirm which version you are running, enter about in the Windows Start box and click About Your PC. As you can see in the screenshot below, my system is currently running version 21H2.
 [Click on image for larger view.]
The wsl command is used to install WSL and different distributions on it. To use the wsl command, you will need to have an elevated command prompt, which you can get by entering cmd in the Windows Start box and selecting Run as Administrator.
 [Click on image for larger view.]
To see all the options that can be used with wsl, enter wsl --help.
To install WSL with the default distribution (Ubuntu), enter wsl --install.
 [Click on image for larger view.]
Even though I already had WSL installed, I got an error message that the default distribution was not installed and that I need to reboot my system. After doing so, I noticed a window that told me that Ubuntu was being downloaded.
 [Click on image for larger view.]
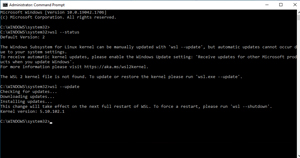
Then I got an error message that WSL requires an update to its kernel.
 [Click on image for larger view.]
I brought up an elevated command prompt and entered wsl --status. This informed me that the WSL kernel was not found.
 [Click on image for larger view.]
As instructed, I entered wsl --update. The kernel was installed, and I was told to reboot my system.
The status switch then said that WSL was installed and running kernel version 5.10.102.1.
I entered wsl --list and was informed that a distribution was not installed, so I entered wsl --list --online to see what distributions were currently available.
 [Click on image for larger view.]
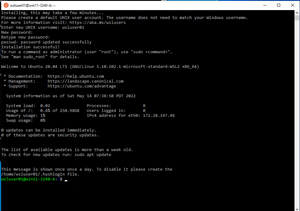
I installed the latest version of Ubuntu by entering wsl --install --distribution ubuntu. After a few seconds, a new window popped up and I was asked for a username (wsluser01) and password. At that point, I was presented with a Linux command prompt.
 [Click on image for larger view.]
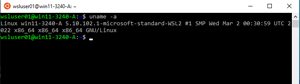
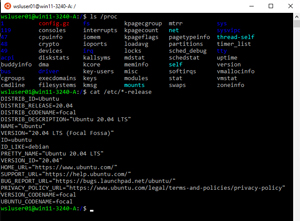
I entered uname -a and was shown Linux kernel information.
 [Click on image for larger view.]
The proc directory holds information about processes and the system.
When I entered ls /proc, I was shown a Linux proc directory. I entered cat /etc/*-release and found the same information I normally would see on a "regular" Ubuntu system.
 [Click on image for larger view.]
I was curious to see what kind of resources the system had, so I entered lshw and ip a and I found information about the system's CPU, memory and IP address. My Windows system had an IP address starting with 10, but the IP address on the WSL system started with 172; however, I could still ping outside IP address and resolve external hostnames.
 [Click on image for larger view.]
Software
I was interested in discovering what packages were installed on WSL, and if I could install additional software on it. I entered apt list which brought up a list of more than 6,000 packages.
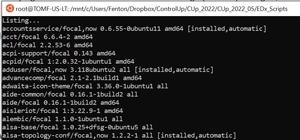 [Click on image for larger view.]
I also found that I could automatically download and install packages using the apt command.
I exited the Ubuntu command line by entering exit and the command-line window disappeared. To bring up WSL, I entered Ubuntu in the Start text box and clicked it.
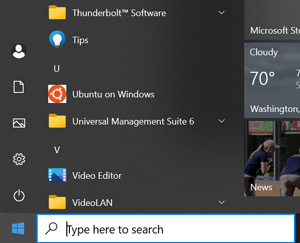 [Click on image for larger view.]
By entering wsl -l, it listed the installed distribution (Ubuntu) and wsl -l --online listed all the Linux distributions that could be installed on the system.
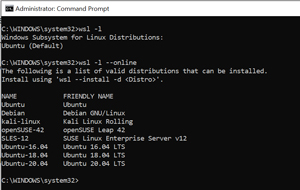 [Click on image for larger view.]
I could bring Ubuntu up from the command line window by entering ubuntu.
 [Click on image for larger view.]
In this article, I showed you how to install Linux on a Windows 10 system. While installing it, I did hit a few snags, but they were easy to overcome. WSL allows you to run Linux on the same system as Windows without worrying about having it in a VM. By having Linux running, you can run Linux-only applications and use the rich set of commands that Linux comes with.
In the next article in this series, I will install a third-party monitoring product on my Ubuntu and take a look at how easy it is to access Windows files from it, and how easy it is to access the files stored on Linux from Windows.
About the Author
Tom Fenton has a wealth of hands-on IT experience gained over the past 30 years in a variety of technologies, with the past 20 years focusing on virtualization and storage. He previously worked as a Technical Marketing Manager for ControlUp. He also previously worked at VMware in Staff and Senior level positions. He has also worked as a Senior Validation Engineer with The Taneja Group, where he headed the Validation Service Lab and was instrumental in starting up its vSphere Virtual Volumes practice. He's on X @vDoppler.