How-To
Configure Single Sign On for AWS, Part 2: Granting Access
After earlier detailing basic setup, Brien shows how to grant SSO access to your AWS and cloud accounts.
In the first part of this article series, I showed you how to assign an identity source to AWS SSO. Now I want to wrap things up by showing you how to grant SSO access to your AWS accounts and your cloud applications.
The first thing that you are going to need to do is to tell AWS which Active Directory objects you are going to need to sync. To do so, go to the console's Settings tab and then choose the Manage Sync option from the Actions drop-down. This will take you to the Manage Sync page. Now, click the Add Users and Groups button, shown in Figure 1, and then supply the names of any Active Directory users or groups that you want to enable for single sign on.
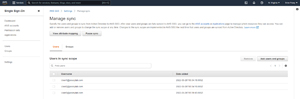 [Click on image for larger view.] Figure 1: You will need to choose the users and groups that you want to enable for single sign on.
The next step in the process is to manage SSO access to your AWS accounts. This step essentially maps Active Directory accounts to AWS accounts. It is worth noting that it can take a while for synchronized Active Directory accounts to show up in this step.
To get started, go back to the Single Sign-On Dashboard and then click on Step 2: Manage SSO Access to Your AWS Accounts. Upon doing so, you will be taken to a screen that displays your organizational structure. You will need to select the checkboxes that correspond to the users and/or groups to whom you want to provide SSO access. You can see an example of this in Figure 2.
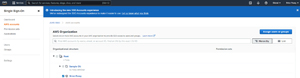 [Click on image for larger view.] Figure 2: Select the accounts for which you wish to enable SSO access.
As you can see in the figure above, the console displays accounts within the context of your organizational structure. If you find that this arrangement makes it difficult to locate the accounts that you are interested in, there are a couple of other options. One option is to click the List icon to see a list of users. Another option is to use the search box to locate a particular user.
When you have selected one or more users, click on the Assign Users or Groups button. When you do, you will see a screen prompting you to select one or more users or groups that you want to give your selected users access to. This screen displays the accounts that have been synchronized from your Active Directory, as shown in Figure 3. As previously noted, it can take a while for the accounts to show up on this screen. Make your selection and click Next.
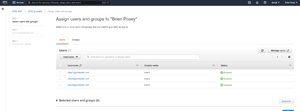 [Click on image for larger view.] Figure 3: Choose the Active Directory accounts to enable for SSO.
Click Next and you will be prompted to specify the level of access that the users and groups have to an AWS account. No permissions exist by default, so you will have to click the Create Permission Set button and then choose the permissions that you want to use. There are predefined permission sets available (such as Admin, Billing and so on), or you can create your own custom permission set.
Make your selection and click Next. You will now be taken to the Review and Submit screen. Take a moment to verify the settings that you have used and then click the Submit button to complete the process.
The third step in setting up SSO is to enable SSO access to your cloud applications. The steps involved tend to vary significantly from one application to the next. Many applications include an option to require users to log in using SAML. You can enable this option and then paste the AWS SSO sign-in URL into that field. Depending on the application, you may also have to provide an SSO certificate.
The basic process that is involved in providing application access is to go to the Single Sign-On Dashboard and click on Step 3 Manage SSO Access to Your cloud Applications. This takes you to a page where you can select the application that you want to add.
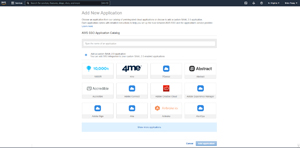 [Click on image for larger view.] Figure 4: Select the application that you want to add.
When you make your selection and click the Add application button, you will be taken to a screen that allows you to provide a display name and description for the application, although this information is populated by default. More importantly, the page provides you with a series of URLs, a link to download an SSO certificate, and a link to instructions for SSO enabling the application. These instructions are unique to each application.
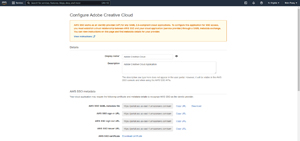 [Click on image for larger view.] Figure 5: Amazon provides all of the information that you need to SSO enable an application.
About the Author
Brien Posey is a 22-time Microsoft MVP with decades of IT experience. As a freelance writer, Posey has written thousands of articles and contributed to several dozen books on a wide variety of IT topics. Prior to going freelance, Posey was a CIO for a national chain of hospitals and health care facilities. He has also served as a network administrator for some of the country's largest insurance companies and for the Department of Defense at Fort Knox. In addition to his continued work in IT, Posey has spent the last several years actively training as a commercial scientist-astronaut candidate in preparation to fly on a mission to study polar mesospheric clouds from space. You can follow his spaceflight training on his Web site.