How-To
Hands-On Review: Inovato Quadra Plus (Raspberry Pi Alternative)
The less-expensive Quadra is a better fit than Raspberry Pi for those who want/need a low-cost software platform to use and experiment with.
In a recent series of articles (starting here), I've looked at the Inovato Quadra, a product that has been positioned as a low-cost alternative to a Raspberry Pi (RPi). After spending quite a bit of time with the Quadra, however, I've come to the conclusion that it fits a different need/market than an RPi.
While the RPi, with its 40-pin GPIO header, may be a better fit for makers, tinkerers or anyone who wants to experiment with hardware-level connectivity to a computer, the Quadra is about half the price of an equivalent RPi once you factor in the price of a case and power supply needed for the RPi. Thus, the Quadra is a better fit for those who want/need a low-cost software platform to use and experiment with.
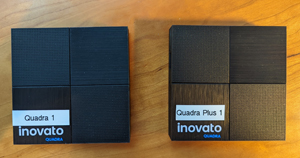
When I wrote my first articles on the I Quadra, there was only a basic $30 option available; the more expensive ($40) Quadra Plus model at the time was back-ordered. However, the Plus has since come back in stock, and I was able to order one.
On their site, Inovato states that the Quadra Plus has "Everything in the Quadra mini-PC PLUS 6x faster WiFi, Bluetooth 4.2 and a USB hub." You can buy an upgrade kit for $10 if you already have the standard kit.
 [Click on image for larger view.]
In this article, I will first look at the Quadra Plus's hardware and the features that make it different from the basic Quadra model, and then I'll give my final thoughts on it.
Heat Issues with the Device
In my previous articles, I've pointed out that the device tends to overheat under a heavy load such as running high-definition videos. Inovato acknowledges this limitation and does not recommend it for such uses. However, on their forums, there are 3D-printable plans for a fan stand for the device that should address this overheating issue. I am working on obtaining a fan and hope to have a follow-up article on it soon.
Specifications
Below is a list of the components that make up the Quadra Plus (taken from the Inovato web site):
CPU - Allwinner H6 quad-core A53 ARM v8 64-bit SoC, 1.7ghz
RAM - 2GB DRAM
Storage - 16GB eMMC (ROM) with OS pre-installed on it
MicroSD Slot - Not used for the OS, but has been shown to work with 1TB cards
HDMI Port - Resolution default 1920px1080p; video playback typical 360p
WLAN - Dual Band Wi-Fi 5 (802.11ac)
Bluetooth - Bluetooth 4.2 / Blu
USB - 4 free (1x3.0, 3x2.0 in included USB hub)
Power In - 5v 2a power adapter included
Size - 92mm x 92mm x 22mm tall (3.62" x 3.62" x 0.86")
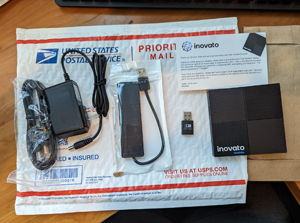
What Came in the Envelope
The device was shipped from Portland, Ore., the same day that I ordered it and it came two days later via a USPS Priority Mail padded envelope.
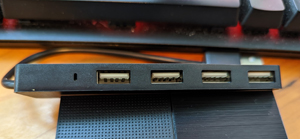
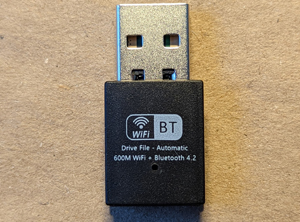
Like the basic version, the envelope contained the device, a power supply, an HDMI cable and an instruction sheet that thanked me for the order and provided basic instructions along with a link to the device's "Getting Started" web site. It also included a four-port USB hub and a Wi-Fi and Bluetooth dongle.
 [Click on image for larger view.]
The hub was generic without any markings. It did have white USB ports which usually signifies USB 1.0 or 2.0.
 [Click on image for larger view.]
The dongle was marked with Wi-Fi and Bluetooth icons and said 600M + Bluetooth 4.2.
 [Click on image for larger view.]
The device was identical to the basic version. The dongle and hub supply the additional capabilities to the device. In fact, as of now, you can simply order the hub and dongle from Inovato for around $10 for those who want to upgrade their existing Quadra.
 [Click on image for larger view.]
Despite having taken the device apart in my article on the basic version, I didn't feel that it was necessary to take this one apart. You can see the innards of the device here. As a side note, Inovato makes it very clear that the Quadra is a repurposed T95 Mini TV box that runs a Linux rather than Android OS.
Boot Up
I plugged the device into a 4K monitor, and plugged in the USB adapter for my Lenovo wireless keyboard and mouse, along with a power adapter, to the device. I did not plug in the blue dongle or hub.
The device booted up and recognized the monitor, keyboard and mouse without any issues. Afterwards, I was presented with the Inovato screen and prompted for a password. After entering the password (1n0v@t0), a desktop appeared.
 [Click on image for larger view.]
Following the instructions in the Getting Started guide, I was able to change the password, connect the device to my wireless network and launch a few applications without difficulties.
Installing the Hub
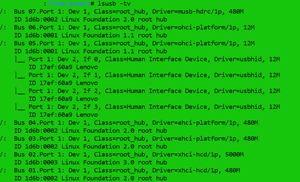
Before plugging in the hub, I looked at the USB layout of the device by entering lsusb -t from a an SSH session that I opened to the device.
 [Click on image for larger view.]
The output of this showed, among other things, that my Lenovo keyboard and mouse dongle were attached to Bus 05, Port 1.
The Universal Serial Bus (USB) specification stipulates five data transfer rates:
USB 1.0/Low-Speed: 1.5 Megabits per second (Mbps)
USB 1.1/Full-Speed: 12 Mbps
USB 2.0/Hi-Speed: 480 Mbps
USB 3.0/SuperSpeed: 5 Gbps
USB 3.1/SuperSpeed: 10 Gbps
The output showed Bus 05 was a USB 1.1 at 12 Mbps, and that Bus 2 was a USB 3.0 at 5000Mbps (5 Gbps).
I unplugged the Lenovo dongle and plugged in the hub. I entered dmesg and verified that a four-port USB 2.0 hub was detected.
 [Click on image for larger view.]
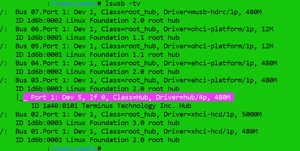
The Lsusb -tv command confirmed that the four-port hub was added.
 [Click on image for larger view.]
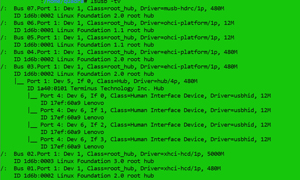
I plugged the Lenovo dongle into the port and the dmesg and lsusb commands showed that it was connected.
 [Click on image for larger view.]
I tested, and was able to use, the hub with various USB components, including keyboards, mice, cameras and USB drives.
Testing Bluetooth
I plugged the Bluetooth/Wi-Fi adapter into the 3.0 USB port, and the lsusb command showed that it had been found as a Realtek RTL8821CU, which supports 802.11 ac/abgn, 802.11ac 1x1, Wave-2 compatible with MU-MIMO and Bluetooth 4.2.
 [Click on image for larger view.]
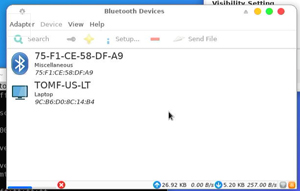
From the Quadra desktop, I was able to pair it to my laptop using Bluetooth.
 [Click on image for larger view.]
Testing the Wi-Fi
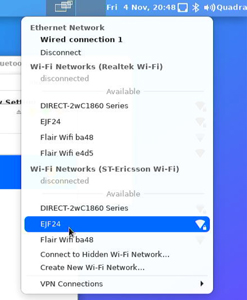
I saw a second Wi-Fi NIC (Realtek) on my system, and I managed to configure it to my wireless network as expected.
 [Click on image for larger view.]
By entering ip -a, I saw that the new NIC was identified as wlan0.
 [Click on image for larger view.]
The dongle is advertised as having a Wi-Fi 5 / 802.11ac. Wi-Fi 5 has a theoretical maximum data transfer speed of 6.9 Gbps. In my experience, the 802.11ac standard has an average data speed of about 200Mbps.
To test the network performance of the device, I used iPerf3, which creates a network load between two systems and then reports the bandwidth, delay jitter, and datagram loss of the network.
I tested the network bandwidth between the Quadra system and a Fedora system on my network. On the Fedora system (10.0.0.219), I entered iperf3 -s to act as the iPerf3 server. On the Quadra, I entered iperf3 -c 10.0.0.219 -t 10 to act as the client. This ran an iPerf3 load test for 10 seconds (-t 10) on a wired connection, the integral Wi-Fi, and using the dongle. The wired connection used Cat6 cables and were connected via a 1Gbps router. The wireless connections went over a NETGEAR Nighthawk Wi-Fi 6 Router (RAX120). I plugged the dongle into the USB 3 port of the Quadra.
It needs to be noted that I wanted to test the effectiveness of the Wi-Fi dongle in a real-life situation and not under ideal conditions.
|
Connection
|
Sent
Bandwidth
|
Received
Bandwidth
|
|
Wired (eth0)
|
94.7 Mbits/sec
|
93.8 Mbits/sec
|
|
Integral Wi-Fi
(wlan0)
|
12.7 Mbits/sec
|
12.3 Mbits/sec
|
|
Dongle Wi-Fi
(wlan1)
|
117 Mbits/sec
|
115 Mbits/sec
|
In my testing, I found that by using the dongle I was able to achieve over 115 Mbps, which was slightly better than my wired connection, and over nine-times better than the speed that I achieved over the integral Wi-Fi.
 [Click on image for larger view.]
Summary
In my ad-hoc testing, I found that the dongle greatly increased the flexibility of the Quadra by allowing me to connect to Bluetooth devices and greatly increase the speed of my Wi-Fi connection. I found the hub so useful that I ended up using a piece of double-sided sticky tape to attach the hub to the side of the Quadra. For $10, these are both very reasonably priced for the usefulness that they provide.