How-To
Troubleshooting RDP Connection Problems with AWS EC2 Windows Instances
Other the years, I have created more EC2 instances on the AWS cloud than I can count. Normally, establishing an RDP connection to a Windows instance is effortless. Every once in a while though, you may find yourself looking at an error message like the one shown in Figure 1, indicating that the Windows RDP client cannot connect to the instance. Fortunately, it's usually pretty easy to fix this problem. In this article, I will show you how to resolve some of the more common causes of RDP connection failures.
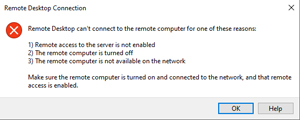 [Click on image for larger view.] Figure 1: The RDP client failed to connect to the EC2 instance.
The first reason why you may be unable to connect to the EC2 instance has to do with the instance creation process. If you want to establish an RDP connection to a Windows instance, that instance will need to be equipped with a public IP address. In the past, the instance creation process automatically assigned a public IP to the instance. Somewhere along the way however, Amazon made a change and now you have to explicitly tell EC2 that the instance needs a public IP.
To assign a public IP address to an instance that you are creating, click the Edit button found in the console's Network Settings section and then set the Auto Assign Public IP option to Enable, as shown in Figure 2.
 [Click on image for larger view.] Figure 2: Set the Auto Assign Public IP option to Enable.
A second reason why you might have trouble establishing an RDP session with a Windows instance is because the security group that's associated with the instance does not allow RDP traffic. Normally, when you create a Windows instance (and you choose to create a new security group with the instance), the RDP rule is automatically created. Even so, I have occasionally modified a security group and accidentally deleted the RDP rule in the process. There have also been times when I tried to reuse an old security group, only to discover that it was originally created for a Linux instance and therefore did not include an RDP rule.
The easiest way to make sure that the security group contains the required rule is to click on the instance within the EC2 console and then select the instance screen's Security tab. This tab will show you the name of the security group that the instance is using. It will also list the security group's inbound and outbound rules. You should have an inbound rule that allows TCP traffic on Port 3389, as shown in Figure 3.
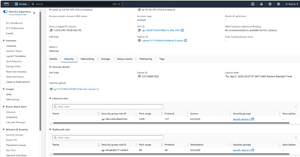 [Click on image for larger view.] Figure 3: RDP traffic uses TCP port 3389.
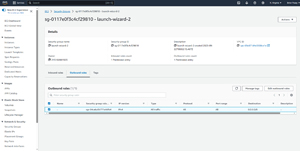
If the required rule is missing, then just click on the security group link, select the Inbound Rules tab, and then click on the Edit Inbound Rules button. Now, click on the Add Rule button and add a rule like the one shown in Figure 4. Be sure to click on the Save Rules button when you are done.
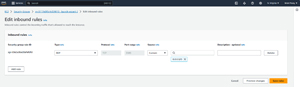 [Click on image for larger view.] Figure 4: Your security group must allow RDP traffic.
There is one more thing that commonly causes RDP connectivity failures. When an RDP client attempts to connect to an EC2 instance, it does so over TCP port 3389. Once the client reaches the instance however, the instance must be able to respond. If the instance fails to respond to the connection request, then you will receive an error like the one shown in Figure 1.
You don't need to create any security group rules in order for the instance to be able to respond to RDP connection requests. An existing outbound rule allows all outbound IPv4 traffic, as shown in Figure 5. It's a good idea to double check to make sure that this rule exists, but the rule itself is not normally the problem.
 [Click on image for larger view.] Figure 5: A default rule allows all outbound IPv4 traffic.
If you have checked your security group and are still having trouble establishing an RDP session, then my recommendation would be to go back to the instance configuration screen and double check to see which VPC the instance resides in (the VPC ID is listed on the Details tab). Make note of the VPC ID (not just the VPC name) that is being used.
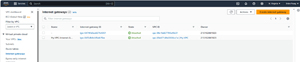
Next, open the VPC console, click on the VPC, and then click on the Internet gateways tab. The instances within the VPC will be unable to send outbound traffic unless there is an Internet gateway associated with the VPC. If no Internet gateways exist, then you simply need to create one. If one or more Internet gateways are present, then check the VPC ID associated with the Internet gateways to see if there is an Internet gateway for the VPC that the instance is connected to.
If you look at Figure 6 for example, you can see that my instance is in a VPC named My-VPC with a VPC ID of vpc-03e871d4e3308ce1e. If you look at the Internet gateways screen shown in Figure 7 however, you can see that while an Internet gateway is present, the VPC ID does not match the VPC where my instance resides. Hence, it is necessary to create a new Internet gateway.
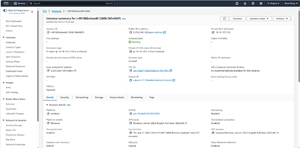 [Click on image for larger view.] Figure 6: The Instance Summary screen lists the instance's VPC.
 [Click on image for larger view.] Figure 7: There is no Internet gateway for the specified VPC.
Creating an Internet gateway is a simple process. Click the Create Internet gateway button, supply a name for the gateway, and then click the Create Internet gateway button. Next, click the Attach to a VPC button and select your VPC. Click the Attach Internet gateway button to complete the process. You can see the newly created gateway in Figure 8.
 [Click on image for larger view.] Figure 8: A new gateway has been created for the VPC.
If you are still unable to establish an RDP session, even after creating an Internet gateway, then you may need to update the routing tables. To do so, open the VPC console, click the Route Tables tab, and then click on the routing table associated with your VPC. If you look at Figure 9, you can see that this routing table contains a route for the local subnet, but there is no route for internet traffic.
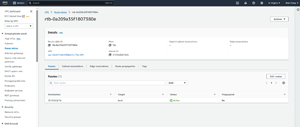 [Click on image for larger view.] Figure 9: The routing table is incomplete.
To add the missing route, click on the Edit Route button and then click Add Route. Set the destination to 0.0.0.0/0 and set the target to Internet gateway (you will then need to specify the gateway that you want to use). Click the Save Changes button, shown in Figure 10, and you should be good to go.
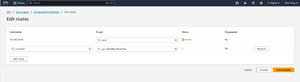 [Click on image for larger view.] Figure 10: Route traffic destined for the Internet (0.0.0.0/0) to the Internet gateway.
About the Author
Brien Posey is a 22-time Microsoft MVP with decades of IT experience. As a freelance writer, Posey has written thousands of articles and contributed to several dozen books on a wide variety of IT topics. Prior to going freelance, Posey was a CIO for a national chain of hospitals and health care facilities. He has also served as a network administrator for some of the country's largest insurance companies and for the Department of Defense at Fort Knox. In addition to his continued work in IT, Posey has spent the last several years actively training as a commercial scientist-astronaut candidate in preparation to fly on a mission to study polar mesospheric clouds from space. You can follow his spaceflight training on his Web site.