10 Tweaks You Should Make to vSphere, Post-Installation
For the most part, I live in a world of default configurations. There are, however a number of small tweaks that I do to ESXi hosts after they have been installed to customize my configuration.
While this list is not specific-enough to work everywhere, chances are you will pick up something and say "Oh, yeah, that's a good idea!" I don't include specific networking or storage topics, as they apply to each specific environment, but this generic list may apply to you in each of your virtualization practices. Most if not all of these settings can be pushed through vSphere Host Profiles, but I don't always work in environments licensed to that level.
Here we go!
1. Set DNS.
Get DNS right. Get DNS right. Get DNS right. Specifically, I set each host to have the same DNS servers and suffixes. This also includes getting the hostname from localhost changed to the proper local FQDN. You are renaming your hosts from localhost, aren't you?
2. Create the DNS A record for the host.
Just to ensure your impeccable DNS configuration from step 1 is made right.
3. Set NTP time servers.
Once DNS is set correctly, I set the hosts to use this pool of NTP servers: 0.north-america.pool.ntp.org, 1.north-america.pool.ntp.org, 2.north-america.pool.ntp.org, 3.north-america.pool.ntp.org. This is set in the host configuration via the vSphere client (see Fig. 1).
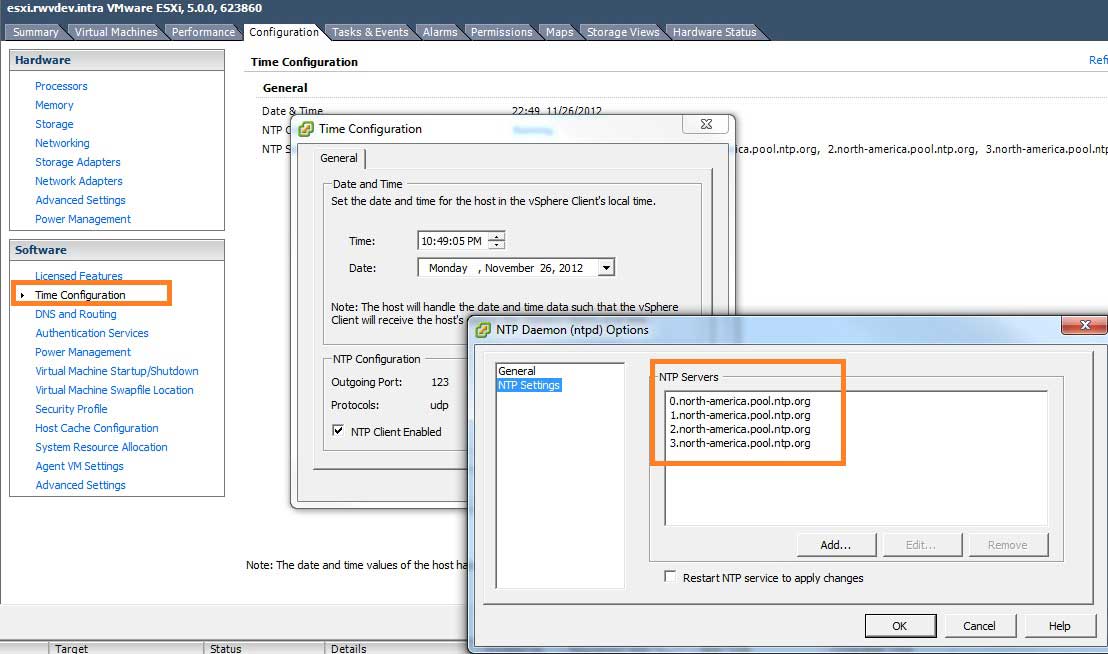 |
Figure 1. The NTP authoritative time server list is configured in the vSphere Client. (Click image to view larger version.) |
4. Raise the maximum number of NFS datastores.
I work in a world where we have multiple NFS datastores, including some that come and go. I did write an earlier blog post on this topic which you can read here.
5. Disable the SSH warning when it is enabled.
I'm sorry, sometimes I need to troubleshoot via the command line and I don't really want to get up from my desk. SSH does the trick. VMware KB 2007922 outlines how to suppress this warning in the vSphere Client.
6. Install correct licensing for the host.
Duh. This will get you in 90 days if you don't do it now.
7. Set any VM's for automatic startup.
This is an important feature when there is a problem such as a power outage. I recommend putting virtualized domain controllers and network infrastructure (DHCP/DNS) first, then critical applications but not necessarily everything else.
8. Set enable vMotion on vmkernel.
Not sure why this isn't a default. Of course environments with multiple vmkernel interfaces will need to granularly direct traffic.
9. Rename local datastores.
Nobody likes an environment littered with datastore, datastore (1), datastore (2), etc. I recommend a nomenclature that self-documents the datastore. I have been using this format: DAS-HostName-LUN1. DAS stands for direct attached storage, HostName is the shortname (not localhost!) for the ESXi system, and LUN1 would be the first (or whichever subsequent) volume on the local system. If you don't want to use direct attached storage, you can delete the datastore as well; the ESXi hosts partitions will remain. If you are using ESX 4.1 or earlier, don't do this however.
10. Test your remote access options.
This can include SSH, a hardware appliance such as KVM, Dell DRAC, HP iLO or others. You can't rely on something you can't support.
That is my short list of tips and tricks for post-installation tips and tricks for generic ESXi host installations. Do you have any post-install tips? Share your tips in the comments section!
Posted by Rick Vanover on 12/19/2012 at 12:48 PM