How-To
Using a SATA SSD Drive with ESXi on Arm on a Raspberry Pi
Yes, Tom Fenton uses ESXi on a Raspberry Pi, but with an added twist: using an M.2 SATA SSD device for USB storage.
In previous articles I wrote about ESXi on Arm (located here, here and here), I provided an overview of requirements to install ESXi on a Raspberry Pi 4 B system, as well as explained how to create a VMFS filesystem on a USB drive and use USB drives as a datastore for virtual machines (VMs).
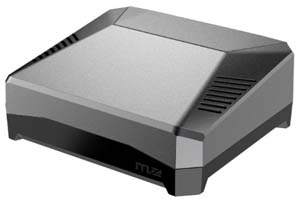
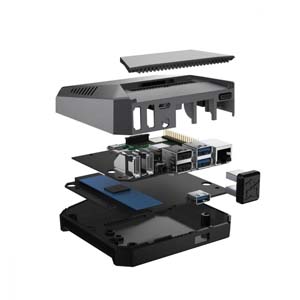
In this article, I will be using ESXi on a Raspberry Pi, but with an added twist: I will be using an M.2 SATA SSD device for USB storage. For this build, I will be using a Raspberry Pi 4 B with 8 GB of RAM in an Argon M.2 case that supports an internal SATA M.2 device.
 [Click on image for larger view.]
For storage, I will be using an M.2 SATA SSD and a 256GB thumb drive. I will also be using an Ubuntu VM to test the SATA drive to see what kind of throughput I can get from the M.2 drive.
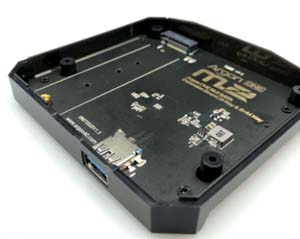
Although others have used SSD drives with ESXi on Arm (most notably William Lam), they have used external enclosers to house the SSD. The Argon case is a little bit different in the sense that the SSD is housed within the case and connects to the Pi via a U-shaped USB connector.
 [Click on image for larger view.]
The case supports M.2 NGFF Key B or B+M SATA SSDs. The M.2 device can be a 2280, 2260, 2242, or 2230 form factor. The SSD uses an ASMedia Technologies ASM1153E chipset and supports up to a 6 Gbps transfer speed. The top of the case is made from aluminum alloy that, along with a 30mm fan, allows for cooling. The top also has a magnetically attached panel that allows you to access the GPIO pins. The bottom of the case, which houses the M.2 device, is made of black translucent plastic. The MSRP for the Argon M.2 case is $45.
The box that the Argon case came in had an M.2 SATA SSD to USB 3.0 board, instruction manual, video/audio PCB extender, GPIO – Fan PCB Hat, and silicone thermal pads. The case is compatible with Raspberry Pi 4. As expected, the case is lilliputian at 4.1” x 3.6” x 1.5” (105 x 93 x 39mm).
This case looks almost identical to the Argon ONE that I used for my first ESXi on Arm build but is slightly taller due to the M.2 SATA to USB carrier board. The top and bottom of the case have slots for cooling. The back of the device has seven connection ports: two mini-HDMI, one USB C (power only), two USB 2.0, and two USB 3.0 (one of which is designed to connect to the SSD). The back also contains an RJ45 1Gb Ethernet port and the power button.
 [Click on image for larger view.]
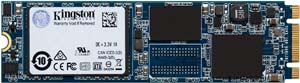
The SSD that I will be using in this device is a Western Digital Blue 500GB M.2 internal SSD (WDS500G2B0B). It has a SATA III 6 Gb/s interface and is rated up to 560 MB/s. I purchased it from Amazon for $54.
 [Click on image for larger view.]
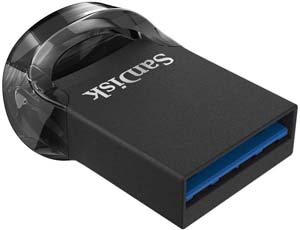
For VM storage, I will be using a SanDisk 256GB Ultra Fit USB 3.1 Flash Drive (SDCZ430-256G-G46) plugged in to one of the USB 2.0 ports. I purchased it from Amazon for $31.
 [Click on image for larger view.]
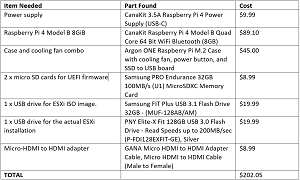
The complete build list for the device is listed in the table below.
| Item Needed |
Part Found |
Cost |
| Power supply |
CanaKit 3.5A Raspberry Pi 4 Power Supply (USB-C) |
$9.99 |
| Raspberry Pi 4 Model B 8GiB |
CanaKit Raspberry Pi 4 Model B Quad Core 64 Bit WiFi Bluetooth (8GB) |
$89.10 |
| Case and cooling fan combo |
Argon ONE Raspberry Pi M.2 Case with cooling fan, power button, and SSD to USB board |
$45.00 |
| 2 x micro SD cards for UEFI firmware |
Samsung PRO Endurance 32GB 100MB/s (U1) MicroSDXC Memory Card |
$8.99 |
| 1 x USB drive for ESXi ISO image |
Samsung FIT Plus USB 3.1 Flash Drive 32GB - (MUF-128AB/AM) |
$19.99 |
| 1 x USB drive for the actual ESXi installation |
PNY Elite-X Fit 128GB USB 3.0 Flash Drive - Read Speeds up to 200MB/sec (P-FDI128EXFIT-GE), Silver |
$19.99 |
| Micro-HDMI to HDMI adapter |
GANA Micro HDMI to HDMI Adapter Cable, Micro HDMI to HDMI Cable (Male to Female) |
$8.99 |
| TOTAL |
|
$202.05 |
If the above table doesn't display well on your device, here's a graphic that might look better:
 [Click on image for larger view.]
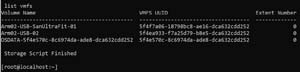
I installed ESXi on the Pi following the steps I listed in my previous write-up (located here). I placed the SATA SSD in the lower half of the case, but I did NOT put the U-shaped USB connector on the case during the initial install as I didn’t want to access the SATA drive right away.
After ESXi was installed, I accessed it using SSH, started my AutoMountUSB script (located here), plugged in the U Connector on the Argon case, and created a datastore on it.
 [Click on image for larger view.]
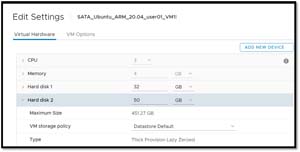
I used vSphere Console to add a 50GB virtual disk to my Ubuntu VM to see how it would appear on a guest VM.
 [Click on image for larger view.]
I entered the following commands in the Ubuntu shell to examine the device:
lshw -C disk
fdisk -l ## (this showed the 50GiB drive as
/dev/sdb)
hdparm -I /dev/sdb ## (this showed a VMware virtual SATA hard drive)
I entered the following commands to get basic performance data from the drive:
hdparm -Tt /dev/sdb ## (this showed cache and buffer reads)
dd if=/dev/zero of=/dev/sdb bs=4k count=5M ## get basic performance info
To get a more definitive rating of the drive, I used fio to run a random write 4k test:
fio --filename=/dev/sdb --ioengine=libaio --rw=randwrite --bs=4k --numjobs=1 --size=4g --iodepth=32 --runtime=300 --time_based --end_fsync=1 --name=4krandwrite --minimal --status-interval=15
I then ran a random 80 percent read, 20 percent write, 4k write mix:
fio --filename=/dev/sdb --ioengine=libaio --rwmixread=80 --bs=4k --numjobs=1 --size=4g --iodepth=32 --runtime=300 --time_based --end_fsync=1 --name=4krandwrite --minimal --status-interval=15
For comparison, I placed a Samsung 128GB thumb drive in the USB 3 and USB 2 ports and reran the tests on it. I’ve listed the results of this test in the table below.
| SATA SSD
USB 3
|
Thumb Drive
USB 3
|
Thumb Drive
USB 2
|
|
| Hdparm -Tt Cached Read
|
835MBs |
835MBs |
833MBs |
| Hdparm -Tt Buffered Read
|
99MBs |
60MBs |
314MBs |
| DD |
54MBs |
28MBs |
|
| Fio 4K Random Read
|
32MiBs / 8121 IOPS |
25 MiBs / 6075 IOPS |
11 MiBs / 3004 IOPS |
| Fio 4K 80/20 R/W
|
7.8MiBs / 1993 IOPS (R)
1.9MiBs / 500 IOPS (W)
|
4MiBs / 1279 IOPS (R)
1.25MiBs / 321 IOPS (W)
|
1.3MiBs / 343 IOPS (R)
0.3MiBs / 86 IOPS (W)
|
If the above table doesn't display well on your device, here's a graphic that might look better:
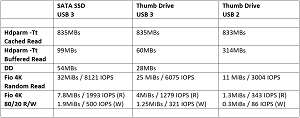 [Click on image for larger view.]
Observations on Testing
Both the SSD and thumb drive reported about two to five times the performance of the thumb drive on the USB 2 port. The hdparm test, which only ran for a few seconds, showed far better performance than the longer test, leading me to believe that there was some caching or buffering going on.
As this was just ad-hoc testing, I was not surprised to find that the performance of the SSD did not come close to matching the theoretical performance of the USB 3.0 bus (625MBs) or the M.2 device (560 MBs). There are many reasons why this could have been occurring, such as the fact that the USB and ethernet ports share the same bus, or I was running a fling from VMware that probably hadn’t been entirely flushed out for performance, or the Ubuntu that I was running the test from was a VM, or any of the many other factors that can cause bottlenecks. In any case, I want to investigate this issue further to see what other devices to see the performance on them.
Conclusion
As with the Argon ONE case that I previously used, I was impressed with the build quality of the Argon One M.2 case. I like the ability to use an M.2 SATA device with the Raspberry Pi as it increases the capacity and is more performant than using a thumb drive.
Note: Argon makes an M.2 base that can be used by those who have already purchased an Argon One case. The downside to this case is that only supports SATA devices, and not NVMe devices which are more popular.