How-To
Adding a USB Datastore and Creating a VM on ESXi on Arm
After previously writing about installing ESXi on Arm on a Raspberry Pi, Tom Fenton walks through the process of using a USB flash drive as a local datastore on the Pi.
In my previous articles on ESXi on Arm (located here and here), I discussed what this is and how to install it on a Raspberry Pi. In this article, I will walk you through the process of using a USB flash drive as a local datastore on the Pi, managing and monitoring the device using the ESXi Host Client, and creating a virtual machine (VM) that will run on it. Before diving into these topics, however, let's talk first about why large cloud providers are using Arm-based servers to begin with.
A prime example of why cloud providers are choosing Arm systems is with AWS Graviton2 instances using the Arm Neoverse N1 processor, which was designed in-house by Amazon. They claim the Arm Neoverse N1 delivers 7x more performance, 4x more compute cores, 5x faster memory, and 2x larger caches. They also state that it provides up to 40 percent better price/performance over AWS x86-based instances1 workloads for application servers, micro-services, high-performance computing, electronic design automation, gaming, open-source databases, and in-memory caches.
For storge on ESXi on Arm, you can either use network storage or a USB device. Using USB as a Virtual Machine File System (VMFS) storage is not officially supported, but it has been reported to work.
After enabling SSH on the ESXi server, I SSHed into the device from my laptop.
I stopped the USB arbitrator service, thereby preventing USB devices from being used as a passthrough device, by entering:
/etc/init.d/usbarbitrator stop
chkconfig usbarbitrator off
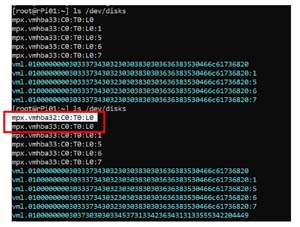
I entered ls /dev/disks, then plugged in my second USB device and re-entered ls /dev/disks, and noticed a new device with the prefix vmhba32 was shown.
 [Click on image for larger view.]
I wrote a GPT label to the device by entering:
partedUtil mklabel /dev/disks/mpx.vmhba32:C0:T0:L0 gpt
I obtained information on the sector of the device by entering:
partedUtil getptbl /dev/disks/mpx.vmhba32:C0:T0:L0.
 [Click on image for larger view.]
I calculated the end sector using the following the following formula:
15062 * 255 * 63 – 1 = 241971029
I created a partition on the device by entering:
partedUtil setptbl /dev/disks/mpx.vmhba32:C0:T0:L0 gpt "1 2048 241971029 AA31E02A400F11DB9590000C2911D1B8 0"
 [Click on image for larger view.]
I created a VMFS filesystem on the device by entering:
vmkfstools -C vmfs6 -S rPi-USB-Datastore-01 /dev/disks/mpx.vmhba32:C0:T0:L0:1
 [Click on image for larger view.]
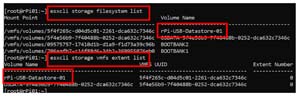
I then entered the following to get more information about the filesystems on the ESXi host:
esxcli storage filesystem list
esxcli storage vmfs extent list
 [Click on image for larger view.]
I plugged the SanDisk Ultra Fit USB thumb drive into the Pi and created another datastore called rPi-USB-Datastore-02 on mpx.vmhba34. I then had three thumb drives on the system: one for ESXi, and two for storage.
Using the ESXi Host Client
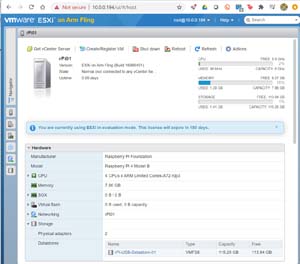
You can manage an ESXi server with the ESXi Host Client, an HTML5 web interface that connects to a single ESXi host. Once connected to the ESXi Host Client, you can create, configure, and manage VMs, networking, and storage. It was originally released as a Fling, but now comes as standard with ESXi, including ESXi on Arm.
To access the ESXi Host Client, you just point a web browser to the IP address of an ESXi server, enter root for the username, and enter the password you set when you installed ESXi on the server.
 [Click on image for larger view.]
After looking over the system and seeing my USB-backed datastores, I created a VM. The ESXi-Arm Fling Doc states that the Arm versions of Ubuntu, CentOS, OpenSUSE, Photon, Debian, and Fedora are known to work on it.
 [Click on image for larger view.]
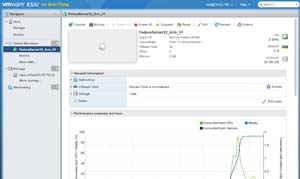
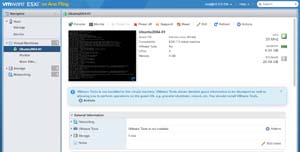
I downloaded the Ubuntu 20.04 LTS iso and used SCP to copy it over to the USB drive on my ESXi server. I also used the host client to create a 3 vCPU, 2GB RAM VM on it.
I started the VM, opened a console to it, and installed Ubuntu by using the defaults. This took longer than it did on my x86 servers, but it did get created nevertheless, and I was able to use the console and SSH to access it.
 [Click on image for larger view.]
Conclusion
I had to use the command line to create a VMFS filesystem on the thumb drives, but the process was relatively straightforward. Creating an Ubuntu VM on the server took longer than it did on my x64 servers but, again, it was straightforward and seems to be running fine so far. I don't have any initial plans for the types of workloads that I will be using the system for, but other users have discussed using them for webservers, and for general low-cost home lab machines.
About the Author
Tom Fenton has a wealth of hands-on IT experience gained over the past 30 years in a variety of technologies, with the past 20 years focusing on virtualization and storage. He previously worked as a Technical Marketing Manager for ControlUp. He also previously worked at VMware in Staff and Senior level positions. He has also worked as a Senior Validation Engineer with The Taneja Group, where he headed the Validation Service Lab and was instrumental in starting up its vSphere Virtual Volumes practice. He's on X @vDoppler.