How-To
Home Lab NAS (QNAP TS-431K) Part 2: Installation and Configuration
Tom Fenton, as part of a project to recover from an ESXi server failure, details how, after earlier introducing his QNAP TS-431K replacement, he set up the device and put an iSCSI target on it.
In a previous article I described my process in selecting a system for network storage. I then gave an overview of the specifications of the device I selected -- the QNAP TS-431K. In this article, I will walk you through how I set the device up, as well as how I set up an iSCSI target on it. In future articles, I will show you how I set up an NFS share on it and enabled it for media streaming.
Installation and Configuration
Because the TS-431K does not have any video ports, it can only be set up and configured over the network. To do this, you need to download and install Qfinder Pro on a Windows, Linux, or Mac. I went to the URL provided in the Quick Installation Guide and downloaded Qfinder Pro on my Windows 10 laptop. Qfinder Pro will automatically find QNAP NAS devices on the LAN that it is running on. It took me less than a minute to download and install it.
Following the instructions in the Quick Installation Guide, I placed an HDD (a new 4TB Seagate Barracuda) drive in a carrier, put the carrier in the device, plugged in the device, and powered it on.
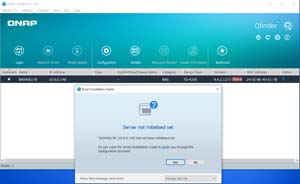
I waited for about five minutes for the device to give a long beep to signal that it had booted up. I then pressed the refresh button on Qfinder Pro, and the device was recognized. A pop-up appeared that asked me if I wanted to initialize the server, and I clicked Yes.
 [Click on image for larger view.]
This launched a web page in my browser, and it told me to click Start if I wanted to download and install the latest firmware to the TS-431K, which I did.
 [Click on image for larger view.]
It took less than a minute to download the firmware, and then about five minutes to install it and reboot the system. I was asked to give the device a name and password, set the time, and select which file services to enable.
It formatted the drive and initialized the system, a process which took about five minutes to complete (it had a countdown timer while the process was taking place) and involved a reboot.
Once my system had rebooted, I found myself stuck in an installation loop when it brought me back to the initial configuration screen and walked me through the configuration process again. I tried various configurations, but it kept bringing me back to the initial configuration screen after it said that everything was installed. Each time it did this, it took about five minutes to reboot. As the device does not have a video port, I couldn't see any error messages, and there wasn't a way to see the error logs.
I then replaced the 4TB HDD with a 2TB Seagate FireCuda drive, and I was able to successfully install and configure the device. It was frustrating that the bad drive was not being reported.
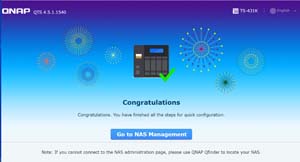
After the system had successfully installed, I clicked Go to NAS Management on the "Congratulations" screen.
 [Click on image for larger view.]
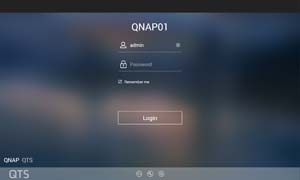
This brought up a login screen, and I logged in as admin using the password that I set when completing the initial configuration.
 [Click on image for larger view.]
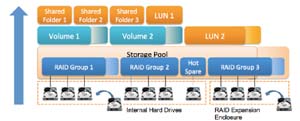
After I logged in, I was given the option to create storage on the device. The wizard walked me through the process of setting up a RAID group as my initial storage pool. I then created a 0.5TB volume on a storage pool.
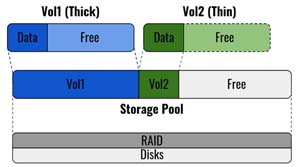
The device uses a storage topology consisting of RAID groups to present the physical devices. A RAID group is made up of one or more physical disks of the same type and capacity. As the device only supports four drives, only RAID 0 and 1 schemes are supported. One or more RAID groups are used to create a storage pool. The storage pool can then be carved out into volumes or LUNs (a LUN can reside in a volume or in a storage pool). A volume can also contain shared folders; a folder can be shared using a NAS storage protocol, such as SMB or NFS, while LUNs are used as SAN storage, such as iSCSI targets.
 [Click on image for larger view.]
QNAP supports static, thin, and thick volumes. A static volume uses the entire RAID group and does not use a storage pool. Whereas thin volumes allocate space in the storage pool as data is written into the volume, thick volumes allocate the total size of the volume upon creation.
 [Click on image for larger view.]
Setting up iSCSI
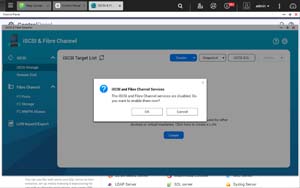
I selected iSCSI & Fibre Channel from the main drop-down menu. I was asked if I wanted to enable the iSCSI services, and I clicked OK.
 [Click on image for larger view.]
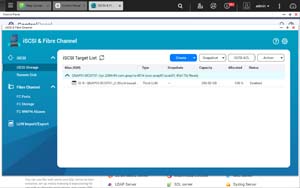
I clicked Quick Configuration Wizard, and the wizard walked me through the steps of creating an iSCSI target and assigning storage space to it. I created a 250GB LUN for the iSCSI target.
 [Click on image for larger view.]
As I wanted to use iSCSI for VM storage in vSphere, I went to my vCenter Server and created a VMFS filesystem on the iSCSI target. You can see read my article on how to do that here.
 [Click on image for larger view.]
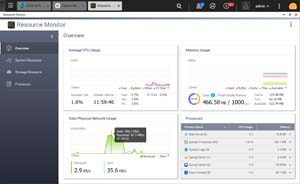
I used vCenter server to clone a VM to the iSCSI disk. It took about three minutes to copy a 32GB Ubuntu VM to the iSCSI target. I monitored the QNAP during the transfer using its Resource Monitor, which reported a maximum of 87MBs transfer rate and 4 percent CPU utilization.
 [Click on image for larger view.]
Although I will be using the TS-431K for static VM storage, I did start the VM and was able to log in to it. Its performance seemed fine for the routine tasks that I performed on it.
Setting Up SMB
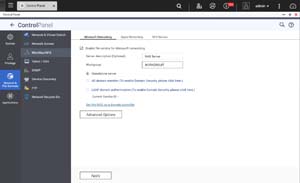
I also wanted to use the QNAP as a place for a Windows share. From the QNAP Control Panel, I selected Network & File Services, and then clicked Win/MAC/NFS. I clicked Enable file services for Microsoft networking, and selected to use it a standalone server rather than using my AD for authentication.
 [Click on image for larger view.]
From the main drop-down menu, I selected Storge & Snapshots. I saw that DataVol1 had 506GB of data. This was the volume that I created when I initially installed the device.
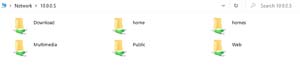
From my Windows 10 laptop, I was able to mount the share and write to it without any issues. It had six predefined folders, and I found the system to be responsive when writing to and from the share.
 [Click on image for larger view.]
Conclusion
In this article, I installed and configured the QNAP TS-431K. I have mixed feelings about it. The fact that it didn't give any indication that I had a bad HDD -- and this was specifically preventing the install to compete -- was troubling. And since it doesn't have a video port, I couldn't see any error messages that may have been displayed.
In my next article in this series, I will install some of the QNAP applications for streaming and sharing data and add additional storage to the device. Then, in my final article, I will look at using the command line on the device and adding an SSD to it to increase its performance, and close with my final thoughts about using it for VM and data storage, and streaming.
Note: Part 3 is here.
About the Author
Tom Fenton has a wealth of hands-on IT experience gained over the past 30 years in a variety of technologies, with the past 20 years focusing on virtualization and storage. He previously worked as a Technical Marketing Manager for ControlUp. He also previously worked at VMware in Staff and Senior level positions. He has also worked as a Senior Validation Engineer with The Taneja Group, where he headed the Validation Service Lab and was instrumental in starting up its vSphere Virtual Volumes practice. He's on X @vDoppler.