How-To
Creating an AWS Cloud S3 Inventory Report
There are any number of reasons why it might be useful to compile an inventory report of an S3 bucket on the AWS cloud. For starters, knowing what is in a bucket can help you to better manage data growth and the corresponding cost. Similarly, complex folder structures in S3 buckets and excessive file versions can diminish a bucket's performance. Hence, creating an inventory report for a bucket can help you to figure out whether a bucket's contents might be causing performance to suffer.
In any case, AWS makes it easy to create an inventory of your S3 buckets. To get started, open the S3 dashboard, click on a bucket and then select the Management tab, as shown in Figure 1.
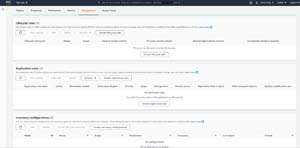 [Click on image for larger view.] Figure 1: Open a bucket and then select the Management tab.
Scroll down to the bottom of the page and locate the Inventory Configurations section. Now, click the Create Inventory Configurations button. AWS will now open the Create Inventory Configuration page, shown in Figure 2.
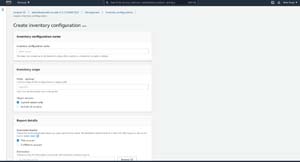 [Click on image for larger view.] Figure 2: This is the interface used to create an inventory configuration.
The first step in creating an inventory configuration is to provide an inventory configuration name. AWS is relatively flexible with regard to the name, but it can't include spaces or special characters (aside from periods and dashes).
The next section allows you to configure the inventory scope. This section determines what will be included in the inventory. One of the things that you can do in this section is to provide an optional object prefix. Only objects that use the prefix will be included in the inventory.
You can also choose whether the inventory should include only a single version of each file or if you want it to show you all of the file versions that exist. The appropriate option to choose will vary depending on why you are creating the inventory. It is worth noting however, that having an excessive number of versions can increase your costs and can also result in slow performance. As such, it can sometimes be useful to look at all of the versions that exist, even if doing so initially seems to be overkill.
Once you have decided what to include in the inventory report, it is time to begin configuring the report details. The first thing that you need to know about this process is that AWS cannot save the report to the same bucket that is being inventoried. As such, you are going to need to provide AWS with a destination bucket that can act as a repository for the inventory report that you are creating.
The first step in this process is to tell AWS whether you are planning to use your current account or a different account. Once you have done that, you can choose a destination bucket. While you can manually specify the bucket's name, it is usually going to be easier to click the Browse S3 button and select the bucket that you want to use. One of the nice things about the way that Amazon has implemented this process is that when you browse the available S3 buckets, the source bucket (the bucket that is being inventoried) is excluded from the list.
One of the things that you probably noticed in the previous screen capture is that the interface contains a block of code within a section called Destination Bucket Permissions. The reason why this code exists is because AWS has to be granted permission to write the inventory report to the destination bucket, and it uses the code shown in the Destination Bucket Permissions section to do so. Thankfully, you do not have to worry about adding this code to the destination bucket yourself. AWS will add the code automatically, on your behalf.
Scroll down and you will see an option that allows you to configure the frequency with which the inventory report is to be created (see Figure 3). You can create inventory reports on either a daily or a weekly basis. Unfortunately, the administrative interface does not give you an option to manually create one-off reports.
 [Click on image for larger view.] Figure 3: You must specify the frequency with which the report will be created.
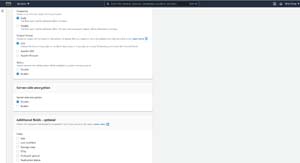
Next, you will need to choose the report's output format. In most cases, you will probably want to create the report in CSV format, but you can choose to create the report in Apache ORC or Apache Parquet instead.
The last option in this section is to select whether the inventory configuration that you are creating should be enabled or disabled. Disabling the configuration prevents the report from being created.
The last two options allow you to control whether or not you want to use server-side encryption and whether you want to include any additional fields in the report. There are a number of additional fields available and these fields may or may not be useful to you depending on why you are creating the inventory report. Some of the additional fields include Size, Last Modified, and Storage Class.
When you are done configuring the inventory report, just click on the Create button to complete the process. As you can see in Figure 4, it can take up to 48 hours for AWS to create the first report.
 [Click on image for larger view.] Figure 4: AWS confirms that the inventory report has been set up.
About the Author
Brien Posey is a 22-time Microsoft MVP with decades of IT experience. As a freelance writer, Posey has written thousands of articles and contributed to several dozen books on a wide variety of IT topics. Prior to going freelance, Posey was a CIO for a national chain of hospitals and health care facilities. He has also served as a network administrator for some of the country's largest insurance companies and for the Department of Defense at Fort Knox. In addition to his continued work in IT, Posey has spent the last several years actively training as a commercial scientist-astronaut candidate in preparation to fly on a mission to study polar mesospheric clouds from space. You can follow his spaceflight training on his Web site.