How-To
Creating AWS IAM Policies the Easy Way
It can be intimidating, but you don't need to use the IAM Management Console.
The AWS cloud's interface for creating IAM policies has always left a little bit to be desired. Although the interface works, it's a little bit messy and I have heard more than one person say that it is intimidating to those who are new to AWS. However, you do not have to use the IAM Management Console to create a new IAM policy. Amazon has a tool called the AWS Policy Generator that can help to simplify the policy creation process. In this blog post, I want to show you both techniques for creating IAM policies.
Creating a Policy in the IAM Management Console
The easiest way to create an IAM policy from within the IAM Management Console is to use the visual editor. To do so, open the IAM Management Console and then click on the Policies tab. This will take you to the IAM Policies screen, which displays all of the existing IAM policies. Even in a small organization, there will likely be hundreds of policies, because numerous AWS managed policies are created automatically.
Click the Create Policy button and you will be taken to the Create Policy screen, which you can see in Figure 1. As you can see in the figure, the visual editor is selected by default, but you can opt to use a JSON file instead. To get started, click on the Choose a Service link. At that point, you will be presented with a list of the various AWS services and you will need to pick the service for which you want to create a policy.
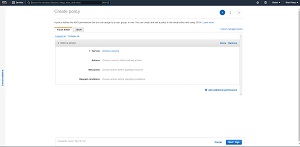 [Click on image for larger view.] Figure 1: The Visual Editor is selected by default.
Once you have selected a service, you will need to choose the actions and the access levels that you want to allow as a part of the policy. Incidentally, there is also a link that you can click to change the actions to Deny, thereby making it possible to create a restrictive policy rather than a policy that grants permissions.
Upon selecting an action, be sure to take a moment and review any action warnings that might be produced. Depending on the service that you are working with, it is relatively common to see warnings indicating that one or more additional actions are required. In some instances, AWS may even produce dozens of these warnings. As you can see in Figure 2, each warning includes a link that you can click on to perform whatever additional action may be required.
 [Click on image for larger view.] Figure 2: When you create an IAM policy, you may have to perform additional actions.
When you are done addressing any action warnings, scroll to the bottom of the screen. If you need to specify any request conditions (which is optional) then you can click on the Specify Request Conditions link. Otherwise, click the Next button. This will cause AWS to display the Add Tags screen.
After you assign any required tags, click Next and you will be taken to the Review screen. Take a moment to review the policy settings and then click the Create Policy button.
Using the Policy Generator
Although you can use the IAM Management Console to create IAM policies, you can use the AWS Policy Generator as an alternative. In addition to being able to create IAM policies, the AWS Policy Generator can also create SQS queue policies, S3 bucket policies, VPC endpoint policies and SNS topic policies. You can see what the AWS Policy Generator looks like in Figure 3.
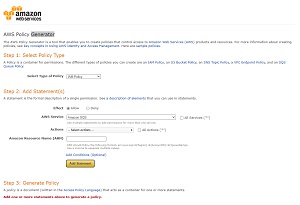 [Click on image for larger view.] Figure 3: This is the AWS Policy Generator.
Being that the goal is to create an IAM policy, you will need to select the IAM Policy option from the Select Type of Policy drop-down list, as shown in the previous figure. The next thing that you will have to do is to select either the Allow or Deny option in order to tell AWS whether you want to grant permissions or deny permissions.
From there, you are going to need to select the AWS service for which you want to apply the policy. You will also need to choose the action that you want to perform and enter the Amazon Resource Number (ARN) for the item or items that the policy will apply to. Once you have entered this number, you can add additional statements if you like, or you can generate the policy. If you need help determining an object's ARN, then be sure to check out my recent blog post on ARN naming conventions.
About the Author
Brien Posey is a 22-time Microsoft MVP with decades of IT experience. As a freelance writer, Posey has written thousands of articles and contributed to several dozen books on a wide variety of IT topics. Prior to going freelance, Posey was a CIO for a national chain of hospitals and health care facilities. He has also served as a network administrator for some of the country's largest insurance companies and for the Department of Defense at Fort Knox. In addition to his continued work in IT, Posey has spent the last several years actively training as a commercial scientist-astronaut candidate in preparation to fly on a mission to study polar mesospheric clouds from space. You can follow his spaceflight training on his Web site.