How-To
Using Amazon's New Backup Capabilities for S3, Part 1: On-Demand Backups
Although Amazon has long offered backup capabilities through its AWS backup service, Amazon S3 was conspicuously absent from the list of supported services. Recently however, Amazon has enhanced AWS backup so that it is now possible to use it to back up data that is stored in S3 buckets.
While you can create ongoing backups of S3 buckets, it is also possible to try out the new S3 backup capabilities by creating an on-demand backup. In either case, select the AWS Backup option from the list of services (it's in the storage section).
Once the AWS Backup console opens, the first thing that you will have to do is to enable S3 backups. Before I show you how to do this, there are a couple of things that you need to know.
First, enabling the backup of S3 buckets does not necessarily give you the ability to back up every S3 bucket. AWS Backup is only able to back up S3 buckets that have versioning enabled. If necessary, you can enable versioning for a bucket by opening the S3 console and then clicking on a bucket. From there, select the bucket's Properties tab and then click the Edit button that is located within the Bucket Versioning section. Set the Bucket Versioning option to Enable and then click Save Changes.
The second thing that you need to know before you enable the protection of S3 buckets is that when you enable the protection of S3 buckets or any other type of resource that was not previously enabled, AWS Backup will only back up those resources if directed to do so by a backup plan that was created within AWS Backup. If a backup plan was created outside of AWS Backup then enabling or disabling resources will have no impact on that backup plan.
With that said, let's take a look at how to enable backup support for S3 buckets. From within the AWS Backup console, select the Settings tab, and AWS will display a list of the services that are currently enabled for backup. As you can see in Figure 1, most services are backup enabled by default. However, the new S3 backup service is not automatically enabled. It is worth noting that there are a few other services that are not automatically enabled including VirtualMachine, Neptune (which is also new) and FSx.
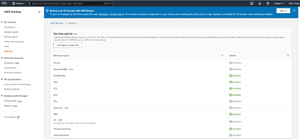 [Click on image for larger view.] Figure 1: S3 backups are not enabled by default.
Click the Configure Resources button, shown in the figure above, and you will be taken to a screen like the one shown in Figure 2. Now, use the toggle switch to enable backups for S3 buckets. When you are done, click the Confirm button at the bottom of the screen.
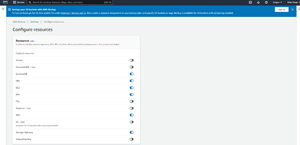 [Click on image for larger view.] Figure 2: Enable the S3 resource (which is listed as S3-new in this screen capture).
Now that S3 bucket support has been enabled, let's take a look at how to back up your S3 buckets. As previously noted, AWS Backup gives you two options -- you can create a backup plan or you can create an on demand backup.
For right now, let's create an on demand backup (I will talk about backup plans in Part 2). Go to the AWS Backup Dashboard and click on the Create On-Demand Backup button. This will take you to the Create On-Demand Backup screen, shown in Figure 3.
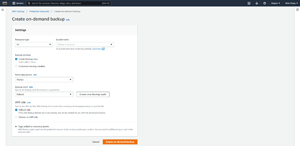 [Click on image for larger view.] Figure 3: Set the Resource type to S3 and choose the bucket that you want to back up.
The first thing you will need to do is to choose the S3 option from the Resource Type drop down list. Next, you must choose the bucket that you want to back up. Remember, you can only back up buckets for which versioning is enabled.
The next option allows you to choose the backup window. For an on-demand backup, you would typically want to use the Create Backup Now option, although you can use a custom backup window if you want. It is worth noting that the Create Backup Now does not usually start the backup instantaneously. Backups are normally launched within an hour, although I have heard unconfirmed stories of backups taking up to two hours to start.
You can specify a retention period if you wish, or you can just leave the retention period set to Always. Similarly, you can choose to use the default IAM role or you can choose a custom role. The role that you choose will provide the permissions that allow the bucket to be backed up.
The last thing that you will need to do is to choose the backup vault that should store the backup that you are creating. If you do not yet have a backup vault then you can use the Create New Backup Vault button to create one. When you are done choosing the options that you want to use, click the Create On-Demand Backup button to start the backup.
Now that I have shown you how to create an on-demand backup of an S3 bucket, I will show you how to create a backup plan for protecting S3 data in Part 2.
About the Author
Brien Posey is a 22-time Microsoft MVP with decades of IT experience. As a freelance writer, Posey has written thousands of articles and contributed to several dozen books on a wide variety of IT topics. Prior to going freelance, Posey was a CIO for a national chain of hospitals and health care facilities. He has also served as a network administrator for some of the country's largest insurance companies and for the Department of Defense at Fort Knox. In addition to his continued work in IT, Posey has spent the last several years actively training as a commercial scientist-astronaut candidate in preparation to fly on a mission to study polar mesospheric clouds from space. You can follow his spaceflight training on his Web site.