How-To
Working With AWS Simple Notification Service, Part 2: Publish a Message
In the first article in this series, I introduced you to some key concepts related to the Simple Notification Service (SNS), such as publishers, subscribers and topics. I also showed you how to create a standard topic.
Now I want to continue the discussion by showing you how to create a really simple subscription and how to publish a message. For the purposes of this article, I will be showing you how to publish a message directly from the SNS dashboard. In real life of course, you would typically publish a message from within an application or service.
As for the subscription process, we will set up an email subscription to the topic that was set up in Part 1 of this article series. In other words, you can compose a message from within the SNS dashboard and have that message sent to your inbox. Keep in mind though, we aren't just composing and sending an email message from the console. Instead, the console is acting as a publisher and sending the email to AWS SNS. SNS receives the message and then routes it to any services that are subscribed to the message's topic. Another way of thinking about this process is that SNS is decoupling the sender from the receiver and acting as an intermediary between the two. Granted, it would be a lot simpler to just send an email message from point A to point B, but email is just one type of subscription. The process works in essentially the same way for other subscription types.
So with that said, the first thing that we need to do is to subscribe to the topic that we created in Part 1. To do so, go to the Amazon SNS Dashboard, and then select the Subscriptions tab. As you can see in Figure 1, no subscriptions currently exist, so go ahead and click on the Create Subscription button to create your first subscription.
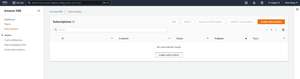 [Click on image for larger view.] Figure 1: Select the Subscriptions tab and click the Create Subscription button. (source: AWS).
At this point, you will be taken to the Create Subscription page, which you can see in Figure 2. The first thing that you need to do on this page is to provide the Amazon Resource Name (ARN) for the topic that you previously created. The good news is that you don't actually have to know the ARN. You can just click on the Topic ARN field and select it from a list.
 [Click on image for larger view.] Figure 2: This is the page used to subscribe to a topic. (source: AWS).
The next step in the process is to choose the protocol that the endpoint will use to communicate with the subscription. In this case, we are using a mail client, so just choose Email as the protocol. There may be some additional configuration options added to the Create Subscription screen depending on the protocol that you choose. Since we are creating an email subscription, the console will prompt you to enter an email address that can receive notifications from Amazon SNS. Now, just click the Create Subscription button to complete the process.
In order to prevent email subscriptions from being used for nefarious purposes, Amazon requires subscriptions to be confirmed before they will become active. If you look at Figure 3, you can see that Amazon has sent me an email message with a link that I have to click on to confirm my subscription. Additionally, the console displays a status of Pending Confirmation until the link has been clicked on. Incidentally, you may have to refresh your browser after confirming a subscription.
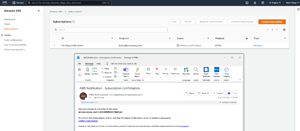 [Click on image for larger view.] Figure 3: Email subscriptions must be confirmed before they become active. (source: AWS).
The last step in the process is to publish a message. To do so, go to the Topics tab and select the topic that you previously created. Now, click on the Create Topic button, shown in Figure 4.
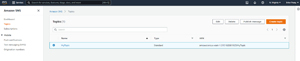 [Click on image for larger view.] Figure 4: Select a topic and click Publish Message. (source: AWS).
At this point, you will be taken to the Publish Message to Topic screen. At the most basic level, all you need to do is enter a subject line and a message. There is no need to specify a recipient, because the message is not being sent directly to a recipient. It's being sent to SNS, which is in turn sending the message to subscribers to the topic. When you are done, click the Publish Message button and the message will be sent to the designated mailbox.
About the Author
Brien Posey is a 22-time Microsoft MVP with decades of IT experience. As a freelance writer, Posey has written thousands of articles and contributed to several dozen books on a wide variety of IT topics. Prior to going freelance, Posey was a CIO for a national chain of hospitals and health care facilities. He has also served as a network administrator for some of the country's largest insurance companies and for the Department of Defense at Fort Knox. In addition to his continued work in IT, Posey has spent the last several years actively training as a commercial scientist-astronaut candidate in preparation to fly on a mission to study polar mesospheric clouds from space. You can follow his spaceflight training on his Web site.