How-To
TerraMaster F2-212, Part 3: Low-Cost vSphere VM Backup Device
I have written two articles on the TerraMaster F2-212 2-bay NAS (TNAS) device that can be used for personal cloud storage. I looked at its specifications in the first article and explored possible use cases. I set the device up in the second article and used it as a file repository.
In this article, I will push it beyond its intended use case, attempt to use it as a repository for virtual machines (VMs), and then see if it can be used as shared storage for running VMs. In my next article, I will see if using an SSD on it will increase its performance and how easy it is to use it for streaming media.
Configuring NFS
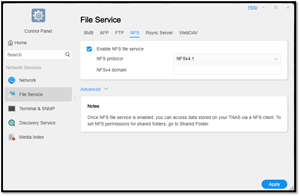
Following the instructions in the TerraMaster user guide, I enabled NFSv4.1 from the Control Panel.
 [Click on image for larger view.]
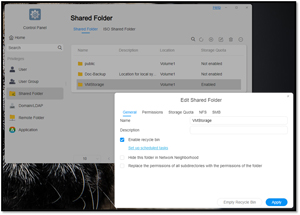
I then created a 2000 GB NFS share called VMStorage on the 8TB HDD, and a 3000 GB share called VMTNASDatastore01 on the HDD drive.
 [Click on image for larger view.]
NFS for VM Backups
To back up the VMs in my vSphere environment, I used NAKIVO Backup & Replication v10.9.0 Free Edition, which allows ten VMs to be backed up. The main reasons for using this backup solution were that it is a virtual appliance that I could download and deploy quickly (in under 10 minutes) and supports NFS.
To get the NFS share to work with NAKIVO, I need to enable "map all users to superuser" and "allow users to access mounted subfolders" for the NFS folder on the TNAS.
 [Click on image for larger view.]
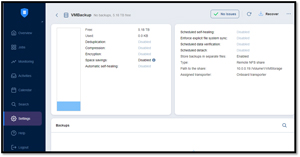
On NAKIVO, I created a VMBackup repository on the NFS share /Volume1/VMStorage.
 [Click on image for larger view.]
I created a schedule to backup an Ubuntu and two Windows VMs every week with an incremental backup daily to the NFS folder.
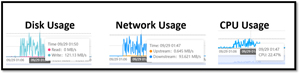
The backups ran and were stored on the NFS share without any issues. While the backups were running, the CPU usage got as high as 48 percent, Disk write got as high as 135 MBs, and Network I/O reached 116 MBs.
 [Click on image for larger view.]
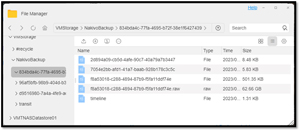
File Manager had three different folders for the VMs that I backed up.
 [Click on image for larger view.]
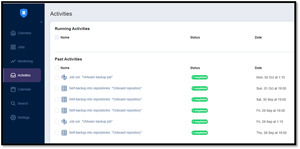
After a few days, I returned to the NAKIVO dashboard, and everything was running as expected.
 [Click on image for larger view.]
Running VMs on NFS
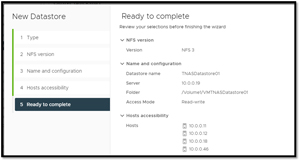
I mounted the NFS data store on the ESXi hosts in my environment using vSphere Client. As I covered this in a previous article, I will not review the details again.
 [Click on image for larger view.]
I cloned a Windows 10 VM with 72 GB of the 200 GB virtual disk from the ESXi server's local disk to the TNAS's NFS share. While the cloning took place, the CPU usage on the TNAS was about 25 percent, the network usage was 36 MBps, and the disk writes were 33 MBps. Cloning the VM to the NFS datastore took slightly more than 50 minutes.
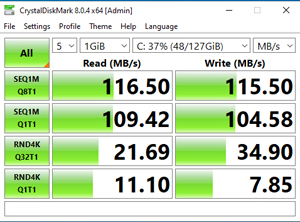
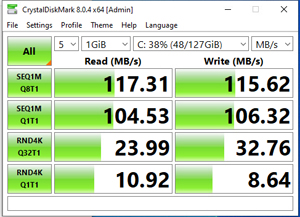
The VM started without any issues. I could browse the internet with it without any problems, but it did seem a little unresponsive. To get a better feel for the actual disk performance of the underlying storage, I ran CrystalDiskMark8 on it and found that it could perform about 115 MBs in sequential testing and about 28 MBs in random reads and writes.
 [Click on image for larger view.]
The CPU usage while the testing took place reached 90 percent.
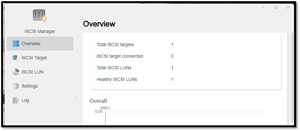
Setting Up iSCSI Targets
iSCSI uses a target (where the storage resides) and server (what is accessing the storage) terminology. After installing the iSCSI Manager from the TerraMaster App Center, I used it to create a 500 GB iSCSI target on the HDD drive called TNASISCSI01 with an IQN of iqn.tnasterramaster.001 with a LUN called TNASISCSILUN01.
 [Click on image for larger view.]
I cloned the same Windows 10 VM I cloned to the NFS share to the iSCSI target. While the cloning took place, the CPU usage varied between about 12 and 31 percent, the network usage was 21 MBs, and the disk writes was 22 MBs. It took 51 minutes to clone the VM to the iSCSI target.
Running VMs on iSCSI
I connected the iSCSI target to my vSphere client without any issues -- my step-by-step instructions on how I did it can be found in this article.
The VM started without any issues. I could browse the internet with it without any problems, but it did seem a little unresponsive. When I ran CrystalDiskMark8 on it, I found that it could perform about 110 MBs in sequential testing and less than 30 MBs in random reads and writes.
 [Click on image for larger view.]
Conclusion on Using the T2-212 with VMs
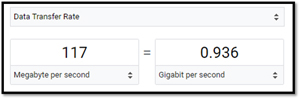
I quickly set up NFS and iSCSI on the TerraMaster F2-212. I could run VMs using it as a datastore with HDD backing. They didn't perform exceptionally well, but they were usable. Using the TerraMaster for this is pushing what it was designed for. The Seagate Ironwolf ST8000VN004 drive is rated at 210MB/s, so the performance was about half of what the drive is theoretically capable of. I believe this is due to the 1 GbE network, which is only capable of 117MBps, which was about the performance I saw during my NFS and iSCSI testing.
 [Click on image for larger view.]
I found that it did work well as a backup repository using NFS. When taking into account the low price of this device (less than $170), I think it is an excellent value for those who can't justify spending a lot of money on a backup repository, and I would consider being able to use it for light duty shared storage for VMs as a bonus.
In my next article, I will look to see if using an SSD drive will improve the performance of the VMs, and I will see how easy it is to set up and use as a multimedia server.
About the Author
Tom Fenton has a wealth of hands-on IT experience gained over the past 30 years in a variety of technologies, with the past 20 years focusing on virtualization and storage. He previously worked as a Technical Marketing Manager for ControlUp. He also previously worked at VMware in Staff and Senior level positions. He has also worked as a Senior Validation Engineer with The Taneja Group, where he headed the Validation Service Lab and was instrumental in starting up its vSphere Virtual Volumes practice. He's on X @vDoppler.