How-To
Installing Flatcar Container Linux on VMware Workstation
In a previous article, I looked at Flatcar, a lightweight, Linux-based 0S designed specifically for running containers. It emerged in 2018 as a successor to CoreOS Container Linux after Kinvolk forked the project to continue its focus on containerized workloads. Flatcar's minimal footprint and immutable infrastructure enhance its security and stability, while its container-centric design optimizes performance.
Flatcar gained significant recognition this year by being accepted as a Cloud Native Computing Foundation (CNCF) incubating project. With Microsoft's backing and a growing community, Flatcar is poised for continued growth and innovation, making it a leading choice for secure and efficient container deployments.
In this article, I will examine how to deploy it. It was designed to run on bare-metal, public cloud, or virtualized environments. For convenience, I will deploy it as a virtual machine (VM) on VMware Workstation. I chose to use Workstation as it is now free. You can read more about Workstation here and here.
Requirements
For detailed information and specific requirements for your setup, please refer to the official Flatcar documentation. But below are some of its hardware requirements:
-
Minimum Requirements
- CPU: 4-core CPU (X64 and ARM supported)
- RAM: 8 GB
- Disk Space: 32 GB
-
Additional Considerations
- Network Connectivity: A stable internet connection is required for initial setup and updates.
- UEFI Boot: For virtual machines, ensure UEFI boot is enabled.
- TPM (Trusted Platform Module): A TPM module is recommended for enhanced security.
Flatcar Installation
Flatcar has an extensive list of guides to help you install it on various public clouds, bare metal servers, and as a VM. For my installation, I followed the guide on "Running Flatcar Container Linux on VMware."
This guide was tested on vSphere and Fusion but has a note that it should work with Workstation. I will make a note of any deviations that I need to make from these instructions.
After downloading [link initiates download] the OVA, the OVA file was 498 MB and took just a few seconds to download. Other stable releases for Flatcar, in ISO and OVA form, for ARM and X64 processors can be downloaded.
To install Flatcar on Workstation:
- In the menu, click File > Open
- In the wizard, I navigated to the location of the OVA template I downloaded earlier and selected it.
- I entered the name the VM Flatcar01, then clicked Enter
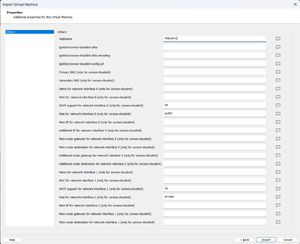
- I was presented with a list of options for the VM. I entered the Hostname and pressed Enter.
 [Click on image for larger view.]
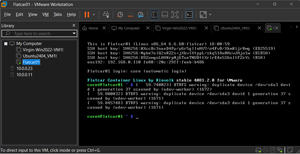
A short time later, in the VM console I was automatically logged on and presented with a prompt.
 [Click on image for larger view.]
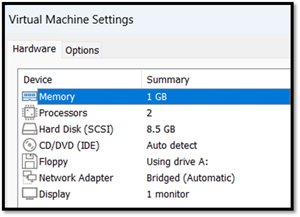
The settings show that the OVA created a Flatcar VM with 1GB of RAM, 2 vCPUs, and an 8.5 GB hard disk. This was far short of the suggested minimum installation requirements.
I also noticed that it had a bridged network. In VMware Workstation, a bridged network allows a VM to appear as if it were a computer directly connected to your physical network.
The VM's network traffic is routed through the host machine's physical network adapter, and the VM appears as a separate device on your network with its IP address.
 [Click on image for larger view.]
Exploring the Flatcar OS
Once Flatcar was installed, I wanted to explore the OS and see what tools were installed with it.
I first entered whoami and found that I was logged in as a user named core.
 [Click on image for larger view.]
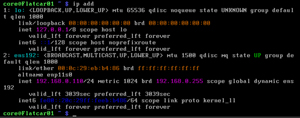
I entered Ip add to see what IP address was assigned to it.
 [Click on image for larger view.]
The NIC was identified as ens192 and had an IP address of 192.168.0.110, which indicated to me that it was, in fact, a separate device on my network.
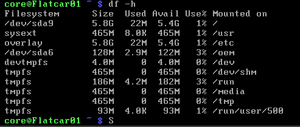
df -h showed information about the filesystems in Flatcar.
 [Click on image for larger view.]
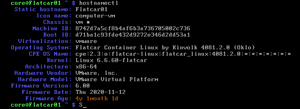
To see the Linux Distro, System Architecture, and IDs, I entered hostnamectl.
 [Click on image for larger view.]
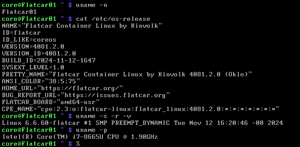
For the hostname, I entered uname -n. To see the os, I entered cat /etc/os-release. For kernel Info and architecture, I entered uname -s -r -v and uname -p.
 [Click on image for larger view.]
All these commands did not show anything about this Linux distribution.
In this article, I found I could easily and quickly deploy Flatcar on a VM from an OVA using VMware Workstation. Although the official Flatcar documentation outlines the minimum hardware requirements --a 4-core CPU, 8 GB RAM, and 32 GB disk space -- the OVA created a VM with 1GB of RAM, two vCPUs, and 8.5 GB of RAM. Using this configuration, the VM booted and operated without any issues. A bridged network was set up on the VM and worked without problems.
Upon successful installation, I explored the Flatcar OS and its available tools. Basic commands like whoami, ip addr, and df -h ran without any issues and revealed information about the user account, network interface, and filesystem, respectively.
So far, I have been impressed by how easy and quick it was to set up Flatcar and by the fact that all the Linux commands I use, and love seem to work fine.
In my next article, I will see how difficult it is to deploy a container on it.
About the Author
Tom Fenton has a wealth of hands-on IT experience gained over the past 30 years in a variety of technologies, with the past 20 years focusing on virtualization and storage. He previously worked as a Technical Marketing Manager for ControlUp. He also previously worked at VMware in Staff and Senior level positions. He has also worked as a Senior Validation Engineer with The Taneja Group, where he headed the Validation Service Lab and was instrumental in starting up its vSphere Virtual Volumes practice. He's on X @vDoppler.