How-To
Using VMware's Free Desktop Hypervisor, Workstation Pro
In two recent articles, I discussed how VMware made its type two hypervisor, Workstation Pro, free for personal use and how easy it was to install on my Windows 10 laptop. In this article, I will create a Windows virtual machine (VM) and use some of its advanced features to see if the free-for-personal-use version of Workstation has lost any functionality.
I have covered much of Workstations functionality in my article on the paid-for version of it. I will be retesting the most interesting of those features in the personal version to verify that these features are present and working in the "for personal use" version of Workstation Pro. If you want a more in-depth look, those articles can be found here and here.
As a bit of background, I first used VMware Workstation in 2000, a year after it came out. Not only did it change the IT industry, but it also changed my life, as I have used it for the next 24 years in my professional life. Yes, its big brother, ESXi, a bare-metal hypervisor, tends to get all the glory. Still, Workstation has exposed more people to virtualization, as they are exposed to it either in school or as IT enthusiasts. I need to give Broadcom a hat tip for making Workstation free for personal use so everyone can now be exposed to this technology.
Creating a Windows VM
Workstation Pro includes a wizard for creating VMs. I started my testing by creating a Windows 11 VM using an ISO image I had previously downloaded to the NUC.
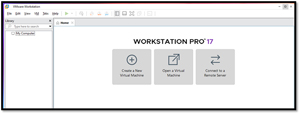
I launched Workstation and clicked Create a New Virtual Machine.
 [Click on image for larger view.]
This launched the Wizard. I selected Typical Installation and was queried for the installation ISO location. I gave the VM a name (Win11-B) and gave it a 64GB hard disk size, two processors and 4GB of RAM. Then, I clicked Finish. Creating a Windows VM was the same as when I used the commercial version of Workstation.
Snapshots
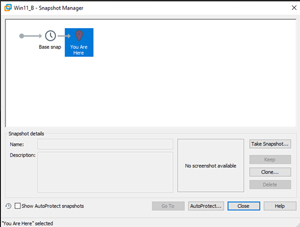
Workstation supports taking a snapshot of a VM. This saves its current state and enables you to repeatedly return to the same state. When you take a snapshot, Workstation Pro captures the entire state of the VM. Snapshot Manager is used to review and act on the snapshots for VMs. It is located by right-clicking the VM.
 [Click on image for larger view.]
A snapshot includes the contents of the VM memory, settings and the virtual disks. When you revert to a snapshot, you return the VM's memory, settings and virtual disks to their state when you took the snapshot.
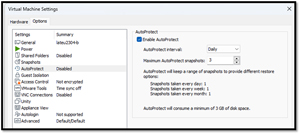
Snapshots are a powerful tool with several features. You can take snapshots of a VM and restore it to a previous state by reverting to a snapshot. You can also revert to a snapshot or take a new one when you power off the VM, which is helpful if you need to discard changes made during that session. The AutoProtect feature allows you to specify regular intervals for taking snapshots to preserve the VM's state automatically. Additionally, you can take manual snapshots at any time. Workstation Pro also allows you to take background snapshots, which means you can continue working while the VM's state is preserved. Finally, you can configure snapshots to preserve states only for certain virtual disks.
 [Click on image for larger view.]
I could create, revert and otherwise manage snapshots without any problems in the free personal version of Workstation.
Full Clone VMs
VMware Workstation supports two mechanisms to create copies of VMs: complete and linked clones. Theoretically, a fully cloned VM will perform slightly better than a linked cloned VM as it makes an exact copy of the files that make up the VM, while a linked clone creates links to its parent VM.
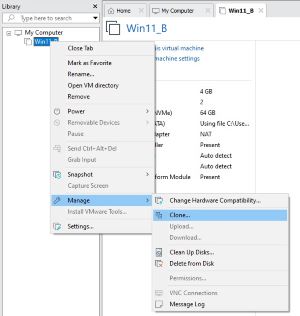
For my first test, I opted to create a full clone. To do this I powered down my Windows 11 VM, right-clicked it, and clicked Manage and Clone.
 [Click on image for larger view.]
This brought up the clone wizard, which I used to the clone. The cloning took less than a minute. The cloned powered on without any issues. I changed the hostname of the fully cloned VM, but the clone had a unique MAC address.
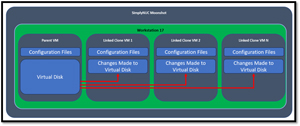
The diagram below shows multiple VMs that were cloned from a single-parent VM. Notice how all the VMs have their own virtual disk and configuration files.
 [Click on image for larger view.]
Linked Clone VMs
Where a fully cloned VM is comprised of a full copy of the files that make up the VM, a linked clone shares the virtual disks with the parent VM and keeps track of the changes made to the linked clone machine.
Linked clone machines can be created in seconds and take up considerably less disk space. However, a snapshot of the parent VM must be taken before a link clone can be made from it.
 [Click on image for larger view.]
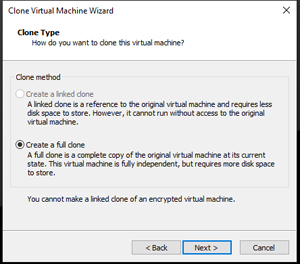
After taking a snapshot of my VM, I tried using the wizard to create a linked clone VM. Unfortunately, I received the following message when I tried.
 [Click on image for larger view.]
On further investigation, I found that creating a linked clone of an encrypted VM with Windows 11 as the guest OS is impossible. This is because Windows 11 requires TPM, and a VM must be encrypted to use TPM in the guest OS. There may be a workaround to accomplish this, which I may pursue in the future. When I tried it with my licensed version, Workstation Pro 17, I got the same message; this functionality is the same in commercial and free personal versions.
Networking
Workstation Pro offers various networking options to enable VMs to connect to the network. These include bridged networking, NAT and host-only networking. Workstation Pro also supports creating custom virtual networks using virtual networking components.
I found that all of these worked the same way as they did in the non-personal version of Workstation.
Workstation provides a virtual network editor under the Edit tab.
 [Click on image for larger view.]
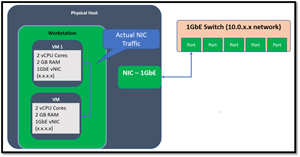
Bridged Networking connects a VM to a network by using the network adapter on the host system. It is the easiest way to give the VM access to the network if the host system is on a network. When you install Workstation Pro, a bridged network (VMnet0) is set up for you.
 [Click on image for larger view.]
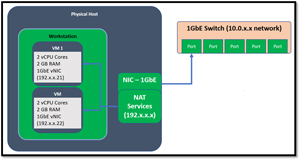
On the other hand, NAT Networking does not provide a VM with its IP address on the external network. Instead, a separate private network is set up on the host system, and the VM gets an address on this private network from the virtual DHCP server. The VM and the host system share a single network identity that is not visible on the external network. Workstation Pro sets up a NAT network (VMnet8) for you during installation, and the New Virtual Machine wizard configures the VM to use the default NAT network.
 [Click on image for larger view.]
Host-Only Networking creates a network that is entirely contained within the host computer. It provides a network connection between the VM and the host system using a virtual network adapter visible on the host operating system. Workstation Pro sets up a host-only network (VMnet1) for you during installation.
 [Click on image for larger view.]
With the Workstation Pro virtual networking components, you can create sophisticated Custom Virtual Networks connected to one or more external networks or run entirely on the host system. You can use the virtual network editor to configure multiple network cards in the host system and create multiple virtual networks.
Unless there are overriding reasons, I use Bridged Networking for most VMs I create.
Replicating Poor Network Conditions
I work with VMware Horizon a lot, and one of the things I like to see is how various OSes running the Horizon client react when network conditions are less than ideal, for examples, when networks drop packets, have limited bandwidth, and/or experience latency issues. I have used various tools in the past to simulate these conditions. These tools have worked well, but they involve routing the network of a VM through an additional VM, which modifies the network conditions to get the simulation. Workstation has the built-in ability to replicate these conditions. I find this one of the more valuable features of Workstation and one unavailable in ESXi.
Network conditions can be set per VM, allowing each VM to simulate different network conditions. You can limit the bandwidth, specify the latency and set each VM's packet loss.
To access these settings, right-click the VM and select Settings from the drop-down menu. Then click Network Adapter and Advanced.
You can configure the settings in the Network Adapter Advanced Settings dialog as needed. In the example below, the latency of my outgoing packets is 500 ms (0.5 seconds). The max latency that you can specify is 2000 ms (2 seconds).
 [Click on image for larger view.]
I tested this the same way I tested it on the commercial version of Workstation Pro. I brought up a streaming music video (Eric Clapton - Layla) and immediately noted a degradation in network performance. It took about a second for the YouTube video to start streaming. Once it did, it played without any jitter or pause. If I skipped ahead in the video, there would be a half-second pause. This was due to me degrading the outgoing packets and the application buffering the video stream.
Conclusion
VMware has recently changed its licensing model, moving from perpetual licensing to subscription-based licensing for all its products, and discontinued its free ESXi hypervisor. These two changes greatly upset many of its users. However, VMware announced that it would now offer its Desktop hypervisors, Workstation 17 Pro and Fusion 13 Pro, for free for personal use. This is great news for students, hobbyists and casual users who want to run multiple OSes on a single computer. The free version is suitable for personal use, while the paid commercial version costs $120 annually. After testing the personal version of Workstation, I found that it offers the same features and functionality as the commercial (paid-for) version. This move is a huge win for students, hobbyists and others looking for an effective way to run multiple OSes simultaneously on a single physical system.