How To Give Windows Server 2012 Users a Traditional User Experience
Windows Server 2012 is here, and like many of you who have downloaded it and tested it, I have been messing around with the new operating system for a while now. I've been exploring new features and capabilities, some of which I like, and others I don't care for all that much. All in all, however, I think both Windows 8 and Windows Server 2012 will be successful over time and I say that because the user experience will take some getting used to.
Once you install the new OS, many will be taken aback and will find navigating and finding old tools and utilities a bit of a challenge. I expect many administrators will be looking for a way to change the new Metro style and trade it in for the traditional Windows Start Menu. The good news is that we can tweak the user interface in Windows Server 2012 to get really close to what a Windows Server 2008 would look like, with the caveat that you will not get everything back. I think Microsoft is trying to push everyone to adopt the new interface and it will be successful over time in accomplishing this, especially if the upcoming Surface tablets takes off.
Let's take a look at what we need to do in order to make the changes:
- Install the Desktop Experience
- Restart the Server
- Pin icons and useful tools and utilities to the desktop
- Disable Server Manager from automatically starting
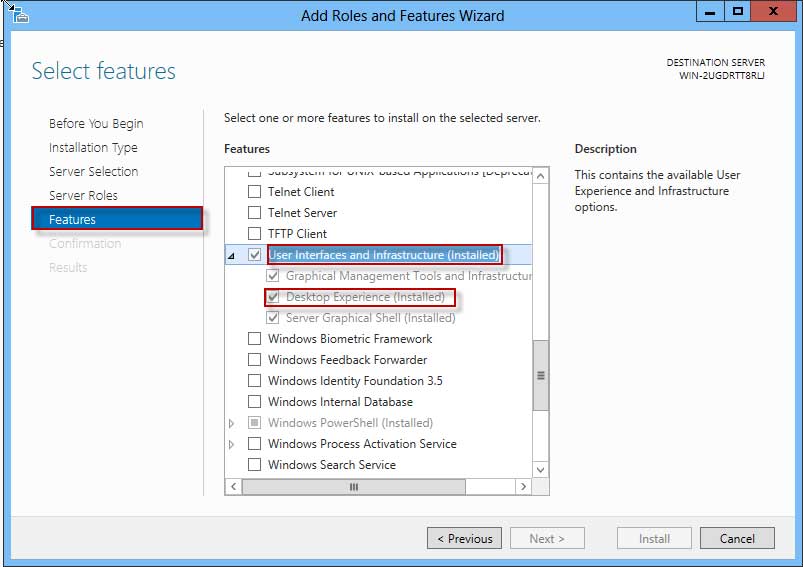 |
Figure 1. Roles and features wizard. (Click image to view larger version.) |
Let's tackle the Desktop Experience. First, in order to gain access to icons like My Computer, Control Panel and many of the traditional features we have been using for years (and keep in mind that when I say gain access, I mean gain access the traditional way -- all the tools still exist; you simply have to learn to access them the new way), follow these steps:
- Launch Server Manager from the taskbar (if it is not started already) and click on Add roles and features.
- Go through the wizard until you get to a screen similar to Fig. 1; make sure to select Features on the left node and scroll down to User Interfaces and Infrastructure.
- Click the arrow to expand this feature and select Desktop Experience.
- Click Next and follow the wizard to completion, which will require a restart of the server.
Even a simple power operation like restart takes some getting used to, so in order to restart your server follow these steps:
- Hover your mouse to the top right-hand corner of the screen and select the Settings icon.
- Now click on the Power icon and restart the server.
Once the server comes back up, you can right-click on your desktop and click on Personalize in order to configure our icons. Select Change desktop icons and add the icons you want to your desktop.
If Server Manager is annoying you every time Windows starts and you want to prevent it from automatically starting, do the following:
- Launch Server Manager.
- On the top right menu, select Manage.
- Select Server Manager Properties.
- Check the box next to "Do not start Server Manager automatically at logon".
At this point your desktop will look pretty close to what what you're used to in Windows Server 2008. I recommend creating shortcuts for some of your favorite tools and utilities and adding them to the desktop. For those of you who like the simplicity of the traditional Start Menu and user interface, in future blogs I will walk through further customizations that will make Windows Server 2012 a bit more friendly.
Posted by Elias Khnaser on 08/20/2012 at 12:49 PM