Sean's Virtual Desktop
VMware App Volumes, Part 2: Installation and Configuration
Delivering applications to virtual desktops is complicated. This step-by-step tutorial simplifies VMware's process.
Other Installments:
App Volumes has a few required components to successfully capture and deploy App Stacks. App Stacks, as mentioned in the last article, are virtual disk files that contain the application's executables and registry keys, and are layered onto virtual desktops or Remote Desktop Session Host servers.
The primary component of an App Volumes infrastructure is the App Volumes Manager. This application handles the provisioning and management of App Stacks, and it needs to be installed before App Stacks can be captured. The requirements for the App Volumes Manager:
- Windows Server 2008 R2
- .Net 3.5 Framework feature enabled
- 4 GB RAM
- 2 vCPU
- 1 GB free disk space
- SQL Server 2008 R2 or SQL Server 2008 R2 Express
SQL Server Express can be installed as part of the App Volumes Manager installation. This is helpful, as the installation process isn't well documented when using a remote SQL Server.
Installing App Volumes
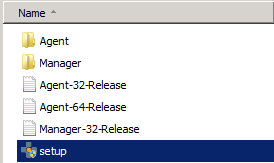
App Volumes is distributed as an ISO file, so it will either need to be mounted to the VM or the contents will need to be extracted to a shared network location. A single setup program is used for both the central management application and the agent. Here are the steps for configuring the App Volumes Manager:
- Launch the App Volumes setup.exe program.
- If UAC is enabled on your server, you will be prompted to allow the installer to make changes to the system. Click Yes to continue.
- Click Next to continue.
- Accept the terms of the license, then click Next.
- Select the "Install App Volumes Manager" option and click Install. This will start the App Volumes Manager installation.
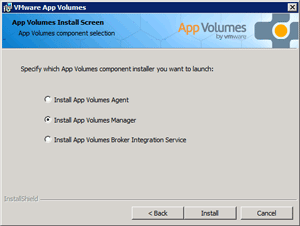 [Click on image for larger view.]
- Click Next to continue.
- Select the SQL Server option you want to use. For this walkthrough, select the "Install local SQL Server Express Database" and click Next.
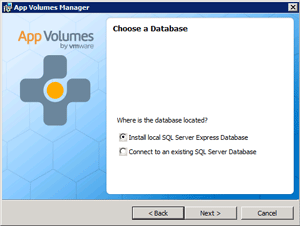 [Click on image for larger view.]
- The installation will install and configure SQL Server Express.
- The first screen after the SQL Server Express install completes is for configuring the database options. Since we're using the SQL Server Express instance that we just installed, we'll accept the defaults by clicking Next. If we were using a remote SQL Server to host the database or working with multiple App Volumes servers, we could configure the database server information on this screen.
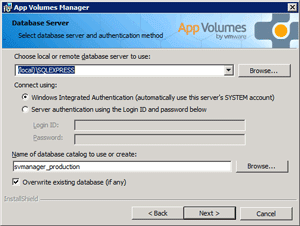 [Click on image for larger view.]
- Select the network ports that will be used for communicating with the server. The defaults should be fine unless there are other Web applications running on the server. If the selected ports aren't open, the installer will configure the Windows Firewall to allow the traffic. Click Next to continue.
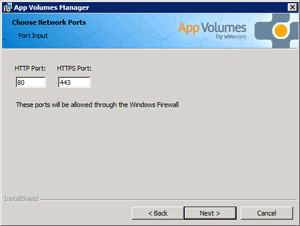 [Click on image for larger view.]
- The next screen allows you to change the installed feature set. You can also change the installation directory. There aren't any options you need to change, so just click Next to continue.
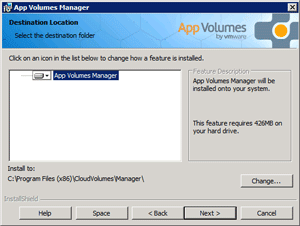 [Click on image for larger view.]
- Click Install to start the installation.
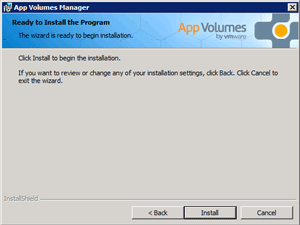 [Click on image for larger view.]
- Once the installation completes, click Finish.
The App Volumes Manager is installed once you hit finish. But it's not configured, and there are still a few steps that need to completed before you can capture and deploy App Stacks.
App Volumes is managed through a Web interface, so the configuration and management can be completed from the server or any workstation on the network. If you plan to finish the configuration remotely, the App Volumes Manager is just http://<servername>. The installer also places a shortcut to the Web interface on the server's desktop. Here are the steps for configuring App Volumes:
- Connect to the App Volumes Manager Web interface by opening a Web browser and going to http://<servername>, or by double-clicking the App Volumes Manager icon on the server's desktop.
- Click the Get Started button.
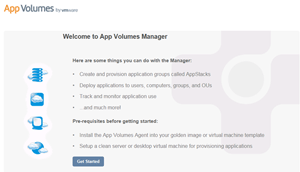 [Click on image for larger view.]
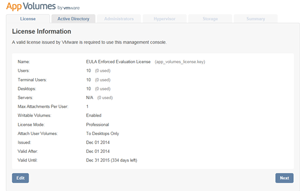
- If you have a valid license file, click Edit to upload it. Otherwise click Next to continue using the evaluation license.
 [Click on image for larger view.]
- If you have a valid permanent or trial license, click Browse to locate the license file, then click Upload to install the license.
 [Click on image for larger view.]
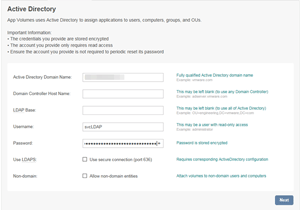
- App Volumes requires Active Directory to work properly. At a minimum, you need to have the fully-qualified domain name and a service account with read-only access. If you only provide a domain name and service account credentials, App Volumes will automatically detect the domain controllers to use and will browse the full directory when looking for users, groups, and computers to attach App Stacks to. Click Next to continue.
 [Click on image for larger view.]
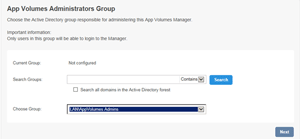
- Select the group that will have administrative access to App Volumes, and click Next to continue.
 [Click on image for larger view.]
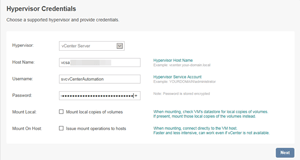
- To create the virtual disks for App Stacks, App Volumes Manager will need to access to vCenter. You'll need to provide the host name and credentials for a service account. The system will verify your service account when you click Next; you won't be able to proceed until a valid account has been configured. Note: To view the permissions required by the service account, click the Required vCenter Permissions link at the bottom of the page.
 [Click on image for larger view.]
- Select the datastores and paths where App Stacks and user-writable volumes will be stored, and click Next to continue.
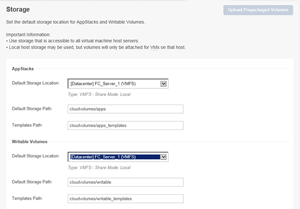 [Click on image for larger view.]
- You'll be prompted to confirm the storage settings. Click Set Defaults to continue. The options presented on this screen will determine how App Volumes imports the default volumes into the datastore. If "Import Volumes Immediately" is selected, you won't be able to complete administrative tasks while the import is underway.
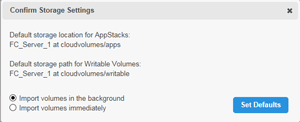 [Click on image for larger view.]
- Select the datastore and the host that will be used for uploading the prepackaged template volumes. You'll also need to provide credentials for the host in order to complete the upload. Click Upload to continue.
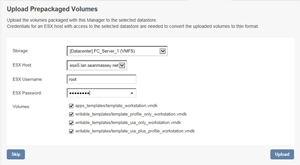 [Click on image for larger view.]
- Once the upload has completed, you'll be able to create new App Stacks and writable volumes.
 [Click on image for larger view.]
At this point, App Volumes is ready to use. In the next article, I'll cover how to set up a capture machine and how to capture your first application to create an App Stack.
About the Author
Sean Massey is a systems administrator from Appleton, Wisc. He blogs about VDI, Windows PowerShell, and automation at http://seanmassey.net, and is active on Twitter as @seanpmassey.