How-To
How To Create a Windows File System in AWS
The AWS FSx service allows you to create an external file system that can be attached to an EC2 instance for supplementary storage.
Amazon Web Services (AWS) makes it possible to create an external file system through a service called FSx. You can then attach this file system to an Amazon Elastic Compute Cloud (EC2) instance and use it as supplementary storage.
Before I begin showing you how to set up FSx and how to attach it to an Amazon EC2 instance, I need to take a moment to talk about prerequisites. You're going to need a Microsoft Active Directory environment within the AWS environment. You're also going to need an Amazon EC2 instance that you can use as a mount point for the file system. For the purposes of this article, I am going to be using a Windows instance.
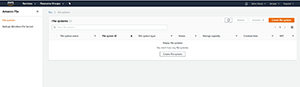
So with that said, let's go ahead and set up an FSx file system. Once you have the prerequisites in place, log into the FSx console, and then click on the Create File System button, which you can see in Figure 1.
 [Click on image for larger view.]
Figure 1. Click on the Create File System button.
[Click on image for larger view.]
Figure 1. Click on the Create File System button.
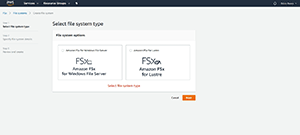
At this point, you'll see a screen, similar to the one shown in Figure 2, asking which type of file server you want to create. As you can see in the figure, you can choose between Amazon FSx for Windows File Server and Amazon FSx for Lustre. For the purposes of this article, I am going to be using the Windows option.
 [Click on image for larger view.]
Figure 2. Choose the type of file system that you want to create.
[Click on image for larger view.]
Figure 2. Choose the type of file system that you want to create.
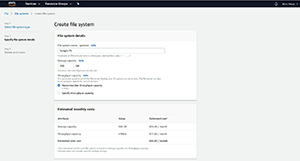
The next step in the process is to provide the required file system details, beginning with a name for the file system. You'll also need to specify the desired storage capacity and the desired throughput. You can use the AWS recommended throughput (which is based on the storage capacity), or you can manually specify the desired throughput. As you populate the screen with the required information, AWS will automatically display a cost estimate, as shown in Figure 3.
 [Click on image for larger view.]
Figure 3. You must provide a file system name, capacity and throughput speed.
[Click on image for larger view.]
Figure 3. You must provide a file system name, capacity and throughput speed.
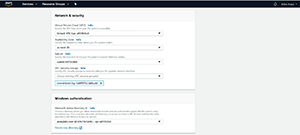
Now, scroll down and you'll see the Network and Security section. This section asks you to specify your VPC, availability zone, subnet and VPC security group. AWS fills in all of this information for you, but it's a good idea to take the time to make sure the information is correct.
When you finish verifying the information in the Network & security section, scroll down a bit more and you'll be taken to the Windows authentication section. The only thing that you have to do in this section is to select the Microsoft Active Directory that you want to use for authentication into the file system. As previously noted, you should already have an Active Directory environment in place, but if you haven't yet created an Active Directory, then there's a link within the Windows authentication section that you can use to create a new directory. You can see what the Network & security and the Windows authentication sections look like in Figure 4.
 [Click on image for larger view.]
Figure 4. You'll need to link the file system to an Active Directory.
[Click on image for larger view.]
Figure 4. You'll need to link the file system to an Active Directory.
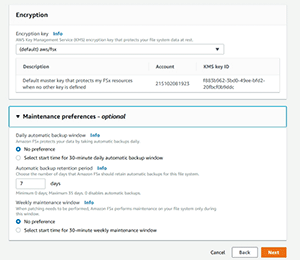
Scroll down a bit more, and you'll be taken to the Encryption section. This section simply asks you which encryption key you want to use to protect the data within your file system.
Finally, there's an optional Maintenance preferences section, which you can see in Figure 5. This section allows you to select a maintenance window and a backup retention period.
 [Click on image for larger view.]
Figure 5. You must choose which encryption key should be used to secure your data, while the Maintenances preferences are optional.
[Click on image for larger view.]
Figure 5. You must choose which encryption key should be used to secure your data, while the Maintenances preferences are optional.
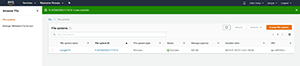
When you're done, click Next, and you'll be taken to a screen that allows you to review the settings that you've chosen. Assuming that everything looks good, click the Create filesSystem button to create the file system. When the file system creation process completes, select the file system, and click the Attach button, which you can see in Figure 6. Incidentally, you will have to refresh the screen or AWS may not show the file system creation process as being complete.
 [Click on image for larger view.]
Figure 6. Select the file system and click Attach.
[Click on image for larger view.]
Figure 6. Select the file system and click Attach.
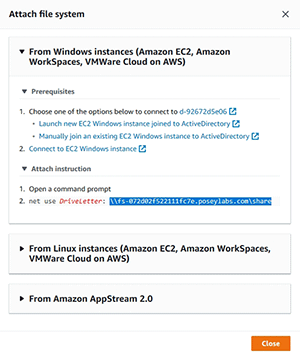
At this point, you will see a popup similar to the one shown in Figure 7. If you look at the Attach instruction section, you'll see the Net Use command. Make note of the FQDN that follows the DriveLetter parameter. This is the share name.
 [Click on image for larger view.]
Figure 7. Make note of the share's FQDN.
[Click on image for larger view.]
Figure 7. Make note of the share's FQDN.
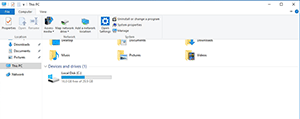
The next step in the process is to attach your Amazon EC2 instance to the newly created file system by using the share name that you just wrote down. To do so, log into your Amazon EC2 instance using a domain account. Once you've logged in, open File Explorer and click This PC. Now, go to the Computer tab, and click on the Map network drive icon, which you can see in Figure 8.
 [Click on image for larger view.]
Figure 8. Click on the Map network drive icon.
[Click on image for larger view.]
Figure 8. Click on the Map network drive icon.
 [Click on image for larger view.]
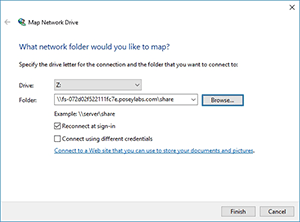
Figure 9. Paste the FQDN into the Folder field.
[Click on image for larger view.]
Figure 9. Paste the FQDN into the Folder field.
When prompted, choose a drive letter, and then enter the previously noted FQDN into the Folder field, as shown in Figure 9. Click Finish, and a network drive will be mapped to the file system that you've created.
About the Author
Brien Posey is a 22-time Microsoft MVP with decades of IT experience. As a freelance writer, Posey has written thousands of articles and contributed to several dozen books on a wide variety of IT topics. Prior to going freelance, Posey was a CIO for a national chain of hospitals and health care facilities. He has also served as a network administrator for some of the country's largest insurance companies and for the Department of Defense at Fort Knox. In addition to his continued work in IT, Posey has spent the last several years actively training as a commercial scientist-astronaut candidate in preparation to fly on a mission to study polar mesospheric clouds from space. You can follow his spaceflight training on his Web site.