How-To
How To Set Up a $40 Printer Server for Virtual Desktops
Tom Fenton sets up an Intel Compute Stick as a cheap and easy printer server option for his Infoprint 1352 printer.
In a recent article, I discussed how I used an Atrust VDI thin client as a printer server for my 15-year-old IBM Infoprint 1352. The Atrust client did a good job acting as a printer server; however, I needed to relocate the thin client to another location, so I looked around for another low-cost printer server solution for my virtual desktops. All the printer servers that I investigated were expensive or didn't specify that they would work with my printer.
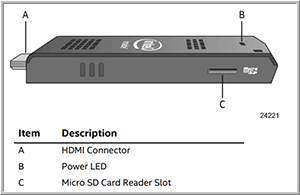
The Intel Compute Stick from Amazon for $40 caught my attention. The Compute Stick (BOXSTCK1A8LFC) has a Quad-Core Intel Atom processor, 1GB of RAM, 8GB of storage, and a Micro SD card slot (Figure 1 and Figure 2). For connectivity, it supports 802.1 1bgn Wi-Fi, Bluetooth 4.0, and has a single USB 2.0 port and a single HDMI port. Moreover, the stick has Ubuntu 14.04 LTS preinstalled on it, and is Lilliputian in size at 1.5 in. x 4.1 in. x 0.5 in. and weighs only 1.9 oz.
 [Click on image for larger view.]
Figure 1. Front of the Compute Stick.
[Click on image for larger view.]
Figure 1. Front of the Compute Stick.
 [Click on image for larger view.]
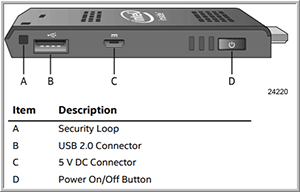
Figure 2. Back of the Compute Stick.
[Click on image for larger view.]
Figure 2. Back of the Compute Stick.
Printer Server Configuration
After I received the Compute Stick, I connected it to my Dell UltraSharp Monitor (U3818DW). The reason I used this monitor is that it has a keyboard, mouse, and video (KVM) switch built into it. I find the monitors with a built-in KVM switch extremely useful as it allows me to switch between two computers with the push of a button. I plugged my Dell wireless keyboard/mouse's dongle into the monitor's upstream USB port.
I then powered on the Compute Stick. About 20 seconds later, I was presented with a configuration wizard for Ubuntu OS. Once I had configured the OS, I logged on to it, opened a terminal window, checked the IP address of the unit by entering ifconfig, and then pinged my virtual desktop server to check network connectivity.
As the Compute Stick only has one USB port and it doesn't have an RJ45 port for a wired network connection, I attached an Inateck USB 3.0 Hub with a built-in Ethernet adapter (HBU3VL3-4) to the stick and plugged a network cable into the RJ45 port. Ubuntu found the device and issued an IP address to the NIC.
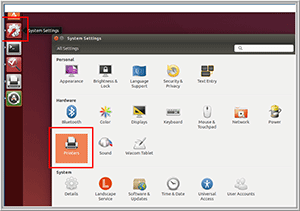
I plugged a USB cable from my KVM and the printer into the hub, clicked the System Settings (gear) icon on the left-side menu, and then clicked Printers (Figure 3).
 [Click on image for larger view.]
Figure 3. The system settings.
[Click on image for larger view.]
Figure 3. The system settings.
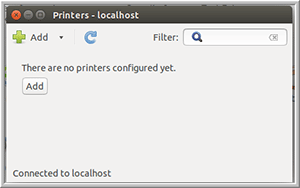
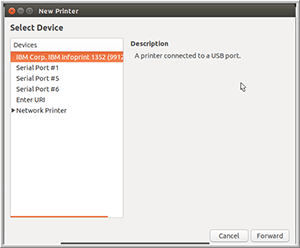
This brought up a dialog stating that there was no printer configured yet (Figure 4). I clicked Add and doing so brought up another dialog that listed my printer, which I selected and then clicked Forward (Figure 5).
 [Click on image for larger view.]
Figure 4. Initial printer dialog box.
[Click on image for larger view.]
Figure 4. Initial printer dialog box.
 [Click on image for larger view.]
Figure 5. The new printer.
[Click on image for larger view.]
Figure 5. The new printer.
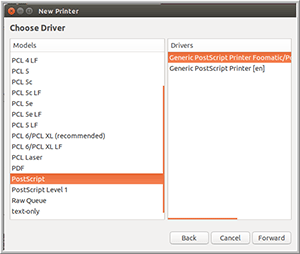
Another dialog came up that let me select the driver for the printer; I selected Generic from the list of manufacturers and Generic PostScript Printer Foomatic from the drivers list (Figure 6), and then clicked Forward. As a side note, I didn't find the 1352 under the IBM and Ricoh manufacturer dropdown menus.
 [Click on image for larger view.]
Figure 6. The printer drivers.
[Click on image for larger view.]
Figure 6. The printer drivers.
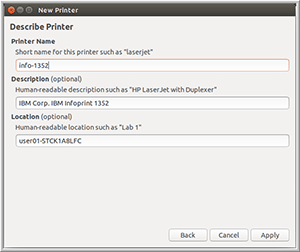
When a dialog came up that asked me to give the printer a name, I entered info_1352 and then clicked Apply (Figure 7).
 [Click on image for larger view.]
Figure 7. Printer name.
[Click on image for larger view.]
Figure 7. Printer name.
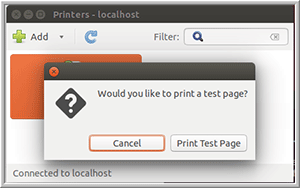
A dialog appeared that let me print a test page (Figure 8), and I was able to do so successfully.
 [Click on image for larger view.]
Figure 8. The Print Test Page dialogue.
[Click on image for larger view.]
Figure 8. The Print Test Page dialogue.
I brought up a terminal window on the system and entered lpstat -a to see the status of the printer, which showed that the printer was accepting requests (Figure 9).
 [Click on image for larger view.]
Figure 9. The status of the printer.
[Click on image for larger view.]
Figure 9. The status of the printer.
Configuring the VDI client
Once I configured my printer, I opened one of the virtual desktops in my VMware Horizon environment and configured it to access the printer server, and I was able to print from the virtual desktop to the print server without any issues. See my article on using a thin client as a print server to learn how I configured my Windows 10 system for remote printing.
Wrapping Up
I found the Intel Compute Stick to be a cheap and easy printer server option for my Infoprint 1352 printer. The Intel Compute Stick was $40 and the three-port USB hub with the built-in NIC was another $15. Although I could've gotten away without the hub if I would've configured the Compute Stick to work with a Bluetooth keyboard and use Wi-Fi rather than a wired connection for networking on the device, I wanted to have a wired Ethernet connection and connect a keyboard to the device. Dedicated printer servers do offer more features and I would recommend looking into using one for a production environment, but for use in my home lab I found the Intel Compute Stick to work fine.
About the Author
Tom Fenton has a wealth of hands-on IT experience gained over the past 30 years in a variety of technologies, with the past 20 years focusing on virtualization and storage. He previously worked as a Technical Marketing Manager for ControlUp. He also previously worked at VMware in Staff and Senior level positions. He has also worked as a Senior Validation Engineer with The Taneja Group, where he headed the Validation Service Lab and was instrumental in starting up its vSphere Virtual Volumes practice. He's on X @vDoppler.