How-To
How to Create a Customer Contact Center in AWS
Brien Posey shows how to use the Amazon Connect cloud service that allows you to connect a phone number to a virtual infrastructure and route calls on an as-needed basis.
Although cloud hyperscalers such as Amazon are well known for their ability to host IT infrastructure, it is also possible to use the AWS cloud for telephony. This is perhaps one of the most underrated use cases for the Amazon cloud. On premises PBX systems can be expensive and are notoriously difficult to configure. However, Amazon offers a cloud service called Amazon Connect that allows you to connect a phone number to a virtual infrastructure and route calls on an as needed basis. In this series, I will show you how it works.
To get started, log into AWS and select Amazon Connect from the list of services (it's in the Customer Engagement section). When Amazon Connect opens, click on the Get Started button.
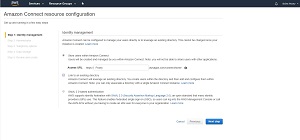
The first step in the configuration process is to specify an identity management provider. The easiest way to do this is to simply provide a URL, as shown in Figure 1. This allows users to be created directly within Amazon Connect. As an alternative, you can link Amazon Connect to an existing directory within the Amazon cloud, or you can opt to use SAML 2.0 based authentication.
 [Click on image for larger view.]
Figure 1. You will need to choose an identity management provider.
[Click on image for larger view.]
Figure 1. You will need to choose an identity management provider.
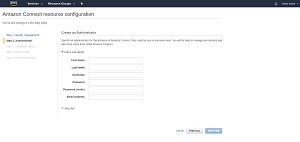
Once you have made your selection, click the Next Step button. You will now be taken to the screen shown in Figure 2, which prompts you to create an administrator account (assuming that you have opted to store user accounts within Amazon Connect). This account will be used to manage this instance of Amazon Connect.. You can save the account creation process for later on, but I recommend that you go ahead and create an account now if possible.
 [Click on image for larger view.]
Figure 2. The second step in the process is to create an administrator account.
[Click on image for larger view.]
Figure 2. The second step in the process is to create an administrator account.
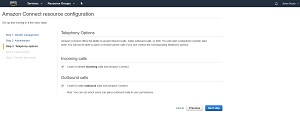
Click the Next Step button, and you will be taken to the Telephony Options screen. This screen allows you to choose whether you want to allow inbound calls and whether you want to allow outbound calls. Obviously the options that you enable will depend on your business use case for Amazon Connect. As you can see in Figure 3, enabling inbound and outbound calls is simply a matter of clicking on a check box.
 [Click on image for larger view.]
Figure 3. Choose whether you wish to enable inbound calls, outbound calls, or both.
[Click on image for larger view.]
Figure 3. Choose whether you wish to enable inbound calls, outbound calls, or both.
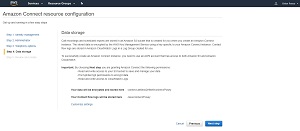
Click the Next Step button, and you will be taken to the Data Storage screen. Amazon Connect stores call logs and recordings in S3 buckets. The nice thing about the Data Storage screen is that you don't actually have to do anything. Amazon uses this screen to tell you which S3 bucket Amazon Connect is going to use, and which permissions will be assigned to the bucket. If for some reason you decide that you don't want to use the default settings, there is a Customize Settings link that you can use to switch to a different storage bucket or to specify separate buckets for call recordings and exported reports. You can see the Data Storage screen in Figure 4.
 [Click on image for larger view.]
Figure 4. It's usually OK to use the default data storage settings.
[Click on image for larger view.]
Figure 4. It's usually OK to use the default data storage settings.
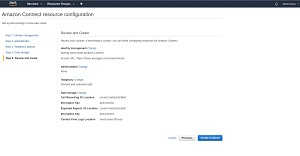
Click the Next Step button, and you will be taken to the Review and Create screen, which you can see in Figure 5. Take a moment to review the settings and then click on the Create Instance button when you have confirmed that all of the settings are correct. This brings up an important point. AWS allows you to create multiple Amazon Connect instances, so you can conceivably create multiple call centers for different purposes.
 [Click on image for larger view.]
Figure 5. Make sure that your settings are correct and then click the Create Instance button.
[Click on image for larger view.]
Figure 5. Make sure that your settings are correct and then click the Create Instance button.
Once you click the Create Instance button, it only takes about a minute (maybe less) for the instance to be created. Once the instance has been deployed, you will see a Success message like the one shown in Figure 6. Notice however, that it can take up to 15 minutes for the login page to become accessible.
 [Click on image for larger view.]
Figure 6. It only takes about a minute to create the Amazon Connect instance.
[Click on image for larger view.]
Figure 6. It only takes about a minute to create the Amazon Connect instance.
Now that I have shown you how to create an Amazon Connect instance, I will walk you through some of the configuration options in Part 2 of this series, now available here.
About the Author
Brien Posey is a 22-time Microsoft MVP with decades of IT experience. As a freelance writer, Posey has written thousands of articles and contributed to several dozen books on a wide variety of IT topics. Prior to going freelance, Posey was a CIO for a national chain of hospitals and health care facilities. He has also served as a network administrator for some of the country's largest insurance companies and for the Department of Defense at Fort Knox. In addition to his continued work in IT, Posey has spent the last several years actively training as a commercial scientist-astronaut candidate in preparation to fly on a mission to study polar mesospheric clouds from space. You can follow his spaceflight training on his Web site.