How-To
How to Set Up SFTP on AWS
Amazon offers its own file transfer service that doesn't support legacy FTP, but rather is based on a more modern variant known as Secure FTP or SFTP. Here, Brien Posey shows how, when enabled, this service allows users to transfer files directly to S3 cloud storage.
Even though the IT industry is known for its rapid evolution, there are a few technologies that have a surprising degree of longevity. Take the old FTP (File Transfer Protocol) for example. I can vividly remember using the FTP protocol nearly 30 years ago, and yet even today some of the publishers that I write for require book manuscripts and the accompanying figures to be uploaded to their servers by way of FTP.
While it is probably true that the vast majority of today's file transfers are done through email, FTP still has a place in the modern world. Some files are simply too large to email, and may even exceed the capabilities of some of the commercial file transfer services. Not surprisingly, Amazon offers its own file transfer service. While the service does not support legacy FTP, it is based on a more modern variant known as Secure FTP or SFTP. When enabled, this service allows users to transfer files directly to S3 cloud storage.
To access Amazon's transfer service, log into the AWS console, go to the list of services, and click on the AWS Transfer for SFTP option. It's located in the Migration and Transfer section.
As you can see in Figure 1, setting up the SFTP transfer services consists of three high-level steps. You will need to map your host name to a server, set up your users, and then select the S3 bucket that you want to use.
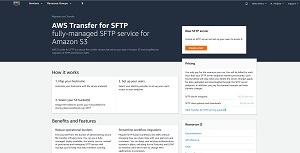 [Click on image for larger view.] Figure 1: Click the Create Server button to get started.
To get started, click on the Create Server button. This will take you to the screen shown in Figure 2.
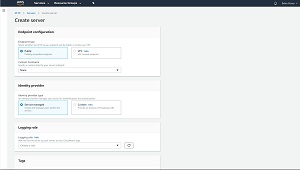 [Click on image for larger view.] Figure 2: The first step in the process is to create your SFTP server.
The first thing that you will need to do is to determine whether you want your SFTP server to be publicly accessible. You can choose to either create an SFTP server that can be accessed from the outside world, or you can opt to create a VPC hosted endpoint instead. For the purposes of this article, I will assume that you are creating a publicly accessible server.
The next step in the process is to optionally define a custom hostname. You can use the default server endpoint by selecting the None option, as is shown in the figure above. As an alternative however, you can choose to use an Amazon Route 53 DNS alias or an external DNS server.
Once you have selected your DNS option, you will need to choose an identity provider. The identity provider is the mechanism that provides authentication and authorization services for users. Amazon gives you two options. You can choose the Service Managed option, which allows user accounts to be created and managed within the transfer service that you are setting up, or you can choose to use an Amazon API Gateway URL instead. If you are in doubt as to which option to select, go with the Service Managed option.
Next, you will need to choose the IAM role for the server to push events to your CloudWatch logs. Simply choose your preferred role from the drop down list.
Finally, add any tags that you want to assign to the server that you are creating, and then click the Create Server button. It takes a few minutes for AWS to set up and fully provision the server. You can see what the server looks like in Figure 3.
 [Click on image for larger view.] Figure 3: This is what the newly created server looks like.
Once the server is online, go ahead and click on it. This will cause AWS to display the screen shown in Figure 4. You will need to assign some users to the server, so click on the Add User button. The resulting screen will allow you to specify the user, their IAM role, an IAM policy, and the user's SFTP home directory within an existing S3 bucket. There is also a place for you to provide the SSH public key that you want to provide.
 [Click on image for larger view.] Figure 4: This is what the Add User screen looks like.
As you can see, setting up the SFTP transfer service is a relatively straightforward process. The key to a successful deployment is to spend a bit of time deciding which DNS option and which IAM roles you want to use before engaging in the deployment process.
About the Author
Brien Posey is a 22-time Microsoft MVP with decades of IT experience. As a freelance writer, Posey has written thousands of articles and contributed to several dozen books on a wide variety of IT topics. Prior to going freelance, Posey was a CIO for a national chain of hospitals and health care facilities. He has also served as a network administrator for some of the country's largest insurance companies and for the Department of Defense at Fort Knox. In addition to his continued work in IT, Posey has spent the last several years actively training as a commercial scientist-astronaut candidate in preparation to fly on a mission to study polar mesospheric clouds from space. You can follow his spaceflight training on his Web site.