How-To
How to Provision EC2 Instances with Elastic IP Addresses
The vast majority of the EC2 instances that are created are not intended to be publicly accessible. These instances are assigned private IP addresses that are valid only within a specific virtual private cloud. However, there are occasionally situations in which an EC2 instance needs to be accessible to the public. For example, an instance that is acting as a Web front end would typically need to be accessible via the Internet. AWS makes this possible through the use of elastic IP addresses.
Simply put, an elastic IP address is an IPv4 address that is accessible from the public Internet (IPv6 addresses are not yet supported).
While there certainly nothing overly complicated about the concept of a public IP address, Amazon has its own way of doing things. Contrary to what you might expect, an elastic IP does not belong to an EC2 instance. Instead, the address is allocated to your AWS account. Because the address is an account level object, you can associate it with account resources (such as EC2 instances) on an as needed basis. This also means that you can reclaim an elastic IP from an EC2 instance and use it elsewhere.
Amazon also has a somewhat unique way for billing its customers for the use of elastic IP addresses. There is an hourly charge for any elastic IP address associated with your account. However, Amazon waives this charge if the elastic IP is allocated to an EC2 instance, so long as the instance is running and does not have multiple elastic IP addresses associated with it.
At one time, elastic IP addresses had to be created at the VPC level. While you can still use the VPC Dashboard to set up elastic IP addresses, Amazon has recently made the process a little bit easier by making it possible to set up elastic IP addresses directly through the EC2 Dashboard.
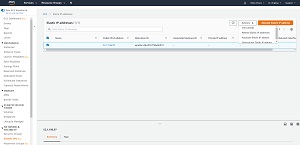
To create an elastic IP address, open the EC2 Dashboard and then click on the Elastic IPs tab. This will cause the console to display the screen shown in Figure 1.
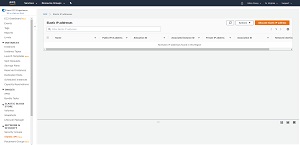 [Click on image for larger view.] Figure 1: Open the EC2 Dashboard and then select the Elastic IPs tab.
Now, click on the Allocate Elastic IP Address button. This will take you to a screen that asks you where you want the elastic IP address to come from. Normally you would choose to acquire the IP address from Amazon's pool of IP addresses. As you can see in Figure 2 however, there is an option to pull IP addresses from your own pool of static IPv4 addresses (if you have previously created such a pool).
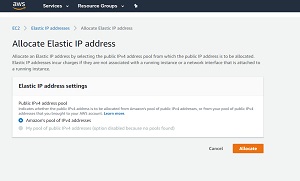 [Click on image for larger view.] Figure 2: You can use one of Amazon's IP addresses, or you can bring your own IPv4 addresses.
Click the Allocate button, and you will be given a public IP address. You can see what this looks like in Figure 3.
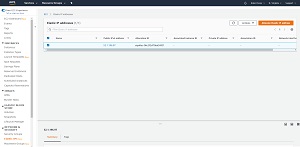 [Click on image for larger view.] Figure 3: An elastic IP address has been added to my account.
The IP address shown in the figure above has not yet been allocated to an EC2 instance. There are a couple of different ways in which you can put the IP address to work.
One option is to assign the address during the instance creation process. When you create a new EC2 instance, there is an Auto Assign Public IP setting that you can use to make sure that the instance you are creating receives a public IP address. You can see what this setting looks like in Figure 4.
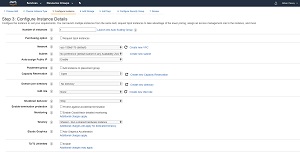 [Click on image for larger view.] Figure 4: You can assign an elastic IP during the instance creation process.
The other option is to assign an elastic IP to an existing instance. From the Elastic IPs tab, select the IP address and then choose the Associate Elastic IP Address option from the Actions menu, as shown in Figure 5.
 [Click on image for larger view.] Figure 5: Select the IP address and then choose the Associate Elastic IP Address option from the Actions menu.
Now, just choose the option to associate the address with an instance, and then choose the instance that you want to associate the address with. You can see what this looks like in Figure 6. Incidentally, the Instance field appears to be empty until you click on it. Clicking on this field will cause the console to display a list of your instances. Once you have made your selection, click the Associate button to complete the process.
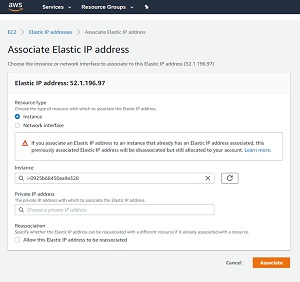 [Click on image for larger view.] Figure 6: Choose your instance and click the Associate button.
About the Author
Brien Posey is a 22-time Microsoft MVP with decades of IT experience. As a freelance writer, Posey has written thousands of articles and contributed to several dozen books on a wide variety of IT topics. Prior to going freelance, Posey was a CIO for a national chain of hospitals and health care facilities. He has also served as a network administrator for some of the country's largest insurance companies and for the Department of Defense at Fort Knox. In addition to his continued work in IT, Posey has spent the last several years actively training as a commercial scientist-astronaut candidate in preparation to fly on a mission to study polar mesospheric clouds from space. You can follow his spaceflight training on his Web site.