How-To
Publishing Applications From the AWS Serverless Application Repository, Part 2
After previously demonstrating how to deploy a serverless application to AWS Lambda, Brien Posey shows how to create a test event, run a test, and then remove the application.
In my previous article, I showed you how to deploy a serverless application to AWS Lambda. Now that I have walked you through the deployment process, I want to show you how to create a test event, run a test, and then remove the application.
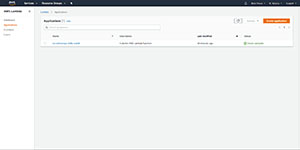
To test your app, open the AWS Lambda dashboard. You can access it from the AWS Services' Compute section. Click on the Applications tab, and you will see your previously deployed application, as shown in Figure 1.
 [Click on image for larger view.]
Figure 1: You should see your app listed on the Applications tab.
[Click on image for larger view.]
Figure 1: You should see your app listed on the Applications tab.
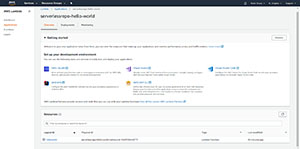
Click on the app, and you will be taken to the screen that is shown in Figure 2. This screen might appear a bit intimidating to those who have never used Lambda before, but most of what is on the screen can be safely ignored. Just click the Dismiss button to clear the clutter from the screen. At this point, the only thing remaining on the screen is your application, or application function (which you can also see at the bottom of Figure 2).
 [Click on image for larger view.]
Figure 2: You should see your app listed on the Applications tab.
[Click on image for larger view.]
Figure 2: You should see your app listed on the Applications tab.
You can click Dismiss to clear some of the clutter from this screen, and then click on the application.
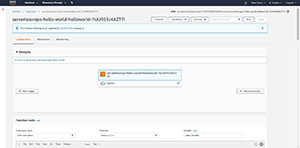
Click on the hyperlink for your application, and you will be taken into the screen shown in Figure 3. If you look at the upper right portion of the screen, you will notice a Test button. Go ahead and click Test.
 [Click on image for larger view.]
Figure 3: Click the Test button.
[Click on image for larger view.]
Figure 3: Click the Test button.
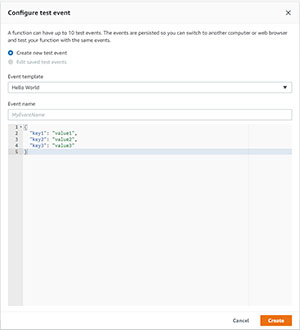
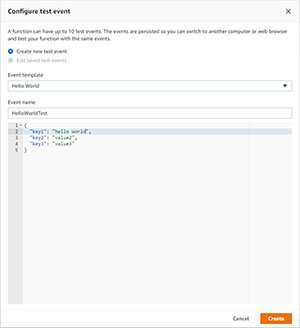
Now, AWS will display the Configure Test Event screen, which you can see in Figure 4. Make sure that the Event Template matches the name of the application or function that you want to test.
 [Click on image for larger view.]
Figure 4: Make sure that the correct event template is selected.
[Click on image for larger view.]
Figure 4: Make sure that the correct event template is selected.
The next thing that you will need to do is to give your test (which Amazon calls a test event) a name. You will need to enter this name into the Event Name field. For the sake of demonstration, I am going to call my test event HelloWorldTest.
Now you will need to modify the code shown in the lower portion of the screen so that it can be used for testing purposes. Unfortunately the code modification requirements are going to vary widely based on the application that you are testing. In the case of the Hello World application, I am going to modify Key 1 to look like this:
"key1":"hello world"
You can see the modification in Figure 5.
 [Click on image for larger view.]
Figure 5: Modify the necessary values and give your testing event a name.
[Click on image for larger view.]
Figure 5: Modify the necessary values and give your testing event a name.
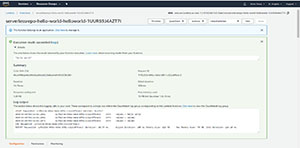
When you are done, click the Create button. Click the Test button again, and you will be taken to the screen shown in Figure 6, where you can verify that the application or function ran correctly. The main area of interest is the Execution Results section, which is shown in the figure. This section shown you whether or not the test succeeded, and you can also see the function's output (in the Details section). The Log Output section provides you with more detail about the test. You can see the input values, and the amount of memory used in the tests. This section also shows you the amount of memory used and the test duration. The Summary section, which appears in the middle of the figure, provides similar (but less detailed) information in a format that is easier to read.
 [Click on image for larger view.]
Figure 6: Make sure that your test has succeeded.
[Click on image for larger view.]
Figure 6: Make sure that your test has succeeded.
When you have finished with your Lambda function, you can easily delete it from the screen shown in the previous figure. Just click on the Actions button and then choose Delete Function from the resulting menu. When prompted, click Delete to confirm the action.
As you may recall from Part 1 of this blog post, I had originally published the Hello World application through the Serverless Application Repository. If you go back to this repository, you will notice that removing your function through the Lambda interface also causes your application to be removed from the Serverless Application Repository's list of published applications.
About the Author
Brien Posey is a 22-time Microsoft MVP with decades of IT experience. As a freelance writer, Posey has written thousands of articles and contributed to several dozen books on a wide variety of IT topics. Prior to going freelance, Posey was a CIO for a national chain of hospitals and health care facilities. He has also served as a network administrator for some of the country's largest insurance companies and for the Department of Defense at Fort Knox. In addition to his continued work in IT, Posey has spent the last several years actively training as a commercial scientist-astronaut candidate in preparation to fly on a mission to study polar mesospheric clouds from space. You can follow his spaceflight training on his Web site.