How-To
Creating Immutable Storage on AWS S3, Part 2
After previously explaining how to create immutable storage within Amazon S3, Brien Posey details some additional capabilities such as automated data lifecycle management or the ability to place a legal hold on certain data.
In my previous blog post, I explained how to create immutable storage within Amazon S3. Immutable storage is used for everything from ransomware protection to complying with data retention requirements. Of course simply creating immutable storage might not always be sufficient. Depending on what you are using the storage for, you might need some additional capabilities such as automated data lifecycle management or the ability to place a legal hold on certain data. In this blog post, I will show you how to enable these sorts of capabilities.
Once you have created an S3 bucket that has object lock enabled, it's time to begin uploading data to the bucket. Simply open the bucket and then click on the Upload button. When you do, AWS will prompt you to select the files that you want to upload.
Once the files have been uploaded, click Next and you will be taken to a screen that asks you to manage the permissions for the object. If you look at Figure 1, you can see that my account has been granted Read access to the object by default. I have also been granted Read / Write access for object permissions, which means that I will have access to modify the object's access control list. There is also an Add Account button that you can use to grant object access to other people.
 [Click on image for larger view.]
Figure 1: When you upload a file, you will need to set the permissions for that file.
[Click on image for larger view.]
Figure 1: When you upload a file, you will need to set the permissions for that file.
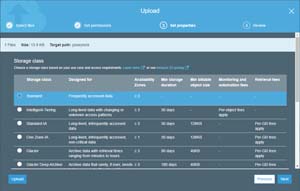
Click Next, and you will be taken to the Set Properties screen, shown in Figure 2. The upper portion of this screen asks you to choose the type of storage that you want to use for the data that you are uploading. If you scroll down, you also have the option of encrypting the data, applying a tag, or writing metadata that is based on key / value pairs.
 [Click on image for larger view.]
Figure 2: You will need to choose the type of storage that is to be used by your data.
[Click on image for larger view.]
Figure 2: You will need to choose the type of storage that is to be used by your data.
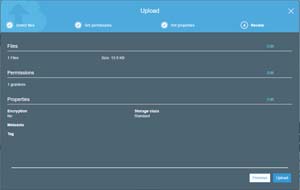
Click Next, and you will be taken to the Review screen, which you can see in Figure 3. Take a moment to make sure that all of the information being displayed on this screen is correct, and then click the Upload button.
 [Click on image for larger view.]
Figure 3: Take a moment and review the settings before uploading your data.
[Click on image for larger view.]
Figure 3: Take a moment and review the settings before uploading your data.
Now that you have put some data into the S3 bucket, it's time to create some lifecycle rules. To do so, go to the bucket's Management tab and then click on the Lifecycle option, which you can see in Figure 4.
 [Click on image for larger view.]
Figure 4: Lifecycle rules can be created through the Management tab.
[Click on image for larger view.]
Figure 4: Lifecycle rules can be created through the Management tab.
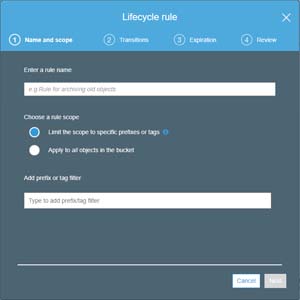
Click on the Add Lifecycle Rule button, and the management console will open the Lifecycle Rule dialog box, which you can see in Figure 5. As you can see in the figure, you will need to provide a name for the rule. It's a good idea to use a descriptive name since you could end up accumulating a lot of rules over time. The dialog box also gives you the ability to either apply the rule to all of the objects in the bucket or to apply the rule only to objects that have specific prefixes or tags.
 [Click on image for larger view.]
Figure 5: Lifecycle rules can be created through the Management tab.
[Click on image for larger view.]
Figure 5: Lifecycle rules can be created through the Management tab.
You will need to provide a name for the rule and assign the rule's scope.
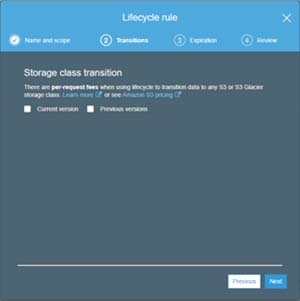
Click Next, and you will be taken to the Transition screen. This screen, which you can see in Figure 6, gives you the option of applying the rule to the file's current version and / or previous versions. When you have made your selection, click Next.
 [Click on image for larger view.]
Figure 6: Choose the data version for which you want the rule to apply.
[Click on image for larger view.]
Figure 6: Choose the data version for which you want the rule to apply.
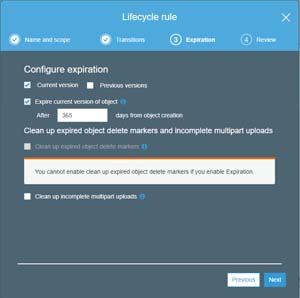
Click Next, and you will be taken to the Expiration screen. This is where you are able to configure your data retention policy. As you can see in Figure 7, this screen gives you the ability to choose how long objects will remain before they are deleted. You can expire current versions of objects, or you can leave the current versions alone, but expire older versions of objects. This screen also gives you the ability to clean up expired object delete markers and incomplete multipart uploads.
 [Click on image for larger view.]
Figure 7: The Lifecycle Rule screen allows you to configure object expiration.
[Click on image for larger view.]
Figure 7: The Lifecycle Rule screen allows you to configure object expiration.
Click Next, and you will be taken to the Review screen. Assuming that the everything on this screen appears to be correct, click Save to create the rule.
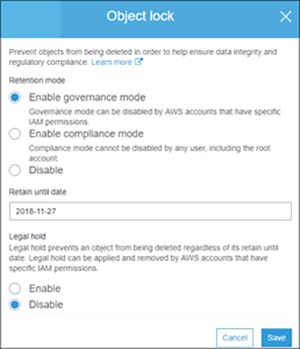
One last thing that you need to know about the Object Lock feature is that you can configure its behavior by setting a mode. It's worth noting however, that you have to be careful about doing this as some operations are irreversible.
To set the Object Lock mode, go to the bucket's main screen, scroll down to the Advanced Settings, and then click on Object Lock. You can choose to enable either Governance Mode or Compliance Mode, as shown in Figure 8.
 [Click on image for larger view.]
Figure 8: You can choose between Governance Mode and Compliance Mode.
[Click on image for larger view.]
Figure 8: You can choose between Governance Mode and Compliance Mode.
The main difference between these two modes are that administrators can disable Governance Mode if necessary. Once Compliance Mode is enabled however, it cannot be disabled. Either option allows you to set a retention period for the bucket as a whole, without having to create a separate lifecycle rule. This is also where you will find the option to enable a legal hold, which overrides the retention mode until you eventually release it.
About the Author
Brien Posey is a 22-time Microsoft MVP with decades of IT experience. As a freelance writer, Posey has written thousands of articles and contributed to several dozen books on a wide variety of IT topics. Prior to going freelance, Posey was a CIO for a national chain of hospitals and health care facilities. He has also served as a network administrator for some of the country's largest insurance companies and for the Department of Defense at Fort Knox. In addition to his continued work in IT, Posey has spent the last several years actively training as a commercial scientist-astronaut candidate in preparation to fly on a mission to study polar mesospheric clouds from space. You can follow his spaceflight training on his Web site.