How-To
Tracking AWS Activities with CloudTrail, Part 2
Following up on a previous post that explained that Amazon logs AWS administrative activities and exposes those activities through CloudTrail, Brien Posey now examines two additional features that are worth looking at: Insights and Trails.
In the first blog post in this series, I explained that Amazon logs AWS administrative activities and exposes those activities through CloudTrail. Although it is undeniably important to be able to browse your organization's AWS event history, CloudTrail offers two additional features that are worth looking at. These features are called Insights and Trails.
Trails are really just focused log files. When you create a trail, you are given the chance to specify the types of activity that you want to include within the trail (log).
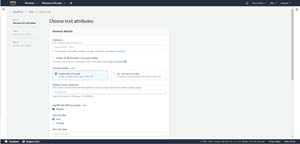
To create a trail, go to the console's Trails tab and then click on the Create Trail button, shown in Figure 1. When you do, you will be taken to the Choose Trail Attributes screen.
 [Click on image for larger view.]
Figure 1: Go to the Trails tab and click on the Create Trail button.
[Click on image for larger view.]
Figure 1: Go to the Trails tab and click on the Create Trail button.
The Choose Trail Attributes screen gives you the opportunity to tell AWS about the trail that you want to create. The first thing that you will need to do is to provide a name for the trail. Names can be up to 128 characters in length, so it's a good idea to try to make the name descriptive. You can also choose whether or not to enable the trail for all of the AWS accounts used by your organization.
The next thing that you will need to do is to choose where you want to store the trail. You can opt to store the trail in an existing S3 bucket, or you can make a new one. This screen also provides you with an option to encrypt your log file, and you can choose the KMS key that is used by the encryption process.
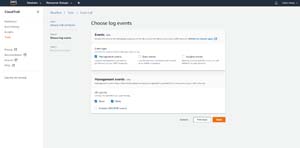
Scrolling to the bottom of the screen reveals options to enable CloudWatch logs and to append tags to the trail that you are creating. Both of these tasks are optional. When you are done, click Next. At this point, you will be taken to the Choose Log Events screen, which you can see in Figure 2.
 [Click on image for larger view.]
Figure 2: The Choose Log Events screen lets you choose the types of events that you wish to include in the trail.
[Click on image for larger view.]
Figure 2: The Choose Log Events screen lets you choose the types of events that you wish to include in the trail.
The Choose Log Events screen lets you choose the types of events that you want to include in the trail that you are creating. For each event type, you also have the option of selecting the types of activity that you want to include. In the screen capture above for instance, you can choose read and / or write events. You also have the option of excluding KMS related events, which can help to free the logs from some of the clutter.
Click Next, and you will be taken to the Review and Create screen. This screen simply displays the options that you have selected for the trail that you are creating. Assuming that everything on the screen is correct, you can click the Create Trail button to create your trail.
While trails act as a log of the activity that is taking place within your AWS account, Insights function as a security tool that helps you to identify unusual activity based on the contents of the trails that you create. While this capability is invaluable from a security prospective, it is important to note that there is an extra charge associated with the use of insights (see pricing). The current rate is $0.35 USD per 100,000 write management events analyzed.
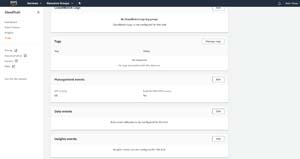
The process of enabling insights for a trail is simple. First, go to the Trails tab and locate the trail for which you wish to enable insights. If you look at Figure 3 for example, you can see that I have created a demo trail, and insights are currently disabled for that trail.
 [Click on image for larger view.]
Figure 3: Insights are currently disabled for this trail.
[Click on image for larger view.]
Figure 3: Insights are currently disabled for this trail.
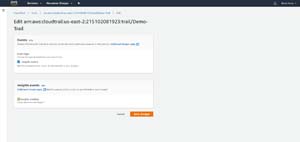
To enable insights, click on the trail's name to access a screen displaying its details. Now, scroll to the bottom of the screen and locate the Insight Events section. Click the Edit button, shown in Figure 4. Now, select the Insights Events checkbox found on the following screen, and then click the Save Changes button. You can see what this looks like in Figure 5.
 [Click on image for larger view.]
Figure 4: Click the Edit button in the Insight Events section.
[Click on image for larger view.]
Figure 4: Click the Edit button in the Insight Events section.
 [Click on image for larger view.]
Figure 5: This is how you enable Insights.
[Click on image for larger view.]
Figure 5: This is how you enable Insights.
Even after you enable Insights for a trail, it can take some time before any activities are displayed in the Insights section. After all, Insights has to review the inbound log entries to get a sense of what is normal before it can identify abnormal activity. According to Amazon, it takes about three days before insights begin to appear. However, this can vary depending on the amount and type of activity that is logged within the trail.
About the Author
Brien Posey is a 22-time Microsoft MVP with decades of IT experience. As a freelance writer, Posey has written thousands of articles and contributed to several dozen books on a wide variety of IT topics. Prior to going freelance, Posey was a CIO for a national chain of hospitals and health care facilities. He has also served as a network administrator for some of the country's largest insurance companies and for the Department of Defense at Fort Knox. In addition to his continued work in IT, Posey has spent the last several years actively training as a commercial scientist-astronaut candidate in preparation to fly on a mission to study polar mesospheric clouds from space. You can follow his spaceflight training on his Web site.