How-To
Setting Up and Working with Amazon WorkSpaces, Part 3
Tom Fenton shows how to set up Active Directory services for his newly created WorkSpaces and deploy them.
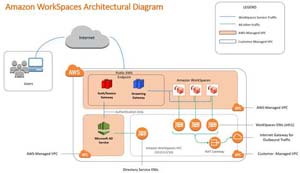
This is my third article in a series on Amazon WorkSpaces, Amazon's Desktop-as-a-Service (DaaS) solution. In my previous two articles (located here and here), I gave an overview of WorkSpaces and described how I set up a WorkSpaces environment. In this article, I will show how I set up Active Directory (AD) services for my WorkSpaces and deployed them.
I will be continuing the setup process from where I had left off in the previous article; I had set up my Amazon Web Services (AWS) infrastructure, including an Amazon Virtual Private Cloud (VPC) and its networking. As I had done previously, I will be referring to the Amazon WorkSpaces Proof-of-Concept (PCOC) document in this article and highlighting the specific aspects that were confusing to me.
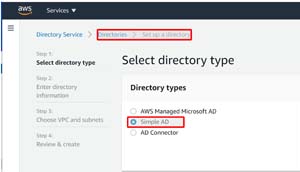
Out of the three options for using directory services -- Simple AD, AWS Directory Services for Microsoft Active Directory and AD Connector -- I chose to use Simple AD, a standalone SAMBA 4 server in AWS.
 [Click on image for larger view.]
Deploying a Simple AD Instance
All the work I have done so far has been in the Amazon VPC console; to set up the Simple AD instance, you use the Amazon WorkSpaces console. To set it up, I followed the instructions listed in the Launch a WorkSpaces with Simple AD section in the POC document.
First, I navigated to the Directories section in the Amazon WorkSpaces console and selected Simple AD.
 [Click on image for larger view.]
I set up a small Simple AD with an organization name of tjfaws and a directory DNS name of tjfaws-WorkSpaces.local. It took about 5 minutes for AWS to create the Simple AD directory; during this time, its status went from Requested to Creating and then finally to Active.
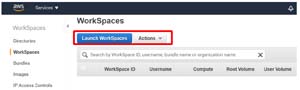
Creating WorkSpaces
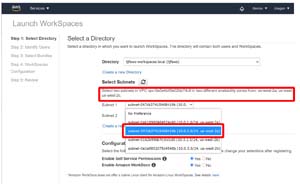
Once the directory had been created, I selected Launch WorkSpaces and began to create the WorkSpaces.
 [Click on image for larger view.]
Unfortunately, when asked to select the private subnets for the WorkSpaces, the drop-down menu only displayed the IP address and not the names of them, so I needed to use the diagram I created earlier to select the correct subnets (10.0.0.0 and 10.0.2.0).
 [Click on image for larger view.]
I then registered three users (User01-User03), for three separate WorkSpaces. When setting up a new user account, an email address is required; the user will receive a confirmation email once their WorkSpace has been created.
I selected the Value with Windows 10 instance for all three WorkSpaces and customized them to autostop after 3 hours. When the WorkSpaces were being created, their status changed from Pending to Available.
Once they were available, I received an email with a link to the WorkSpaces. The link was to a web page that allowed the user to set a password for their WorkSpace, as well as to select the VDI client to connect to it.
 [Click on image for larger view.]
When you use your VDI client, you will be asked to enter the registration code provided in the email.
I downloaded and installed the Windows App and then launched it. I was able to connect to my WorkSpace and resize the window of the VDI client without any issues.
I was also able browse the internet using a Firefox browser, which was preinstalled on the WorkSpace, without any issues. I also didn't run into any problems when I downloaded and installed Chrome from the internet, or when I tried playing a YouTube video.
 [Click on image for larger view.]
Using and Monitoring WorkSpaces
I ran the following commands to discover more information about the WorkSpace I was using:
-
WinVer
- Windows Server 2016 version 1607
-
Systeminfo
- 1 vCPU Intel64 Family 6 Model 85 Stepping 4 GenuineIntel ~2500 Mhz
- 4 GB RAM
- System manufacturer: Amazon EC2
- Eth 4 on 198.19.x.x network
- Eth 5 on 10.2.112.x network
-
TaskManager
- PCoIP running
- Amazon-ssm-agent running
-
Apps on the WorkSpace
- Firefox
- Install Amazon WorkDocs
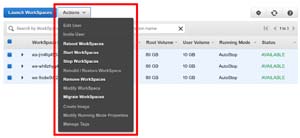
When I returned to the WorkSpaces console, I found that when I clicked on the Actions drop-down menu, I was able perform various WorkSpace-related actions, including stopping it and removing it.
 [Click on image for larger view.]
Conclusion
In this article series so far, I have shown you how I deployed Simple AD to supply AD services, created new WorkSpaces and explored a particular WorkSpace. The POC document was invaluable when setting up my environment. In my next article, I will show you some available AWS tools to monitor WorkSpaces and then explain how I deployed a third-party monitoring tool, ControlUp, in the environment.
Update: Here is Part 4
About the Author
Tom Fenton has a wealth of hands-on IT experience gained over the past 30 years in a variety of technologies, with the past 20 years focusing on virtualization and storage. He previously worked as a Technical Marketing Manager for ControlUp. He also previously worked at VMware in Staff and Senior level positions. He has also worked as a Senior Validation Engineer with The Taneja Group, where he headed the Validation Service Lab and was instrumental in starting up its vSphere Virtual Volumes practice. He's on X @vDoppler.