A Total Beginner's Guide to macOS X on AWS, Part 3: Connect to Instance
After detailing the need for dedicated hosts, how to handle quotas and creating instances, Brien Posey walks you through the instance connection process.
In my previous blog posts in this series, I talked about how to create a dedicated host for running macOS instances, and how to create an instance on the host. Now I want to talk about how to connect to a macOS instance that is running on the AWS cloud.
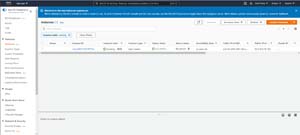 [Click on image for larger view.]Figure 1: A macOS instance is running on a dedicated host.
Whenever you create an instance in EC2, the way that you connect to the instance varies based on the instance type. For example, you would normally use an RDP client to connect to a Windows instance. Similarly, you would typically connect to a Linux instance through an SSH client.
Amazon actually gives you three different options for connecting to macOS instances. You can connect using EC2 Instance Connect, Session Manager, or an SSH client. For the purposes of this blog post, I will show you how to connect by using an SSH session.
To connect to a macOS instance, select the Instances tab (shown in the previous figure), and then select the checkbox that is associated with your macOS instance. Now, select the Connect option from the Actions menu, shown in Figure 2.
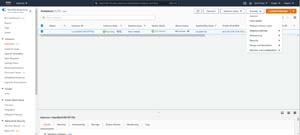 [Click on image for larger view.]Figure 2: Select your macOS instance and then choose the Connect option from the Actions menu.
At this point, the AWS console will display the Connect to Instance screen. As you can see in the figure, there are three tabs -- EC2 Instance Connect, Session Manager, and SSH Client. Each of these tabs corresponds to a different connection method. Since we are going to be connecting through SSH, go to the SSH tab. As you can see in Figure 3, this screen provides basic connectivity instructions.
 [Click on image for larger view.]Figure 3: There are three different options for connecting to a macOS instance.
Connecting via SSH does require you to install an SSH client on your PC. I recommend using PuTTY, because it is free and it works well. You can download PuTTY here:
Before you will be able to connect to the instance using PuTTY, you will need to convert your private key into RSA format. To do so, open PuTTYgen (it is listed under PuTTY on the Windows Start menu), and then choose the Load Private Key option from the File menu. When prompted, load the private key file (the .PEM file) that is associated with your macOS instance. Now, click the Save Private Key button and then follow the prompts to create a private key file.
Now, open the PuTTY client and then enter the instance's IP address into the Host Name (or IP Address) field. Make sure that the connection type is set to SSH and that the port number is set to 22. Next, expand the Connection option in the console tree and navigate to Connection | SSH | Auth. Click the Browse button and provide the private key file that you just created, as shown in Figure 4.
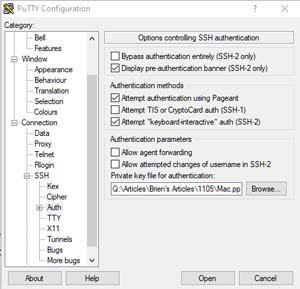 [Click on image for larger view.]Figure 4: There are three different options for connecting to a macOS instance.
Click Open to launch the SSH session. When you do, you will be prompted for a user name. The default user name is ec2-user. This user does not initially have a password associated with it. Upon entering the username, you should be taken to the command-line environment, as shown in Figure 5.
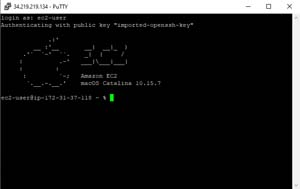 [Click on image for larger view.]Figure 5: This is what the macOS environment looks like.
In case you are wondering, the reason why there is no password associated with the default user account is that the user is authenticated through the private key file that you created. Even so, you will need to associate a password with the user account if you plan to enable the GUI environment.
If you are interested in enabling the GUI environment, you can find the full
instructions on GitHub. The process involves installing VNC server, which allows you to access the host's GUI through a Web browser.
Before you do that however, you will need to assign a password to the macOS instance. To do so, type this command:
Sudo passwd ec2-user
You can see what this looks like in Figure 6.
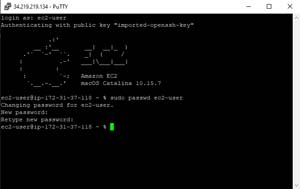 [Click on image for larger view.]Figure 6: This is how you add a password to the default user account.
As you can see, it is relatively easy to establish a connection to a macOS instance using PuTTY SSL. If you run into problems however, then my advice would be to revisit the security group that is associated with the instance and verify that it allows traffic to flow across Port 22.
About the Author
Brien Posey is a 22-time Microsoft MVP with decades of IT experience. As a freelance writer, Posey has written thousands of articles and contributed to several dozen books on a wide variety of IT topics. Prior to going freelance, Posey was a CIO for a national chain of hospitals and health care facilities. He has also served as a network administrator for some of the country's largest insurance companies and for the Department of Defense at Fort Knox. In addition to his continued work in IT, Posey has spent the last several years actively training as a commercial scientist-astronaut candidate in preparation to fly on a mission to study polar mesospheric clouds from space. You can follow his spaceflight training on his Web site.