How-To
Creating an IAM Role for the AWS Fault Injection Simulator
Brien walks through the process of creating an IAM role for the AWS Fault Injection Simulator in order to find out what happens when an EC2 spot instance is interrupted.
I recently wrote a blog post about using the AWS Fault Injection Simulator to find out what happens when an EC2 spot instance is interrupted. One of the key requirements for making the Fault Injection Simulator work is that you will need an IAM role. However, not just any IAM role will do. You are going to need a role that has been purpose built for the task at hand. In this blog post, I want to walk you through the process of creating such a role.
To get started creating the IAM role, open the IAM console, select the Roles tab, and then click on the Create Role button. At this point, you will see a screen asking you to choose the use case for the role that you are creating. Make sure that the AWS Service option is selected, click on EC2, and then click Next, as shown in Figure 1.
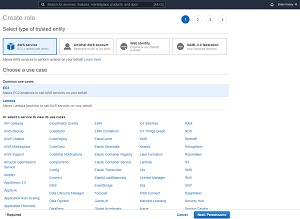 [Click on image for larger view.] Figure 1: You will need to choose the EC2 option.
At this point, you will be taken to the Create Policy screen, shown in Figure 2. Several policies are selected by default, but you will also need to create three additional policies and attach them to the role (without removing those policies that exist by default). Click the Create Policy button and you will be taken to the Create Policy screen. Select the JSON tab, shown in Figure 3.
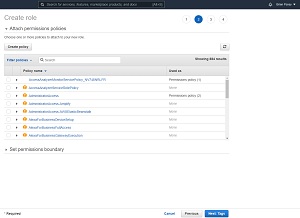 [Click on image for larger view.] Figure 2: You will need to create three additional policies.
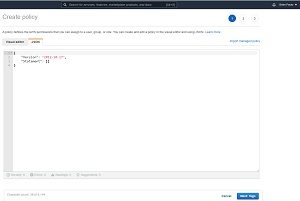 [Click on image for larger view.] Figure 3: Click the Create Policy button and then select the JSON tab.
The first policy that you will need to create gives the Fault Injection Simulator permission to perform fault injections. To create this policy, paste this code into the editor (replacing any existing code):
{
    "Version": "2012-10-17",
    "Statement": [
        {
            "Sid": "AllowFISExperimentRoleFaultInjectionReadOnly",
            "Effect": "Allow",
            "Action": [
                "iam:ListRoles"
            ],
            "Resource": "*"
        },
        {
            "Sid": "AllowFISExperimentRoleFaultInjectionActions",
            "Effect": "Allow",
            "Action": [
                "fis:InjectApiInternalError",
                "fis:InjectApiThrottleError",
                "fis:InjectApiUnavailableError"
            ],
            "Resource": "arn:*:fis:*:*:experiment/*"
        }
    ]
}
Click Next to go to the Tags screen, and then click Next again to go to the Review Policy screen. Here you will need to create a name and an optional description for the policy that you are creating. Keep in mind that there are over 800 native policies, so be sure to keep track of the names of the policies that you are creating. When you are done, click the Create Policy button.
The next policy that you will need to create grants the Fault Injection Simulator permission to use AWS FIS actions for EC2. Repeat the steps that were used to create the first policy, but paste this code into the JSON editor:
{
    "Version": "2012-10-17",
    "Statement": [
        {
            "Sid": "AllowFISExperimentRoleEC2ReadOnly",
            "Effect": "Allow",
            "Action": [
                "ec2:DescribeInstances"
            ],
            "Resource": "*"
        },
        {
            "Sid": "AllowFISExperimentRoleEC2Actions",
            "Effect": "Allow",
            "Action": [
                "ec2:RebootInstances",
                "ec2:StopInstances",
                "ec2:StartInstances",
                "ec2:TerminateInstances"
            ],
            "Resource": "arn:aws:ec2:*:*:instance/*"
        },
        {
            "Sid": "AllowFISExperimentRoleSpotInstanceActions",
            "Effect": "Allow",
            "Action": [
                "ec2:SendSpotInstanceInterruptions"
            ],
            "Resource": "arn:aws:ec2:*:*:instance/*"
        }
    ]
}
The third policy that you will need to create grants the Fault Injection Simulator additional permission to use AWS FIS actions for EC2. Once again, repeat the previous steps, pasting the following code into the JSON editor:
{
    "Version": "2012-10-17",
    "Statement": [
        {
            "Sid": "AllowFISExperimentRoleECSReadOnly",
            "Effect": "Allow",
            "Action": [
                "ecs:DescribeClusters",
                "ecs:ListContainerInstances"
            ],
            "Resource": "*"
        },
        {
            "Sid": "AllowFISExperimentRoleECSActions",
            "Effect": "Allow",
            "Action": [
                "ecs:UpdateContainerInstancesState",
                "ecs:ListContainerInstances"
            ],
            "Resource": "arn:aws:ecs:*:*:container-instance/*"
        }
    ]
}
When you are done, go back to the Attach Permissions Policies screen (which is part of creating a role) and then select the policies that you have created. You can use the Filter Policies option to narrow down the list and make your policies easier to find. You can see what this looks like in Figure 4.
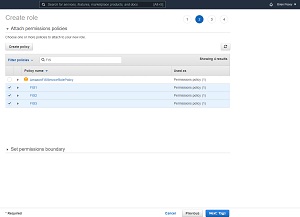 [Click on image for larger view.] Figure 4: Select the policies that you have created.
Click Next twice and you will be taken to the Review screen. Here you will need to provide a name and an optional description for the role that you are creating. When you are done, click the Create Role button.
There is one more thing that you will need to do before you will be able to use the role that you have just created. From the Identity and Access Management screen, select the Roles tab and then click on the role that you just created (the search box can make the role easier to find). When the role opens, select the Trust Relationships tab and then click the Edit Trust Relationship button. Paste the following code into the editor and then click on the Update Trust Policy button:
{
  "Version": "2012-10-17",
  "Statement": [
    {
      "Effect": "Allow",
      "Principal": {
        "Service": "fis.amazonaws.com"
      },
      "Action": "sts:AssumeRole",
      "Condition": {}
    }
  ]
}
The IAM role should now be ready to use. If the Create Experiment Template screen does not initially display the IAM role on the IAM Role drop down list, try waiting a few minutes and then refreshing the screen. The role should eventually appear.
About the Author
Brien Posey is a 22-time Microsoft MVP with decades of IT experience. As a freelance writer, Posey has written thousands of articles and contributed to several dozen books on a wide variety of IT topics. Prior to going freelance, Posey was a CIO for a national chain of hospitals and health care facilities. He has also served as a network administrator for some of the country's largest insurance companies and for the Department of Defense at Fort Knox. In addition to his continued work in IT, Posey has spent the last several years actively training as a commercial scientist-astronaut candidate in preparation to fly on a mission to study polar mesospheric clouds from space. You can follow his spaceflight training on his Web site.