How-To
Raspberry Pi Zero 2 W: A $15 Edge Computer/Device?
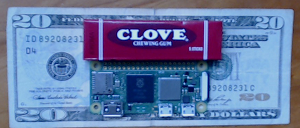
The Raspberry Pi (RPi) Zero 2 W is a small (the size of a pack of gum) Arm-based single-board computer (SBC), developed in the United Kingdom by the Raspberry Pi Foundation and released at the end of October 2021. In this article, I will look at what the Zero 2 W is and if it can, in fact, be used as a $15 edge computer/device.
Introduction
The Raspberry Pi project was originally developed about a decade ago to give students a hands-on device to learn basic computer science. RPi devices were immediately a huge success, not only for their originally targeted audience (education), but also for hobbyists, tinkers and makers; they even found a commercial audience. Two of the uses for RPi that I have found are using the RPi 3B+ as a VDI client and using the RPi 4B+ to run ESXi.
 [Click on image for larger view.]
I have written extensively on running ESXi on RPi, both on Virtualization & Cloud Review (located here) and in my published book from Apress titled "Running ESXi on a Raspberry Pi: Installing VMware ESXi on Raspberry Pi 4 to run Linux virtual machines," (located here).
Individuals and companies are using RPis for digital signs, robotics, security devices, telescope cameras, weather stations, humidor monitoring, home media, print servers, radio stations, VPN servers and basically any other use that can be handled by a low-powered computer.
A $15 Computer?
The Zero 2 W isn't as powerful as the 3B+ or the 4B+, but it still has a quad-core Arm processor, 512 MB of RAM, Bluetooth and wireless Ethernet for connectivity. Below is a table that compares various RPi systems as well as the first personal computer I used, a Radio Shack TRS-80 back in the early 1980s, to show how far we have come in respect to price and performance in the last four decades.
|
System
|
Processor
|
Memory
|
Connectivity
|
Price
|
|
Raspberry Pi Zero 2 W
|
BCM2710A1 @ 1GHz
(4 cores)
|
512 MB
|
Wireless
|
$15
|
|
Raspberry Pi 3 B+
|
BCM2837B0 @ 1.2GHz
(4 cores)
|
1GB
|
Wired and wireless
|
$35
|
|
Raspberry Pi 4 B
|
BCM2711 @1.5GHz
(4 cores)
|
1-8GB
|
Wired and wireless
|
$35-$75
|
|
Radio Shack TRS-80
|
Zilog Z80 @ 1.774 MHz
(Single core)
|
64 kB
|
Cassette tape drive
|
$399 (1980 USD)/
$1350 (2022 USD)
With monitor and keyboard
|
What You Get for $15
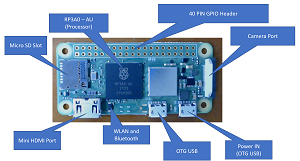
It is truly amazing what Raspberry was able to include on such a small (65mm x 30mm), inexpensive device. The diagram below shows not only the components that make up the system but also what a minimalistic , clean and well-laid-out design it is.
 [Click on image for larger view.]
Below is a list of the components that make up the Zero 2 W:
- RP3A0 - This is the heart of the system and is the chip that contains the CPU, GPU RAM, as well as other auxiliary components.
- CPU - Cortex-A53 (four cores; 32-bit and 64-bit capable; ARMv7 + ARMv8-A support)
- GPU - VideoCore IV (FullHD 1920x1080p video output & H.264 decode)
- RAM - 512 MB (LPDDR2)
- MicroSD Slot - Used to store the OS and persistent data and has been shown to work with 1TB cards.
- HDMI Port (Mini-HDMI Type C)
- WLAN and Bluetooth (802.11b/g/n, Bluetooth 4.2 / BLE)
- OTG USB (USB OTG microUSB)
- Power In (USB OTG microUSB, 5V, Max. 3W (0.6 A))
- Camera Port (CSI-2 camera connector)
- 40 Pin GPIO Header - The HAT-compatible 40-pin GPIO header allows the RPi to use sensors for monitoring and additional circuitry control for other electronic devices. The device comes pre-drilled for header pins but doesn’t include pins.
What You Don't Get for $15
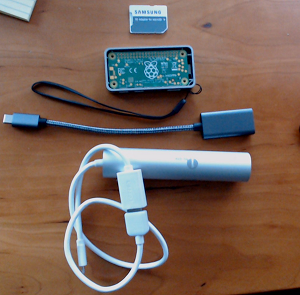
Yes, it is remarkable what you get with the Zero 2 W, but you will need additional components to build a usable system. At the bare minimum, you will need a quality MicroSD and a power supply. As the device uses Mini-HDMI and OTG USB ports, you will probably need adapters as well. You will also probably want to get a case for together with a USB hub being that its single USB port is somewhat limiting. The chart below shows the price of these components.
|
Required Component
|
Approximate Price
|
|
RPi Zero W 2
|
$15
|
|
OTG Power Supply
|
$10
|
|
MicroSD Card 128GB (Samsung 128 EVO)
|
$15
|
|
Mini-HDMI Adapter *
|
$5
|
|
OTG to USB-A Adapter *
|
$5
|
|
Case **
|
$10
|
|
USB Hub **
|
$5
|
|
USB Hub with 1GB Ethernet
|
$15
|
A bare-bones usable system will cost ~ $40; a system that will work for most users will cost closer to $50; and the cost of the system that I used, which includes a 1 GB wired USB hub, was $75 (see below).
 [Click on image for larger view.]
One thing you need to keep in mind when you purchase a RPi is that you are buying a single-board computer (SBC) -- not a complete computer. If you are going to use this device on the edge, you will need to configure it with additional components. For example, if you are using the camera for video surveillance, a basic video camera for it will cost $10 while an HQ camera with a 12.3MP IMX477 sensor that supports C- and CS-mount lenses will cost $85. For monitoring environmental conditions, such as humidity and temperature, a sensor will cost $3.
Where Can You Get a $15 RPi Zero 2 W?
With all the power in such a low-cost package, it would seem like everyone would want a RPi Zero 2 W, and they do -- in fact, right now Raspberry cannot keep up with the current demand. I was able to order a device from SparkFun.com and PiShop.us; however stock availability with both of these sites is hit or miss, as neither allow for backordering, and they have a single quantity limit. Because of this, you will need to check back frequently to try and snag one.
While the above-named sites, as well as CanaKit.com, may be out of the Zero 2 W as a single component, I have noticed that you may be able to get them in a kit, which may not be a bad idea since you will need additional components to make them usable anyway.
Lastly, if you are desperate to get your hands on a Zero 2 W and don't mind paying a premium, I have seen them listed on both eBay and Amazon.
 [Click on image for larger view.]
Conclusion
Although you will need additional components in order to use a RPi Zero 2 W, you should be able to have a fully functional quad-core system with 512MB of RAM and 128GB of storage for under $65. In my next article, I will go through the hands-on process of building, installing and configuring this device.
About the Author
Tom Fenton has a wealth of hands-on IT experience gained over the past 30 years in a variety of technologies, with the past 20 years focusing on virtualization and storage. He previously worked as a Technical Marketing Manager for ControlUp. He also previously worked at VMware in Staff and Senior level positions. He has also worked as a Senior Validation Engineer with The Taneja Group, where he headed the Validation Service Lab and was instrumental in starting up its vSphere Virtual Volumes practice. He's on X @vDoppler.