How-To
Home Lab NAS with Terramaster F5-221, Part 2: Installation and Configuration
In a previous article, I described why I am reviewing the Terramaster F5-221 and then gave an overview of the specifications of the device. In this article, I will walk you through how I set the device up, how I attempted to set up an NFS and an iSCSI target on it.
Installation and Configuration
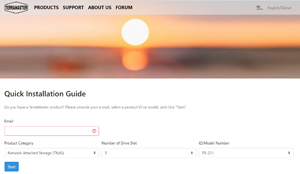
The Quick Installation Guide has a QBR code and address for the actual guide (htps://start.terra-master.com/). A separate guide consists of illustrations on how to add drives to the system. The web site required an email address before accessing the installation guide. I have not seen another storage vendor require an email address before accessing an installation guide.
 [Click on image for larger view.]
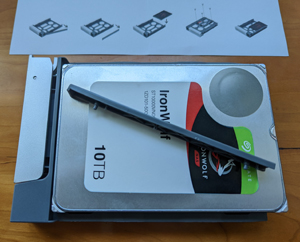
I followed the guide and installed a 10TB Seagate Ironwolf HDD drive in the device. To do so I needed to snap off the side rails, insert the drive, pop the rails back on and then insert three screws in the bottom of the carrier.
 [Click on image for larger view.]
I connected the device to my network using the included CAT 6 cable, plugged it to my power supply and powered it on.
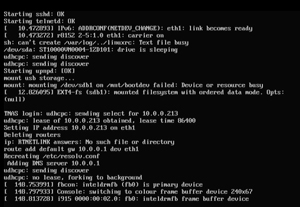
I entered http://tnas.local/ to access the device. After five minutes the web site was still inaccessible. I used the HDMI port to watch the device boot. This showed that that it used DHCP to acquire a IP address.
 [Click on image for larger view.]
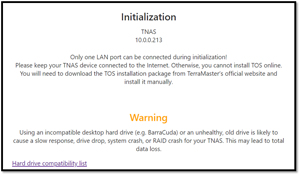
I entered the devices DHCP provided IP address in my web browser and was able to access the configuration screen. The configuration screed asked me to verify that the drive was compatibility with the device. I checked it and it was.
 [Click on image for larger view.]
I selected to use automatic installation, which uses the default configuration, which is relatively simple and fast and is suitable for ordinary home users. I could have used the custom installation, which would walked me through item-by-item settings.
During the installation it downloaded, installed, initialized the OS (TOS) and rebooted the device.
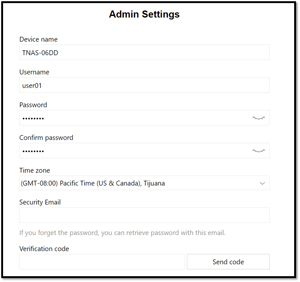
After the system restarted the web page refreshed and presented me with an admin settings page.
 [Click on image for larger view.]
I set the username/password and was asked for an email address that will let me receive my password.
It then informed me that my HDD would be formatted. It took less than a minute for my drive to be formatted and then was presented with a page that allowed me to access the device.
 [Click on image for larger view.]
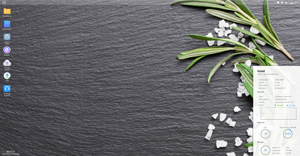
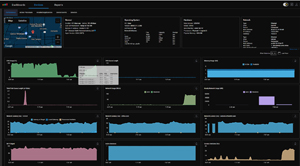
I accessed the devices web portal which showed the devices performance in the lower right.
 [Click on image for larger view.]
I went back to the online manual to set up the device to set up an NFS share. Unfortunately, there wasn't a lot of information or step-by-step instructions on how to do this. Pulling from different sections, this is what I did to set it up.
I brought up the Control Panel.
 [Click on image for larger view.]
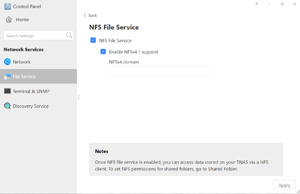
I verified that the NFS service was enabled by looking under File Service.
 [Click on image for larger view.]
I brought up File Manager and navigated to Volume #1 > public.
 [Click on image for larger view.]
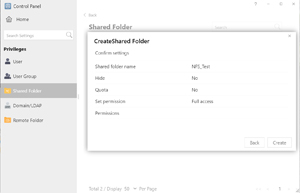
I created a new shared folder called NFS_Test. I set the permissions on it to full access.
 [Click on image for larger view.]
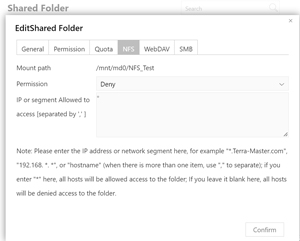
After the shared folder was created, I selected NFS_Test selected Edit and selected the NFS tab to see the mount path and verified that all IP addresses (*) could access the NFS share.
 [Click on image for larger view.]
Mounting NFS on Windows 10
Windows 10 Enterprise and Pro both support mounting an NFS share.
I attempted to mount it on my Windows Pro laptop by first enabling it by entering the PowerShell command:
Enable-WindowsOptionalFeature -FeatureName ServicesForNFS-ClientOnly, ClientForNFS-Infrastructure -Online -NoRestart
 [Click on image for larger view.]
This can also be enabled from Programs and Features under Add Features.
I then tried to mount the NFS share as a Z drive by entering the PowerShell commands:
mount -o anon \\10.0.0.7\md0\NFS_Test Z:
mount -o anon 10.0.0.7:/md0/NFS_Test Z:
Neither of these worked so I brought up Windows Subsystem for Linux (WSL) and entered the following to install the NFS client:
apt -y install-common
I attempted to mount the share by entering:
mount 10.0.0.7:/mnt/md0/NFS_Test /mnt/NFS_Mount
But this gave me "access denied by server while mounting 10.0.0.7:/mnt/md0/NFS_Test."
 [Click on image for larger view.]
I logged on to a standalone Linux system and ran the same command and it failed as well.
At this point I SSHed into the Terramaster system to get to a command-line prompt.
To see what mount points are available I entered:
exportfs -v
But this did not show anything.
I verified that the mount point existed and that there was a nfsd process was running and was listening for connections.
 [Click on image for larger view.]
I rebooted the Terramaster system, but still could not mount the NFS share.
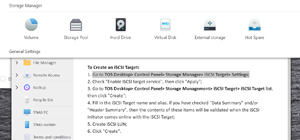
Setting Up iSCSI
I tried to follow the instructions in the manual to create an iSCSI target, however they referenced widgets that were not where they should be.
 [Click on image for larger view.]
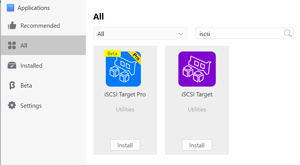
After searching around on various forums, I did come up with an idea how to create an iSCSI target.
I first installed the iSCSI Target application.
 [Click on image for larger view.]
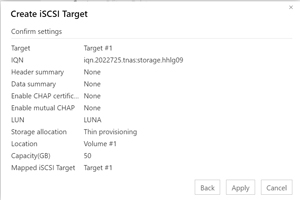
I then launched the application and created an iSCSI target named TM001 with an IQN of iqn.2022725.tnas:storage.8tq5bn.
 [Click on image for larger view.]
The application allowed me to create a 50GB LUN named LUNA.
 [Click on image for larger view.]
I mounted the iSCSI target from a Linux Fedora system without any issues by entering:
iscsiadm -m discovery -t st -p 10.0.0.7
iscsiadm -m node --targetname "iqn.2022725.tnas:storage.hhlg09" --portal 10.0.0.7:3260 --login
fdisk -l
 [Click on image for larger view.]
I then detached the iSCSI target by entering:
iscsiadm -m node --targetname "iqn.2022725.tnas:storage.hhlg09" --portal 10.0.0.7:3260 -logout
I then reattached the iSCSI target on the Linux system and ran a two-hour random 4k read/write test to see the IOPS on it by entering:
fio --filename=/dev/sdb --direct=1 --rw=randrw --bs=4k --ioengine=libaio --iodepth=256 --runtime=1800 --numjobs=4 --time_based --group_reporting --name=iops-test-job --eta-newline=15
The test showed 591 read and 592 write random 4K IOPS.
I ran a 4K sequent read test to test throughput on it by entering:
fio --filename=/dev/sdb --direct=1 --rw=read --bs=4k --ioengine=libaio --iodepth=256 --runtime=1800 --numjobs=4 --time_based --group_reporting --name=iops-test-job --eta-newline=15
The test showed 94.3MB/s (23K IOPS) sequential 4K reads.
I ran a 4K sequent write test to test throughput on it by entering:
fio --filename=/dev/sdb --direct=1 --rw=write --bs=4k --ioengine=libaio --iodepth=256 --runtime=1800 --numjobs=4 --time_based --group_reporting --name=iops-test-job --eta-newline=15
The test showed 86.1MB/s (21K IOPS) sequential 4K writes.
While the test was running, I monitored it and noticed that each core on the CPU on the Terramaster was only being used about 17 percent of the time.
 [Click on image for larger view.]
While the CPU usage on the initiator was and 100 percent during the random test and 50 percent during the sequential tests.
 [Click on image for larger view.]
The Seagate Spec sheet rates these drives at a maximum sustained transfer rate of 210MB/s of the drive. Theoretically the 1Gb NIC can handle 125MBps, so the device's throughput at 94.3MB/s does not appear to be bottlenecked by the network or the disk.
 [Click on image for larger view.]
Conclusion
Unfortunately, the documentation for setting up an NFS share and iSCSI target was not very good for this device and I was unable to set up an NFS share on the Terramaster. The iSCSI transfer rate was far less then what I expected.
I am not sure if it was the drive (which is rated at 210MBps), the Terramaster device (which is rated at read speed reaching 119 MB/s), the network (which is capable of 125MBps), or the OS running on the device. In further testing I will investigate these possibilities and see if I can get more performance from the device.