How-To
Home Lab NAS with Terramaster F5-221, Part 3: Performance Improvements
Although designed to act as a home/small business file and back-up repository, Tom thinks its specs might allow it to work a storage server for virtualization for a small home lab.
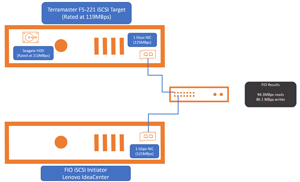
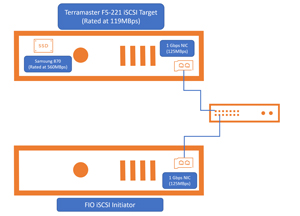
In previous articles (starting here) I looked at setting up and using a Terramaster F5-221 as an iSCSI and NFS storage device. Although I couldn't get NFS to work on it, I was able to get iSCSI to work with it. However, the performance was not that great. To be fair, this device was not designed to be a storage server for virtualization -- it was designed to act as a home/small business file and back-up repository. However, its specifications might allow it to work as one for a small home lab.
The F5-221 hardware is limited -- it has dual 1GB NICs, a dual-core Intel Celeron J3355 processor and 2GB of RAM.
In my initial test I used a Seagate 10TB HDD in the device and was only able to get 591 read and 592 write random 4K IOPS, 94.3MB/s sequential reads and 86.1MB/s (21K IOPS) sequential 4K writes from the device.
The HDD is rated at 210 MBps, the Terramaster device has an advertised rated at read speed reaching 119 MB/s and a 1Gbps network is capable of 125MBps. In further testing I will investigate these possibilities and see if I can get more performance from the device.
 [Click on image for larger view.]
Different iSCSI Initiator
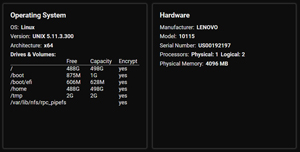
For my initial testing I used a Lenovo IdeaCenter as the iSCSI initiator from which I ran my FIO tests.
 [Click on image for larger view.]
During the testing the system used 100 percent of the CPU during the random tests and about 50 percent of the CPU during the sequential tests. The 100 percent utilization didn't worry me as I was looking at total bandwidth testing, which only used 50 percent of the CPU. However, to remove the possibility that it was affecting my testing, I moved to a more powerful system to initiate my testing.
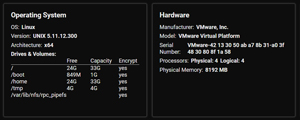
The new system was a virtual machine running Fedora with 4CPUs and 8GB of RAM.
 [Click on image for larger view.]
I couldn't remove the target from the previous Linux system, so I had to reboot it to free up the target.
I ran the sequential test on the device. With the new server I was able to get 113MBps.
 [Click on image for larger view.]
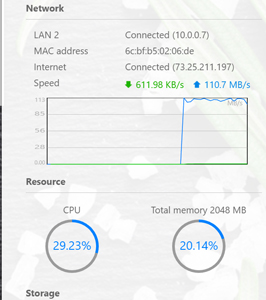
The F5-221 was using about 34 percent of its CPU during the testing.
 [Click on image for larger view.]
The Fedora VM used about 8 percent of its CPU.
 [Click on image for larger view.]
This is close to what I expected from network storage with 1Gbps NIC.
Adding an SSD
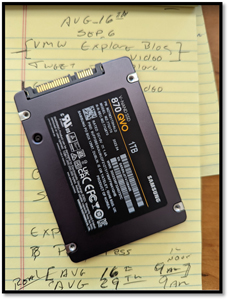
To see if the drive was the limiting factor of the performance of the device, I added an SSD drive to the Terramaster in its second bay.
 [Click on image for larger view.]
The drive was a 1TB 2.5-in. SATA Samsung 870 QVO drive that was rated at up to 560MBs read and 530MBs write speed.
 [Click on image for larger view.]
 [Click on image for larger view.]
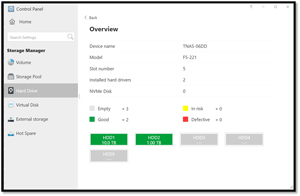
The SSD drive was recognized on the F5-221 automatically without any interaction from me.
 [Click on image for larger view.]
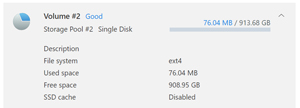
I created a new volume (Volume #2) storage pool (Storage Pool #2) using the entire SSD.
 [Click on image for larger view.]
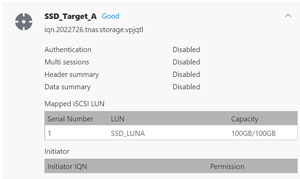
I created the 100GB LUN, which I used as an iSCSI target using the SSD for backing.
 [Click on image for larger view.]
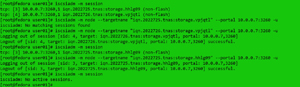
The new iSCSI target (iqn.2022726.tnas:storage.vpjqtl) was mounted without any issues as /dev/sdc by entering
iscsiadm -m node --targetname "iqn.2022726.tnas:storage.vpjqtl" --portal 10.0.0.7:3260 --login
 [Click on image for larger view.]
I ran the sequential test on the device. With the new server I was able to get 116MBps which was close to but not meeting the advertised speed of 119MBps of the F5-221.
 [Click on image for larger view.]
Again, the F5-221 was using about 34 percent of its CPU during the testing.
 [Click on image for larger view.]
The Fedora VM used about 7 percent of its CPU while I was running the tests.
 [Click on image for larger view.]
This proved that regardless of if I used an HDD or a SSD drive the performance of the F5-221 was the same.
Adding More RAM
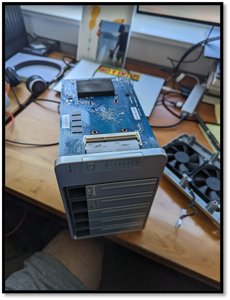
Terramaster does support adding more RAM to the F5-221 and even has a video of how to install more RAM on the device. This entails removing the case cover and placing it in the RAM slot.
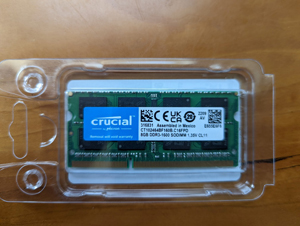
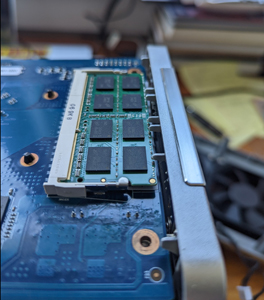
The RAM that I purchased for the system was Crucial RAM 8GB DDR3 1600 MHz CL11 Laptop Memory CT102464BF160B, which cost $36.
 [Click on image for larger view.]
Before powering down the F5-221 system I unmounted the iSCSI targets for the Fedora system.
 [Click on image for larger view.]
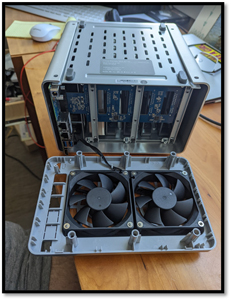
To access the RAM module slot, I needed to remove the rear panel and the outer shell and bottom. It took less than 10 minutes to install the RAM on the system.
 [Click on image for larger view.]
 [Click on image for larger view.]
The one issue that I did have is that I needed to remove two screws from the motherboard to gain space to slide the RAM into its slot.
 [Click on image for larger view.]
Once the system was rebooted it showed a total of 10GB of RAM (the 2GB of existing RAM and the 8GB that I added).
I reran my test and had the identical results when using 10GB of RAM as when using 2GB of RAM.
This again pointed to the 1Gbps NIC being the limiting factor of the device.
Adding a 2.5GB NIC
Searching the Terramaster forums shows TOS4.2.09 added 2.5G network card chip driver support but they found that it had issues, so they removed support for it.
Conclusion
In my efforts to eke out slightly more performance from the F5-221, I put an SSD drive in it and added more RAM to it. None of these helped the performance of the system -- the bottleneck appears to be the 1Gbps NIC. As I was writing this series of articles, Terramaster released a version 5 of their operating system TOS. In my next article I will attempt to install it on my F5-221 and see if it will support a 2.5GBps USB NIC.