In-Depth
How to Enable TPM Support for AWS Windows EC2 Instances
Surprisingly, most Windows EC2 instances do not support TPM 2.0, but thankfully there is a way to enable TPM support, explains Brien Posey.
Although Trusted Platform Module (TPM) has been a topic of conversation in Windows circles for years thanks to BitLocker, TPM received renewed attention with the launch of Windows 11. Being that Microsoft uses TPM for everything from BitLocker encryption to UEFI Secure Boot, it might surprise you to learn that Most Windows EC2 instances do not support TPM 2.0. Thankfully, there is a way to enable TPM support.
If you have an existing Windows instance, chances are that it probably does not have TPM support enabled. To find out for sure, open Windows PowerShell for AWS and enter the following command:
Get-EC2Instance | Select-Object -ExpandProperty Instances | Select-Object TPMSupport
If you look at Figure 1, you will notice that when I entered this command, no results were returned. This means that none of my existing instances have TPM support enabled. Unfortunately, Amazon does not allow you to add TPM support to an existing instance. You can however, create a new instance with TPM support enabled. For the purposes of this blog post, I will focus on Windows instances. However, Linux instances are also supported.
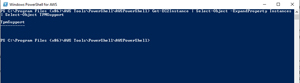 [Click on image for larger view.] Figure 1: Most instances do not support TPM.
The trick to creating a Windows instance with TPM support is that you have to use an Amazon Machine Image (AMI) that has UEFI Secure Boot enabled. Amazon provides a list of compatible AMIs.
To create a basic Windows instance that includes TPM support, open the EC2 console and then select the AMI Catalog tab. Next, enter "TPM-Windows_Server-2022-English-Full-Base" into the search box. When the results are displayed, select the Community AMIs tab, shown in Figure 2.
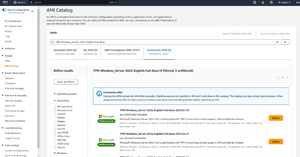 [Click on image for larger view.] Figure 2: You can acquire the necessary AMIs on the Community AMIs tab.
At this point, you need only to click the Select button next to the AMI that you want to use and then click the Launch Instance with AMI button. You will now be taken to the same screen that is used for launching any other instance. Populate any extra configuration options that you want to use and then click the Launch Instance button.
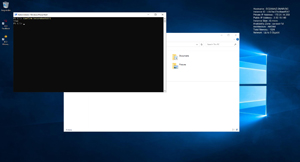
Once the instance is up and running, you can repeat the command that I showed you earlier to verify that TPM support is indeed enabled. As you can see in Figure 3, the instance that I just created has TPM 2.0 support enabled.
 [Click on image for larger view.] Figure 3: TPM 2.0 support is enabled for this instance.
As you can see, it is relatively easy to create an EC2 instance that has TPM support enabled. Even so, there are a few things that you should know.
For starters, when you enable TPM for an EC2 instance, what you are actually enabling is virtual TPM, not a physical TPM. This virtual TPM is based on something called NitroTPM. The reason why this matters is because it means that you can only enable TPM support for instances running in locations that are compatible with NitroTPM. Specifically, this means that you can't enable TPM support for instances that are running on Outposts. Similarly, TPM support is not available for instances that are running in local zones or in wavelength zones.
Another important thing to keep in mind is that although NitroTPM exists as a part of the AMI from which a TPM enabled instance is created, NitroTPM resides outside of the operating system. This means that if you were to create an EBS snapshot of an instance, the TPM state will not be included in that snapshot. Similarly, if you export a TPM enabled instance, the TPM state will not be included in the exported instance.
Once the instance is up and running, you may want to confirm that the instance is indeed using UEFI secure boot. The easiest way to do so is to open PowerShell (from inside of the instance) and enter the following command:
Confirm-SecureBootUEFI
If UEFI secure boot is enabled then this command should produce a response of True, as shown in Figure 4.
 [Click on image for larger view.] Figure 4: UEFI Secure Boot is enabled for this instance.
One last thing that is worth mentioning is that if you decide to enable BitLocker encryption for one or more of the instance's volumes, then those volumes will become dedicated to that instance unless you decide to remove the encryption later on. In other words, you can't detach a BitLocker encrypted volume from one instance and attach it to another instance as you can do with other EBS volumes.
About the Author
Brien Posey is a 22-time Microsoft MVP with decades of IT experience. As a freelance writer, Posey has written thousands of articles and contributed to several dozen books on a wide variety of IT topics. Prior to going freelance, Posey was a CIO for a national chain of hospitals and health care facilities. He has also served as a network administrator for some of the country's largest insurance companies and for the Department of Defense at Fort Knox. In addition to his continued work in IT, Posey has spent the last several years actively training as a commercial scientist-astronaut candidate in preparation to fly on a mission to study polar mesospheric clouds from space. You can follow his spaceflight training on his Web site.