How-To
Running AI Locally, Part 2: From VMware Context to Hands-On Tools
In part 1 of this article, I compared and contrasted what I called Private AI (large-scale, enterprise-grade AI using local enterprise-grade resources) and Local AI (small-scale AI using one or two local machines). I then dove into what is required to run AI on virtual machines.
In this article, I will go from the theoretical to the practical and show you the tools that you can use to determine if a large language model (LLM) is a good fit for the hardware that it is running on, how easy it is to create a locally powered ChatGPT-like experience using local AI, and follow up with how to benchmark local AI.
Use LLMfit to Evaluate Your Hardware Requirements
It is remarkable the range of hardware that can run LLMs, but just because you can do something doesn't mean that you should do it. For example, one of the first local AI projects that I was involved with was running AI on a Raspberry Pi 5. The Raspberry Pi that I used, although fully functional as a desktop, I found that LLM inference did not perform very well on the Pi's ARM CPU and took over 17 minutes to generate an answer to a simple question. While the Pi's 16 GB of RAM could hold the models, the CPU's speed in pulling them from RAM was a bottleneck. Also, the Pi's ARM Cortex-A76 lacks the x86 vector instruction extensions commonly used by AI frameworks, such as Intel AVX-512, which further hampered the Pi's performance.
After discovering the limitations of running AI on a Pi, I, for the most part, have been running local AI on x64 hardware ranging from an old laptop with an older four-core i7-8665U CPU and 16 GB of RAM to a Lenovo P16 with a newer 24-core Ultra 9 285HX CPU, 192 GB of RAM, and an NVIDIA RTX PRO 5000 Blackwell Laptop GPU.
As you can see, you can run AI on a wide range of hardware, but the question is, should you, and more importantly, what LLM should you run on your hardware? This is where LLMfit comes into play: it analyzes your device's hardware and shows how well various LLMs will run on it. Using LLMfit saves me a lot of time compared to my old method of manually trying different LLMs.
In the example below, you can see that when I used LLMfit to see what Llama models would run on the Lenovo P16, only their largest models, that is, ones with more than 400 billion parameters, would not run on the system; all others would run well on it.
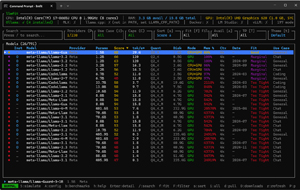 [Click on image for larger view.]
When I ran LLMfit on my older work laptop, I could only run the smallest LLMs, and they were only a "good," not a "perfect," fit.
 [Click on image for larger view.]
Using LLMfit
To dive deeper into LLMfit, it is a free, open-source product with an easy-to-understand Terminal User Interface (TUI) that analyzes your device's hardware, scores hundreds of LLMs, and advises you on which ones will run well on it. Its interface reminds me of the Linux "top" command.
Tom's Tip: There are many ways to install LLMfit on a Windows system, but the easiest I've found is to use the Scoop package manager and PowerShell using the following commands.
Set-ExecutionPolicy -ExecutionPolicy RemoteSigned -Scope CurrentUser

Invoke-RestMethod -Uri https://get.scoop.sh | Invoke-Expression

scoop install llmfit
To start the LLMfit TUI, type in llmfit. It will analyze your hardware and present a list of LLMs that it is aware of. As this list is rather extensive, with hundreds of LLMs, you will want to narrow it down.
Tom's Tip: The accuracy and speed of responses depend heavily on the model you use. LLMs labeled as coder models are far smaller and perform far better at coding tasks than general LLMs.
The top row shows information about the machine. This includes the CPU, RAM, and GPU. Under that row, it shows whether Ollama is installed, how many LLMs it has installed, and other frameworks like LM Studio and Docker.
The next section shows the search criteria you can use to narrow results in the Models section.
To narrow it down to the LLMs that would work on my limited hardware and be good for coding, I pressed the "f" key and cycled through to "Runnable," as there were no "Perfect" models. I then pressed "U," which brought up a "Use Case" dialog, selected "Coding," and pressed Escape to return to the main dashboard.
This limited it to 21 models from the original 791 shown, with usable Ollama models marked with an "O" in the Inst column. If the model has already been downloaded, there would be a green check mark in the far-left column. I then used the arrow keys to move down to the model I wanted to install and pressed "d." In the lower-right corner, you will see a dialog showing the download progress.
 [Click on image for larger view.]
Being able to discover what LLM would work best with my hardware and then download models directly using LLMfit is a huge time-saver.
Using Ollama as a Chatbot
Using LLMfit to find an LLM that will work with your hardware is great, but what you really want to do is communicate with an LLM. For this, you will need a framework that makes all the connections and displays a dialog so you can interact with it as you do with ChatGPT or other chatbots.
In the early days, I tried to set up the environment and build Python scripts to do this. It quickly became too complex and unwieldy, so I was thrilled when I discovered Ollama, a runtime and management platform for running local LLMs that handles all the underlying work, so you can type prompts and receive answers. It has a GUI and a command-line interface. Ollama works with Windows, macOS, and Linux.
Tom's Tip: To install Ollama on Windows, enter winget install ollama.
Once installed, you can either launch the GUI or use it from the command line.
Some of the switches that you can use from the command line are:
ollama --help ## to display the switches

ollama --version ## to display the version

ollama list ## to display any of the LLMs that it knows about

ollama ps ## shows running models
One interesting thing about Ollama is that it automatically downloads models if they are not already downloaded.
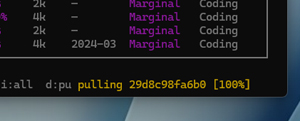
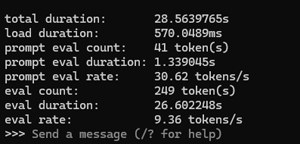
To start a chat session, I entered ollama run qwen2.5-coder:1.5b --verbose.
Tom's Tip: The --verbose switch will display timing metrics after a prompt answer is completed.
This started a chat session with the qwen2.5-coder model.
I was presented with the prompt input (>>>) and entered my prompt, "Create the HTML code to display 'Hello World' in blue."
Seconds later, the correct code was displayed (I tested it in my browser), along with an explanation of what the code did. At the bottom, the statistics were displayed, showing the prompt eval rate was 30 tokens/sec, and the eval rate was 9 tokens/sec.
 [Click on image for larger view.]
Tom's Tip: To conserve resources, the LLM will unload after five minutes of inactivity, but when you enter another prompt, it will automatically reload the LLM.
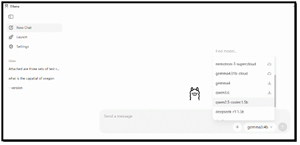
Using the GUI with Ollama is just as easy. Launch the application and select Chat. From the chat window, select the LLM you want to use. It can use models that you have already downloaded, download new models (the down arrow), or use cloud-based models.
 [Click on image for larger view.]
Benchmarking AI
After I had an LLM and a framework to work with it, I wanted a way to measure how well the hardware supports AI. At first, I just ran scripts using Ollama. This gave me a fair idea about the performance, but it was pretty unscientific and had far too many variables to make me feel comfortable with it. After doing some searching, I found that Geekbench had an AI-specific benchmarking tool called, appropriately, "Geekbench AI."
Geekbench AI is a cross-platform benchmarking suite developed by Primate Labs, the same people who developed Geekbench. It was designed to measure machine learning, deep learning, and AI-centric capabilities of devices. Geekbench AI focuses on real-world tasks, evaluating how effectively a device's Central Processing Unit (CPU), Graphics Processing Unit (GPU), and specialized Neural Processing Unit (NPU) handle computer vision and natural language processing workloads.
It measures both processing speed and the accuracy of AI output and penalizes systems that sacrifice precision for speed. Instead of presenting a single score, Geekbench AI reports results for different numerical precision workloads, including Single Precision, Half Precision, and Quantized workloads.
Geekbench AI scores include Full Precision, Half Precision and Quantized states. Full Precision (FP32) uses a standard 32-bit floating-point format. This is for tasks that require absolute precision and granular detail, such as testing heavy architectural frameworks or highly detailed computer vision tasks where output degradation cannot be tolerated.
Half Precision, or FP16, reduces the format to 16-bit floating-point numbers, striking a balance between performance and accuracy. This is used by consumer-facing graphics applications such as real-time photo filters and video background blurring.
Finally, the Quantized score relies on low-precision, 8-bit integers (INT8) rather than floating-point numbers, measuring a device's ability to compress and run models with maximum power efficiency and speed, which is critical for mobile devices and localized AI tasks like real-time face detection, text translation, or voice-to-text processing, where memory and battery life are more important than absolute accuracy.
To achieve this, Geekbench AI integrates directly with the industry's leading frameworks rather than running generic code. For Apple ecosystems, including iOS and macOS, it natively leverages Core ML, allowing it to tap directly into Apple's hardware-tight Neural Engine optimizations. On Windows and Linux, the benchmark utilizes Intel's OpenVINO framework to test x86 CPUs and integrated graphics. It also supports Microsoft's DirectML and ONNX Runtime to target cross-vendor discrete graphics cards. On Android, Geekbench AI uses vendor-specific TensorFlow Lite delegates, including Qualcomm's QNN, Samsung's ENN, and ArmNN.
Tom's Tip: To install Geekbench on a Windows system, enter winget install -e --id PrimateLabs.GeekbenchAI.
Geekbench AI Results
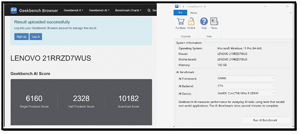
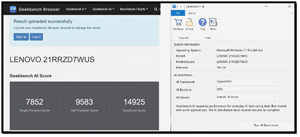
I previously had the opportunity to review a few different Lenovo ThinkPad laptops, including the 21RR-zd7wus, the company's flagship P16 Gen 3, which has different ways to process AI workloads, including an NVIDIA RTX PRO 5000 Blackwell discrete GPU.
One of the great things about Geekbench AI is that it can test the AI performance of CPUs, GPUs, and NPUs.
CPU
 [Click on image for larger view.]
NVIDIA GPU
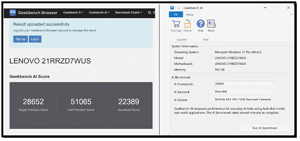 [Click on image for larger view.]
NPU
 [Click on image for larger view.]
Based on the Geekbench AI benchmarks, I could see that this ThinkPad had a multi-tiered AI-processing environment, with the NVIDIA RTX PRO 5000 Blackwell discrete GPU dominating intensive workloads, particularly excelling in Half Precision (FP16) matrix calculations for local deep learning. Meanwhile, the Intel Core Ultra processor and integrated NPU provided efficient acceleration for lighter AI tasks optimized for CPU and NPU execution. However, the unit's dedicated NPU sacrifices raw computational speed for extreme thermal efficiency and can handle continuous AI-based background tasks without draining the battery or engaging the cooling fans.
Based on this information, we can infer the following local AI uses for these processors.
| Hardware | Typical Local AI Use |
|---|
| CPU only | Small models, coding assistants |
| Integrated GPU/NPU | AI PC workloads |
| 8 GB GPU | Small quantized models |
| 16-24 GB GPU | Larger local models |
| Enterprise GPU | Large models and multi-user inference |
Final Thoughts
In this article, I explored the possibilities of running AI locally and found that the technology is far more accessible than many people would assume. I differentiated it from enterprise private AI platforms such as VMware's VPAIF, which provides organizations with secure, scalable environments for deploying AI workloads across the entire organization. Local AI offers a simpler approach that allows individuals and smaller teams to run large language models on their own hardware. The biggest advantages of both private AI and local AI are privacy, data control, cost management, and compliance, since information stays on systems that organizations own and manage.
One of the more interesting things I discovered is that expensive GPUs are not always required, as many AI models can run on CPUs, though dedicated acceleration dramatically improves performance. The key is to match the model to the available hardware, whether it's physical or virtualized.
A successful local AI deployment is less about having the most powerful system and more about understanding the relationship between hardware, models, and software frameworks. Free, easily accessible tools like LLMfit simplify this process by analyzing hardware capabilities and recommending models that run effectively, while Ollama makes interacting with local LLMs as straightforward as using cloud-based chatbots. I also used benchmarking tools such as Geekbench AI to measure CPU, GPU, and NPU performance.
Hopefully, this article showed you how local AI is becoming a practical option across a wide range of systems, from enterprise servers to modern laptops, giving users more control over where and how their AI workloads run.