How-To
How To Use Linux for an ESXi iSCSI Server
Tom Fenton walks you through step-by-step to set up an iSCSI target on Ubuntu and how to connect ESXi to iSCSI.
In a previous article, I showed you how to set up and use Ubuntu as a Network File System (NFS) server and use it to store virtual machines (VMs) from a vSphere environment. In this article, I'll go a step further and show you how to set up an iSCSI target on Ubuntu and how to connect ESXi to iSCSI, and then I'll give some of my final thoughts on using Linux as an iSCSI target.
NFS shares files while iSCSI shares block devices, which means that that a filesystem will need to be put on the iSCSI target after it has been shared with another system. There are different reasons why people choose to use NFS or iSCSI for storage, and it would take a rather long article to discuss the advantages of one over the other. As a matter of principal, however, vSphere can use either NFS or iSCSI.
Before diving in, let me define some key words referenced in this article. An iSCSI target is the device to be shared, an iSCSI initiator is the client that attaches to the target, and the iSCSI Qualified Name (IQN) is the name that's used to identify both the target and the initiator.
Setting up SSH
Because I used the command line to set up iSCSI, I first set up my Ubuntu to accept an SSH connection so I could connect to it from my laptop.
To install SSH, I entered the following commands to gain root privileges, get the latest package list, install openssh-server, and then checked the status of the SSH server (Figure 1), which indicated that it was indeed running:
sudo bash
apt update
apt install openssh-server>
systemctl status ssh
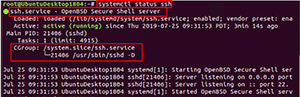 [Click on image for larger view.] Figure 1. Checking the status of the SSH service.
I entered ssh user01@localhost to verify that I could connect to the system via SSH, which proved successful (Figure 2).
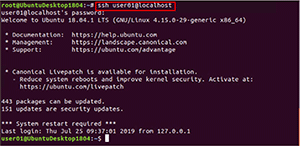 [Click on image for larger view.] Figure 2. Checking SSH to localhost.
I then used PuTTY to connect to my Ubuntu desktop from my laptop (Figure 3).
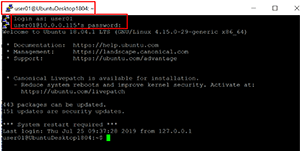 [Click on image for larger view.] Figure 3. Connecting PuTTY to Ubuntu.
Installing and Configuring iSCSI
As iSCSI shares a block device rather than files, I shut down my system, added a second drive to it and then powered it back up.
I entered lsblk to show the block devices on the system. The new block device was identified as /dev/sdb.
I used fdisk to create a new Linux primary partition on /dev/sdb that consumed all the space on the drive. Lsblk then showed a partition on the device (Figure 4).
 [Click on image for larger view.] Figure 4. The lsblk output.
I installed tgt (iSCSI target framework package) by entering apt install tgt -y.
The tgt package allows you to configure a device as an iSCSI target either by using a configuring file or by using the tgtadm command. I chose to use a configuration file; to do this, I created a file named /etc/tgt/conf.d/target01.conf with the following information:
<target iqn.2019-07.fentronics.local:lun1>
  # Provided device as an iSCSI target
  backing-store /dev/sdb1
</target>
I recommend reading the tgt documentation to verify the parameters for the tgt configuration file.
I restarted the iSCSI service and displayed the iSCSI targets being shared (Figure 5) with the following commands:
systemctl restart tgt
tgtadm –mode target –op show
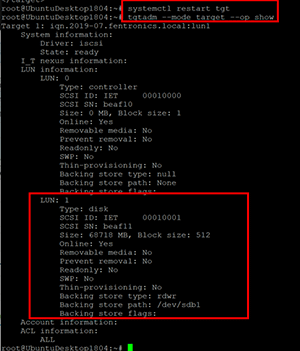 [Click on image for larger view.] Figure 5. The iSCSI LUN.
Connecting to iSCSI Using vSphere
To add the iSCSI disk as a datastore, I logged in to my vSphere Client, selected my ESXi host, then followed this pathway: Storage | Configuration| Storage Adapters | Add Software Adapter | Add software iSCSI adapter (Figure 6).
 [Click on image for larger view.] Figure 6. The iSCSI storage adapter.
Next, I selected iSCSI software Adapter | Dynamic Discovery | Add and then entered the IP address of the server that would be hosting the target (Figure 7).
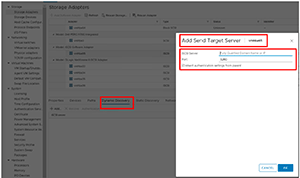 [Click on image for larger view.] Figure 7. Adding the iSCSI server.
After I clicked Rescan Storage | Devices Tab, I was able to verify the iSCSI target (Figure 8).
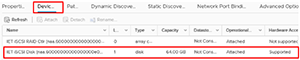 [Click on image for larger view.] Figure 8. Verifying the iSCSI target.
I right-clicked my ESXi host and selected Storage | New Datastore | VMFS. I then selected the iSCSI disk and named it iSCSI_DS, and used all the space on disk to be used for the datastore (Figure 9).
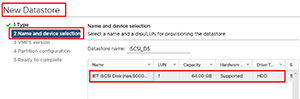 [Click on image for larger view.] Figure 9. Setting up the Datastore for the iSCSI disk.
The storage view then displayed the iSCSI-backed datastore (Figure 10).
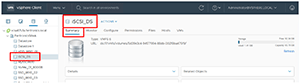 [Click on image for larger view.] Figure 10. The iSCSI-backed datastore.
Wrapping Up
I have set up iSCSI targets on Linux in the past, but I found that using tgt to do so significantly streamlined and simplified the process. Furthermore, I was somewhat surprised to see that I was able to attach my ESXi host to the iSCSI target without any additional reconfiguration. As a precautionary note, I'll advise that without extensive testing, I wouldn't completely trust the performance, reliability, or robustness of this configuration to those of a dedicated iSCSI appliance; however, for ad hoc testing and home lab use, I don't foresee any issues.
About the Author
Tom Fenton has a wealth of hands-on IT experience gained over the past 30 years in a variety of technologies, with the past 20 years focusing on virtualization and storage. He currently works as a Technical Marketing Manager for ControlUp. He previously worked at VMware in Staff and Senior level positions. He has also worked as a Senior Validation Engineer with The Taneja Group, where he headed the Validation Service Lab and was instrumental in starting up its vSphere Virtual Volumes practice. He's on X @vDoppler.