How-To
Optimizing VMs in Azure
Everything you need to know about how to select, deploy, optimize and more when it comes to managing your virtual machines in Microsoft Azure.
In last month's column I covered the basic step-by-step instructions for creating a virtual machine (VM) in Microsoft Azure. This time I'm going to dig deeper and cover selecting the right VM size, deploying multiple VMs, optimizing storage performance, managed disks and disk encryption. The final part on Azure Infrastructure-as-a-Service (IaaS) VMs will follow with a discussion of Just-in-Time (JIT) access, Azure Security Center, backup, optimizing networking for VMs, and tips and tricks for managing VMs running in Azure.
Selecting the Right VM Size
The problem of picking the right VM size has only grown worse over the years as Azure has added a bewildering array of different types of VMs, designated by letters (just like Amazon Web Services [AWS], although the families aren't comparable) and within each family there are different sizes and levels. If you're new to the cloud you might ask yourself what the issue is, after all if you're creating a VM in Hyper-V or VMware you simply select the number of vCPUs, memory and virtual disks (up to the resources available on your hosts). Not so in the cloud -- you can only pick from the T-shirt sizes on offer -- and you need to find the one closest to your CPU/memory/network needs.
My advice is to not start by looking at the different types -- start with your workload. I know it's a dying art for a lot of server administrators, but once upon a time we actually had to know the workload that was going to run on a server and size it accordingly (especially when we actually had to order the hardware -- before virtualization). Investigate the workload -- if you're migrating a VM look at its current specifications -- not just CPU and memory, but most importantly storage performance, as well as networking. If you don't have the workload yet, check the documentation, do some careful "guesstimating," deploy a pilot and measure what the usage is.
Once you have the business and technical requirements, look at the families of VMs on offer. I'm going to guide you in the reverse order to what most articles do, with general purpose last, so that you can see how knowing your workload lets you eliminate categories that don't fit the workload's need.
Meet the Whole Family
For high-performance computing (HPC) workloads (crunching scientific data and the like) look at the H series (and A8-A11). These VMs come with eight or 16 vCPUs, housed on Intel Haswell E5-2667 V3 hosts with DDR4 memory and SSD temporary storage. Importantly, the H16 sizes (and A8 & A9) come with RDMA networking using InfiniBand for high-throughput, low-latency requirements.
If you're looking for applications that require a GPU, your friend is the N series with several variations. The NC (Tesla K80), NCv2 (Tesla P100), NCv3 (Tesla V100) and ND (Tesla P40) VMs differ based on the GPU they have attached and are optimized for CUDA and OpenCL simulations, AI and deep learning. The NV (Tesla M60) series, on the other hand, is useful for virtual desktops for graphics-intensive workloads.
The storage optimized VMs in the L series are suitable for Big Data, SQL and NoSQL databases where IO is paramount, the largest size can give you 160,000 IOPS and 1600 Mbps throughput.
For compute optimized VMs with high CPU to memory balance the F series is the best option. The newest Fsv2 series runs on hosts with Intel Xeon Platinum 8168 CPUs.
The opposite to compute optimized is memory-balanced VMs and here there are a few choices, the E, G, M and D series. The M ("Monster") series can have up to 128 vCPUs and 3.8TB of memory for enormous databases or SAP workloads. There's a specific feature for the M series disk performance called Write Accelerator for the log volumes (only) on these VMs. The G ("Godzilla") series goes up to 448GB of memory with 32 vCPUs. The Ev3 series runs on hosts with 2.3 GHz Intel XEON E5-2673 v4 (Broadwell) processors and provide a good balance of fast CPU and lots of memory, it also supports nested virtualization where you can run Hyper-V in a Windows VM, with other VMs hosted inside the VM (training labs is one use case). Continue on for the D series.
If your workload doesn't fit into any of the categories I've just listed you should look at the general-purpose series, Av2, B and D. Note here the distinction between the Basic Tier and the Standard Tier, the former doesn't support solid-state drive (SSD) storage or HA features. The A series is the smallest, generally suitable for test and development. The B series, on the other hand, is for bursty workloads, where most of the time the CPU is close to idle but (you build up credit points when the VM is running but not using a lot of CPU) when you need to burst you can use the CPU heavily for short periods of time before being throttled. Both the A and B series are extremely cost-effective. For production workloads the D series is the recommendation, the newest version is the Dv3.
To be able to compare VM sizes there's Azure compute units (ACU), which give you a relative score for how fast a VM is. The A1 is the baseline at 100 ACU, with a large Dsv3 coming in at 190, for instance, or a Standard_H16mr at 300.
If you need the "security" of knowing that the only VMs running on your host are your own there are two SKUs, E64i_v3 and E64is_v3, where that host is only running that one VM, for you to then use nested virtualization to host your own VMs.
If you're going to have VMs running for prolonged periods of time, consider reserved instances. By reserving instances for one or three years you get a considerable discount on the usage cost of VMs.
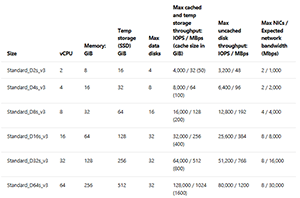
So far, I've been covering series of VMs but within each series there are actual sizes; for instance, Figure 1 is the table for Dsv3 VMs.
 [Click on image for larger view.]
Figure 1. The sizes of Dsv3 virtual machines.
[Click on image for larger view.]
Figure 1. The sizes of Dsv3 virtual machines.
The naming of the VM sizes breaks down as follows: an A4v2 has four vCPUs and 8GB of memory and can support up to eight data disks and can have up to four vNICs. The multiplier for the A series is two for memory and disks and one for NICs. A D16s_v3 (from the table in Figure 1) has 16 vCPUs, 64GB of memory (4x) and up to 32 data disks (2x) and up to eight vNICs (0.5x). The S in a VM name means the VM can use Premium Storage (SSD based), an R stands for RDMA networking and an M stands for memory optimized, for instance the Standard_H8m has eight vCPUs but the m indicates that the memory multiplier is higher (14x) for 112GB of memory, max data disks of 32 (4x) and max vNICs of four (0.5x).
Where a series has had an upgrade (D and A, for instance) the newer series gets a v2 or v3, generally along with price cuts.
The third-party service Amazon Compute Info offers a handy, searchable table for finding the best VM size for you, along with pricing per hour for all regions. You can change the size of a VM if you find that you've over- or under-provisioned. You may have to stop and deallocate the VM if the new size isn't available in the hardware cluster where the VM is running.
Multiple VMs
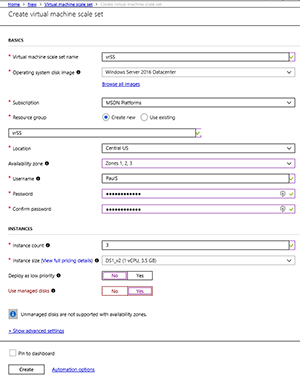
When you need multiple VMs for HA, you should use an availability set (AS). Azure does offer a 99.9 percent SLA for single-instance VMs (AWS does not), while two or more VMs in an AS has a 99.95 percent SLA. AS is suitable when you have a workload where multiple machines play nicely together, maybe Web front-ends for a database back-end, and you're happy to pay for at least two of them running at all times. If, on the other hand, you need multiple VMs but also the ability to scale the number up and down easily, the right solution is creating VM Scale Sets (VMSS), as shown in Figure 2. If you use your own custom image you can scale up to 300 instances, with a marketplace image you can go up to 1,000. VMSS works with the Azure Load Balancer for layer 4 traffic distribution and Application Gateway for layer 7/SSL termination. VMSS also works with availability zones.
 [Click on image for larger view.]
Figure 2. Creating a VM scale set.
[Click on image for larger view.]
Figure 2. Creating a VM scale set.
Storage
The key to success with IaaS VMs as stated in the introduction is understanding the workload, this is particularly true when it comes to storage performance. For VMs you have two options for types of disks, traditional storage accounts where you must manage the distribution of disks and managed disks. For all new workloads you should go with managed disks; there's less management overhead and HA distribution is taken care of for you. One difference to keep in mind is that with managed disks you're charged for the size of the disk, not the actual data in it, so a 120GB OS disk with only 12GB of OS files will cost you a little extra (storage is cheap in the cloud), so pick VM templates with a smaller OS disk.
If you have existing workloads housed on traditional storage accounts there's a script that will check performance and usage of each account in your subscription.
Your next choice (as alluded to with the "s" in some VM sizes above) is between Standard (hard drive-based, 300 IOPS for Basic, 500 IOPS for Standard) and Premium (SSD-based, up to 7500 IOPS and 250MB/s per disk) and the newest kid on the block; Standard SSD (same specs as for Standard HDDs, but "more even and predictable performance"). You can convert between disk types.
These specs are for each individual disk, but if you want to unlock disk performance, you'll need to create multiple data disks for your VM and then stripe them together (for speed, Azure takes care of durability of your data automatically behind the scenes). If you have more than eight VHD data disks attached to a Windows VM, make sure you use PowerShell (New-VirtualDisk), not Server Manager, to create the volume so that you can specify the NumberOfColumns parameter equal to the number of disks (Server Manager doesn't do that automatically for more than eight disks). For stripe size (Format-Volume) select 64KB and enable Large File Record Segment (FRS), for SQL data warehousing workloads, select 256KB stripe size. For Linux VMs with multiple disks, use software RAID.
My recommendation is for dev and test and other low-priority workloads, use Standard storage (Standard SSD where available), for production workloads that need to have good IO performance, always use Premium disks, and if you have very high IO needs, definitely stripe many disks together for good results.
Disk Encryption
All managed disks, snapshots and images are automatically encrypted with Storage Service Encryption (SSE), with the keys managed by Microsoft. If you'd like (or compliance requires) more controlled, VM-specific encryption, use Azure Disk Encryption (ADE), which works for both Linux and Windows VMs. You manage the keys yourself, using Azure Key Vault. You can't use ADE with Basic-tier VMs or classic (pre-Azure Resource Manager [ARM] VMs). If you want to check the impact of encryption on VMs, there's a script that will create four VMs, two with Standard disks, two with Premium disks and with SSE or ADE. Note that ADE adds about 3 percent CPU overhead and a varying (10 percent to 30 percent) amount of disk throughput impact for Premium (SSD) disks.
My recommendation is to use ADE for all production VMs that contain sensitive data and be aware of the considerations when backing up and restoring these VMs.
Wrapping Up
Last month I looked at the basics of creating a single VM in Azure, here I looked at picking the right VM type and size for your workload, deploying multiple VMs, selecting the appropriate disk type and encrypting disks for security.
Next month I'll look at Just-in-Time (JIT) access, Azure Security Center, backup, optimizing networking for VMs, and tips and tricks for managing VMs running in Azure.
About the Author
Paul Schnackenburg has been working in IT for nearly 30 years and has been teaching for over 20 years. He runs Expert IT Solutions, an IT consultancy in Australia. Paul focuses on cloud technologies such as Azure and Microsoft 365 and how to secure IT, whether in the cloud or on-premises. He's a frequent speaker at conferences and writes for several sites, including virtualizationreview.com. Find him at @paulschnack on Twitter or on his blog at TellITasITis.com.au.