How-To
Home Lab NAS (QNAP TS-431K) Part 4: Command Line, Performance and Conclusion
Finishing up his 4-part series on setting up a QNAP TP-431K network appliance to replace a failed ESXi server, Tom Fenton adds a caching drive to the device, uses the command line on it and sets it up as an NFS file share on it for vSphere before sharing his final thoughts on it.
This is the fourth and final article in a series on the QNAP TP-431K. If you are unfamiliar with the TS-431K, I would suggest reading my three previous articles on it (located here, here and here) to see the specs of the device and find out how I set it up for data storage and video streaming.
In this article, I will give an overview of adding a caching drive to the device, using the command line on it and setting it up as an NFS file share on it for vSphere. I well then provide some final thoughts on it.
QNAP Command Line
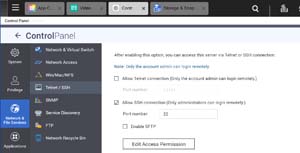
Although it is not very well-advertised, you can use SSH to connect to the TS-431K device. When I first tried to SSH into it from my laptop, I got a "connection refused" message. To fix this, I opened the QNAP Control Panel, selected Telnet/SSH under the Network & File Services tab, clicked Allow SSH connection and then selected Edit Access Permission.
 [Click on image for larger view.]
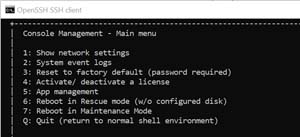
After completing these steps, I was able to SSH from my Windows laptop (you can read my article on SSH on Windows here) and log in as admin. The console's main menu showed a few different options.
 [Click on image for larger view.]
I entered 1 to find the network settings, which only showed the IP and MAC addresses of the device. I then entered Q to quit and entered the shell.
I entered Uname -a and it showed that it was running Linux on an Arm processor; ip neigh showed the networking information; cat /proc/cpuinof and /cat/proc/meminfo showed CPU and memory information; mount, du, df, blkid reported the information I expected; and fsck, lspci, lsblk, mkfs, smartctl were not found. Although I was able to run some common Linux commands on this device, it was definitely designed to be administrated from the web portal.
Setting Up a Cache
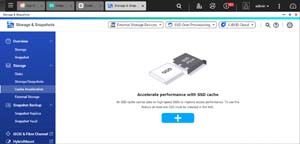
After going back to the QNAP Control Panel, I selected System > Storage > Cache Acceleration. This showed that the QNAP can use an SSD to improve performance.
 [Click on image for larger view.]
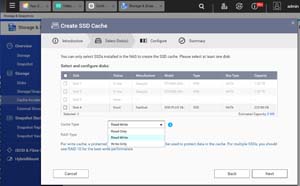
I put an SSD (SanDisk SSD PLUS 240 GB - SDSSDA-240G) into slot 4 of the device. After the system beeped twice, I clicked the plus sign and a wizard guided me through using the SSD as a cache. I had the option to use the SSD for reading, writing, or both. I selected Read-Write. It also had me specify the volumes and LUNs that I wanted to use the cache on.
It just took a few moments for the device to be formatted and ready for use. I then had two 2TB HDD drives for storage and a 240GB SSD for cache.
 [Click on image for larger view.]
Setting up an NFS Share
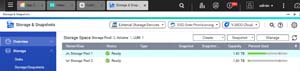
The final task I wanted to complete was to set up an NFS share for vSphere. First, however, I wanted to see how difficult it would be to remove an existing volume. I selected the Storage/Snapshot tab and I saw that the 2TB drive that I added was shown as a static volume. I selected it from the Manage drop-down menu and clicked Remove.
To re-add the disk to my existing storage pool, I selected Storage/Snapshot from the Create drop-down menu. Then, I selected the New Storage Pool tab and created a new storage pool using the new 2TB disk.
 [Click on image for larger view.]
After the storage pool was created, I selected New Volume from the Create drop-down menu. Using the new volume wizard, I created a new 500GB thin volume on the storage pool.
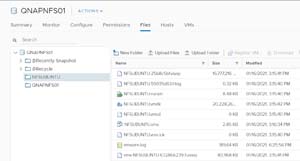
I went to Control Panel, selected the Privilege tab and then Shared Folders from the Create drop-down menu. After selecting Shared Folder, I used the wizard to create an NFS share named QNAPNFS01 on the new volume (DataVol2).
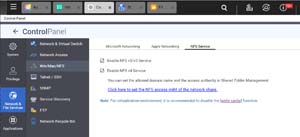
I then needed to enable the NFS service. In Control Panel, I selected the Network & File Services tab, then Win/Mac/NFS. I clicked the NFS Service tab and enabled NFS services.
 [Click on image for larger view.]
Once I created the NFS share, I configured an ESXi server to attach to it. You can read my previous article on how I did this. I then cloned a VM to the NFS share and was able to run it without any issues.
 [Click on image for larger view.]
Conclusion
At the beginning of this series of articles, I set out to find a cost-efficient, easy-to-manage network storage for my home vSphere lab. After I looked at my available options, I decided on the QNAP TS-431K as both a storage solution and a means to provide data sharing and video streaming for my home.
Although I found the lack of error messages and a console frustrating when I ran into issues installing the system due to a bad drive, the installation process went smoothly once I put a good drive in the device. I then went on to create an iSCSI target, and NFS and SMB shares, on the device, as well as store and run VMs using iSCSI and NFS for datastores, without any issues. I have also been using Qsync for file storage and sharing, Music Station to stream audio, and Video Station to stream video for the past two weeks I haven't and haven't encountered any problems with the streaming but I am not that found of Music and Video Station's interface, so I have used VLC as the interface to stream audio and video.
When I purchased the device, I was afraid that its hardware would be somewhat limiting as it only has 1GB RAM, a quad core 32-bit CPU, four 3.5-in. drive bays and two 1GbE NICs. However, for what I have been doing, it seems to be working fine and I have yet to see any bottlenecks due to the device's hardware limitations.
The more I use the device, the more I become aware of what it is capable of, not so much in terms of storing and running VMs, but from the home entertainment side. All in all, I have a put little bit less than $400 into the device: $250 for the device itself, $108 for two 2TB HDD drives ($54 each), and $35 for the SSD drive that I use for caching. My overall opinion about the QNAP TS-431 K is that it is a good value for the amount I spent on it as it allowed me to set up my home lab network storage device and home media streaming services very quickly and with acceptable performance.
About the Author
Tom Fenton has a wealth of hands-on IT experience gained over the past 30 years in a variety of technologies, with the past 20 years focusing on virtualization and storage. He previously worked as a Technical Marketing Manager for ControlUp. He also previously worked at VMware in Staff and Senior level positions. He has also worked as a Senior Validation Engineer with The Taneja Group, where he headed the Validation Service Lab and was instrumental in starting up its vSphere Virtual Volumes practice. He's on X @vDoppler.